| |
How to connect the on-board computer board
to the configuration program and configure the software.
First of all, immediately download the driver and configuration
program.
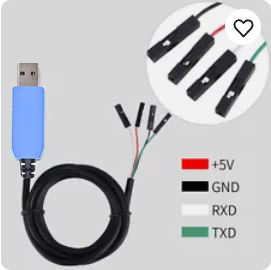
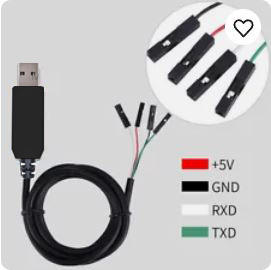
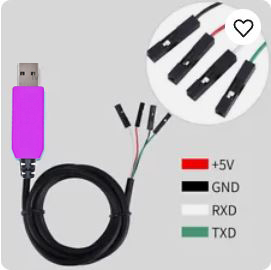
If you have not yet installed the driver, you must do so and connect
the USB cord; make sure that in the Device Manager com-port emulator
is detected correctly (remember the port number).
|
|
| |
Как подключить плату бортового компьютера к
программе конфигураций и произвести настройку софта.
Первым делом сразу скачайте драйвер и программу для настройки.
Если вы еще не установили драйвер, необходимо это сделать и
подключить USB-шнур; убедиться, что в диспетчере устройств эмулятор
com-порта определяется корректно (запоминаем номер порта).
|
|
| |
If you cannot connect to the 3dMFD, then you have the "wrong" driver
installed. You need to uninstall the device completely and reinstall
it (with a different driver). Different operating systems behave
differently |
|
| |
Если не получается подключиться к 3dMFD, значит у вас установлен "неправильный"
драйвер. Необходимо полностью удалить устройство и заново его
установить (с другим драйвером). Разные ОС ведут себя не одинаково |
|
| |
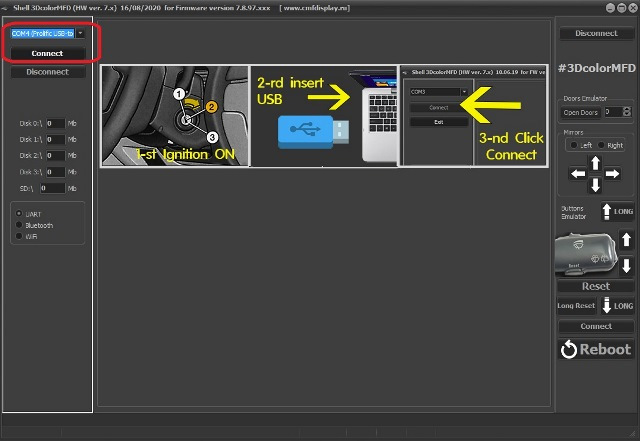
Let's consider a particular case: setting the
module installed in the car.
1. Switch on the ignition, plug the USB cable into the computer
connector, start the Shell program.
Important! The program must be started when USB is already
connected. Otherwise it will not see your COM port.
2. Choose the correct com port and press the Connect button. Wait
for the connection
|
|
| |
Рассмотрим частный случай: настройка модуля, установленного
в автомобиль.
1. Включить зажигание, вставить USB-кабель в разъем
компьютера, запустить программу Shell.
Важно! Программу необходимо запускать, когда USB уже
подключен. Иначе она не увидит ваш ком-порт
2. Выбрать правильный com-порт, нажать кнопку Connect.
Дождаться подключенияя |
|
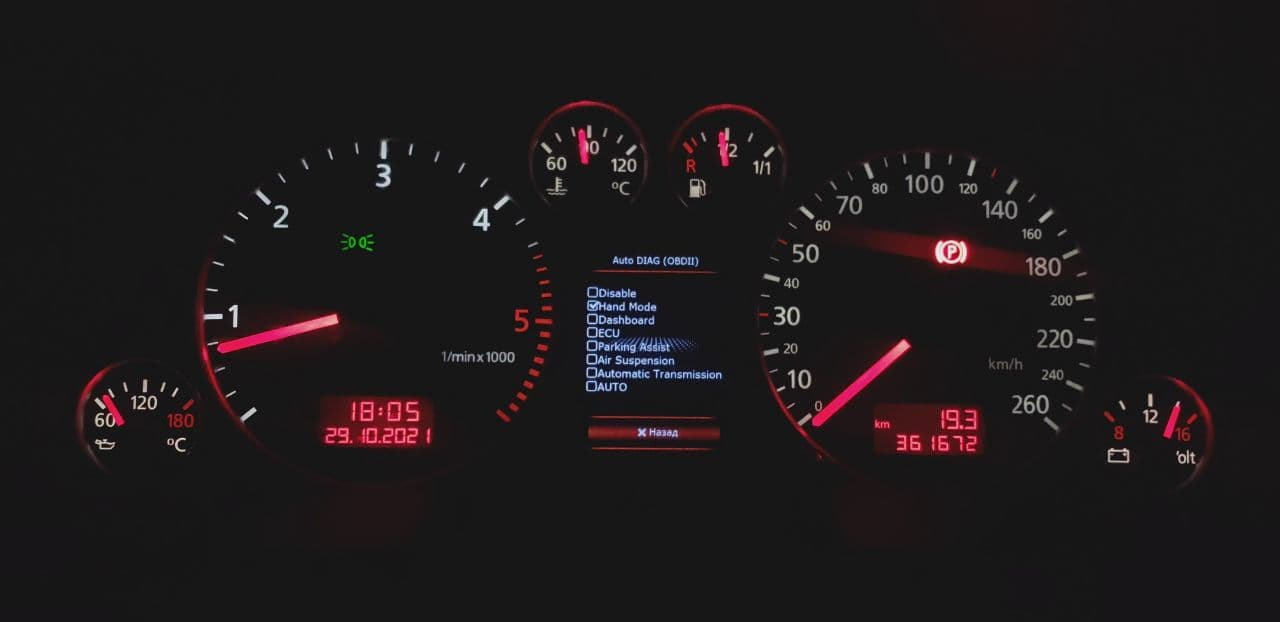
| |
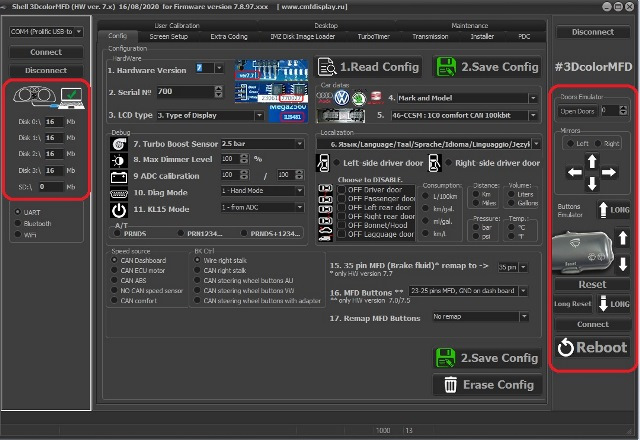
The evidence of the connection of the program to the module will be,
to identify the memory areas (8-16 MB each), active emulator buttons
- the module should respond to them, as well as the
icon of an established connection in the module status bar.
|
|
| |
Свидетельством подключения программы к модулю будут, сли определис
области памяти (по 8-16 Мб), активные кнопки эмулятора — модуль
должен на них реагировать, а также иконка
установленного соединения в строке состояния модуля.
|
|
| |
If the connection fails, you must remove the USB cable and insert it
again.
Important note: 1) the basic principle of setting the parameters is
that each selected section of the settings must first be read
(Read), then made changes, and then saved (Save); 2) before changing
any parameters, it is recommended to remember/photograph the current
settings to be able to restore them; 3) after all settings, you must
reboot the module (Reboot).
3. this is a big section, I will include here a description of the
available tabs in the Shell program.
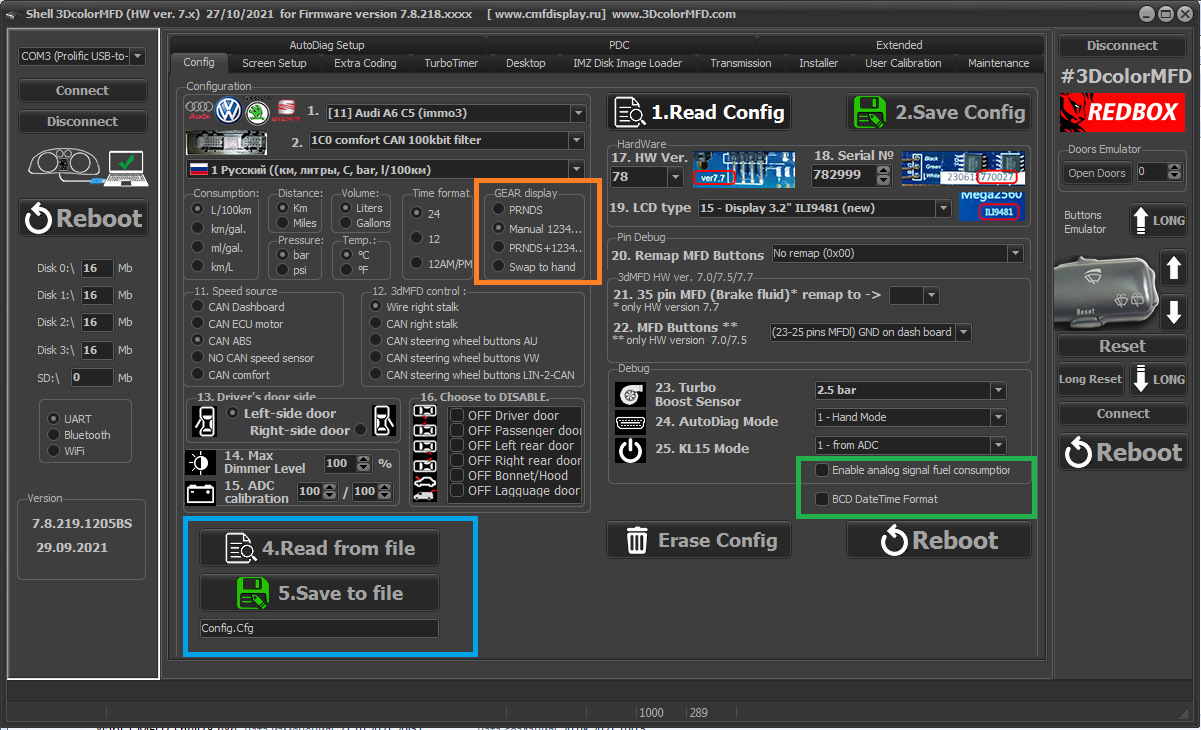
1) Config. The main section for configuring the module's operation
|
|
| |
Важное примечание: 1) основной принцип настройки параметров состоит
в том, что каждый выбираемый раздел настроек сначала нужно прочитать
(Read), затем внести изменения, и затем сохранить (Save); 2) перед
тем как менять какие-либо параметры, рекомендуется запомнить/сфотографировать
текущие настройки для возможности их восстановления; 3) после всех
настроек необходимо перезагрузить модуль (Reboot).
3. Это большой раздел, включу здесь описание имеющихся вкладок в
программе Shell.
1) Config. Основной раздел для настройки работы модуля
|
|
| |

|
|
| |
Mark and model - make and model of your car
2. 46-CCSM - type of comfort unit
3. Language/Location - language and country of use. The unit of
measure selection, door deactivation (it is necessary to tick the
checkbox in order to deactivate it)
Units of measure
4. Fuel consumption
5. Distance
6. Pressure
7. Volume
8. Temperature
9. Time format
10. Type of gearbox
Gear display - added ability to "turn off" the gear number display
for manual transmission, only D will be displayed on the move.
11. Speed source - the source of speed readings
12. 3dMFD control type
13. Left- and right-hand drive selection (driver's door location)
14. Max dimmer level - maximum brightness level
15. ADC calibration - processor input calibration, affects boost and
voltage
Screen mirroring
Horizontal screen position.
Important! Do not touch this section if you don't know what you are
doing!
17. Hardware version - your hardware version (your board)
18. Serial number - serial number of your board (doesn't matter)
19) LCD type - display type, important setting. If this is not
correct, the picture will be mirrored or you will get a white
background. Most of the displays lately with ILI9481 driver
20 Remap buttons - remap pins of the 3dMFD control buttons. If one
or more control buttons are out of order, set No remap by default.
21 Turbo boost sensor - type of supercharging sensor
22 Diag mode - mode of the diagnostic module, allows to receive
additional data from various units in real time
23 KL15 mode - KL15-Terminal15 power and ignition control mode.
24 Brake fluid remap - remap of brake fluid control port, not actual
for last versions (35 by default)
25 MFD Buttons - pins for control buttons, for last versions 23-25
|
|
| |
1. Mark and model – марка и модель вашего
автомобиля
2. 46-CCSM – тип блока комфорта
3. Language/Location – язык и страна
использования. , отключение дверей (для отключения необходимо
поставить галочку), выбор единиц измерения
Единиц измерения
4. Расход топлива
5. Расстояние
6. Давление
7. Объём
8. Температура
9. Формат времени
10. Тип коробки передач
Gear display — добавлена возможность "отключения" отображения номера
передачи для МКПП, в движении будет отображаться только D.
11. Speed source – источник показаний скорости
12. Тип управления 3dMFD
13. Выбор лево- и
право- стороннего движения (расположение водительской двери)
14. Max dimmer level – максимальный уровень
яркости
15. ADC calibration – калибровка входа процессора,
влияет на буст и напряжение
Отзеркалить изображение экрана
Горизонтальное положение экрана.
Важно! Не трогайте этот раздел ели не
знаете что делаете!
17. Hardware version – версия железа (вашей платы)
18. Serial number – серийный номер вашей платы (не имеет значения)
19. LCD type – тип дисплея, важный параметр. Если он выбран
неправильно, изображение будет зеркальным или будет белый фон. В
последнее время большинство дисплеев с драйвером ILI9481
20 Remap buttons – перенос пинов кнопок
упраления 3dMFD, в случае выхода из строя
одной или нескольких кнопок управления, по
дефолту ставить No remap
21 Turbo boost sensor – тип датчика наддува
22 Diag mode – режим работы диагностического модуля, позволяет
получать дополнительные данные от разных блоков в режиме реального
времени
23 KL15 mode – режим контроля питания и зажигания
KL15-Terminal15.
24 Brake fluid remap – перенос порта контроля тормозной жидкости,
для последних версий не актуально (по дефолту 35)
25 MFD Buttons – пины для кнопок управления, для последних версий
23-25
|
|
| |
|
|
| |
Gear display - added the ability to "turn off" the gear
number display for manual transmission, only D will be displayed in
motion.
Read & Save config to file - added possibility to store
config settings in a file, so called backup.
Analog signal consumption - enabling fuel consumption calculation
through the analog input, is done for the rare and very much
suffering from dashboards without can-bus (919);
BCD format time - there is unusual format of date and time
from info/convience bus at Audi recently, ...very rare format, less
than 1% of all A6C5s. I've only seen it a couple of times on
allroads. Almost everyone needs this checkbox, but in case you have
the date and time on your CAN bus and the display interprets them
incorrectly, you should uncheck it.
Erase config - zeroing config, if something messed up with
the settings or firmware.
|
|
| |
Gear display — добавлена возможность "отключения" отображения
номера передачи для МКПП, в движении будет отображаться только D.
Read & Save config to file — появилась возможность хранить
настройки конфига в файле, т.н. бэкап.
Analog signal consumption — включение подсчета расхода топлива через
аналоговый вход, делается для редких очень сильно страждающих с
приборками без can-bus (919);
BCD format time — недавно обнаружился необычный формат
времени и даты из шины info/convience у Ауди, …очень редкий формат,
меньше 1% из всех А6С5. Встретил всего пару раз на Оллроадах. Эта
галочка нужна почти всем, но в том случае, если дата и время имеется
в вашей кан-шине и дисплей интерпретирует их некорректно, то галочку
нужно убрать.
Erase config — обнуление конфига, если что-то начудили с
настройками или прошивкой.
|
|
| |
|
|
| |
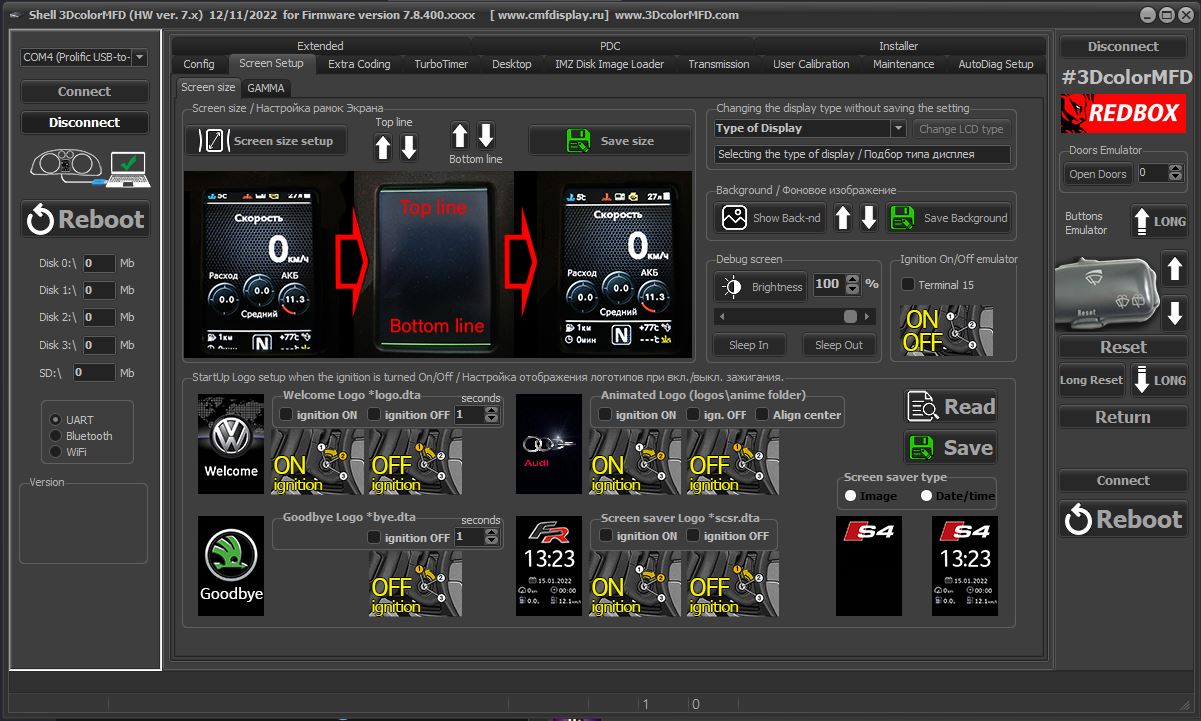
Screen setup, screen size tab
1 Adjust screen size - picture with instructions in the program,
move the green lines of the screen frame with the help of the
buttons in the program.
2 Changing the display type without saving the setting / Changing
the display type without saving the setting, if you replaced the
display or "pressed something and it broke", the screen became
white, has the wrong colors or inverted, it is necessary to make the
correct setting of the display driver, this tool helps to find the
driver without rebooting 3dMFD, after you have found the right
driver type, you must go to the tab Config and save the driver type
you have chosen.3 Background is a tool for viewing and saving
preloaded background images in 3dMFD.
4 Brightness setting
5 Emulation of the ignition switch to turn on the
3dMFD on the bench.
6 Customize the display of logos.
3dMFD has 4 logos
1 Welcome Logo *logo.dta - this is the logo when you turn on the ignition,
as well as this logo you can turn on when you turn off the ignition.
It is important for each brand file name is different * - brand
index
Audi - aulogo.dta
VW - vwlogo.dta
Skoda - sklogo.dta
Seat - selogo.dta
ignition ON - display when the ignition is turned on
ignition OFF - display when the ignition is on
Seconds - display time.
2 Goodbye logo
Audi - aubye.dta
VW - vwbye.dta
Skoda - skbye.dta
Seat - sebye.dta
ignition OFF - display with ignition on
Seconds - display time.
3 Animated Logo - this is an animated logo when you turn on the ignition.
You can also turn this logo on when the ignition is turned off, and
it will be played back in reverse order.
ignition ON - display when ignition is on
ignition OFF - display with ignition on
Align center - align the image to the center.
4 Screen saver Logo *scsr.dta - shows the logo at ignition on, also you
can show the logo at ignition off.
It is important that the file name is different for each make *make
index
Audi - auscsr.dta
VW - vwscsr.dta
Skoda - skscsr.dta
Seat - sescsr.dta
ignition ON - display when ignition is on
ignition OFF - display with ignition on
Screen saver type
Only picture
Picture and Time date and data of the past trip
|
|
| |
Screen setup, вкладка screen size
1 Настройка размеров экрана – картинка с инструкцией в программе,
двигайте зеленые линии рамок экрана с помошью кнопок
в программе.2 Changing the display type without saving the
setting / Изменение типа дисплея без сохранения настройки,
если вы заменили дисплей или "что-то нажали и все сломалось", экран
стал белым, имеет неправильные цвета или инвертирован, значит нужно
сделать правильную настройку драйвера дисплея, этот инструмент
помогает подобрать тип драйвера без перезагрузки 3dMFD,
после того как вы нашли нужный вам тип драйвера,
нужно перейти во вкладку Config и сохранить
подобранный тип драйвера.
3 Background / Фоновое изображение - это инструмент просмотра и
сохранения предзагруженых фоновых изображений в 3dMFD.
4 Brightness setting / Яркость
5 Эмуляция включения зажигания для включения
3dMFD на столе.
6 Настройка отображения логотипов.
3dMFD имеет 4 логотипа
1 Welcome Logo *logo.dta - это логотип при включении зажигания, так же
этот логотип вы можете включить при выключении зажигания.
Важно для каждой марки имя файла разное *- индекс марки
Audi - aulogo.dta
VW - vwlogo.dta
Skoda - sklogo.dta
Seat - selogo.dta
ignition ON - отображать при включении зажигания
ignition OFF - отображать при выключении зажигания
Seconds время отображения.
2 Goodbye logo
Audi - aubye.dta
VW - vwbye.dta
Skoda - skbye.dta
Seat - sebye.dta
ignition OFF - отображать при выключении зажигания
Seconds время отображения.
3 Animated Logo - это анимированный логотип при включении зажигания.
Так же этот логотип вы можете включить при выключении зажигания, и
он будет проигрыватся в обратном порядке.
ignition ON - отображать при включении зажигания
ignition OFF - отображать при выключении зажигания
Align center - выравнивать изображение по центру.
4 Screen saver Logo *scsr.dta - это логотип при включении зажигания, так
же этот логотип вы можете включить при выключении зажигания.
Важно для каждой марки имя файла разное *- индекс марки
Audi - auscsr.dta
VW - vwscsr.dta
Skoda - skscsr.dta
Seat - sescsr.dta
ignition ON - отображать при включении зажигания
ignition OFF - отображать при выключении зажигания
Screen saver type
Только изображение
Изображение и Время дата и данные за прошедшую поездку
|
|
| |
|
|
| |
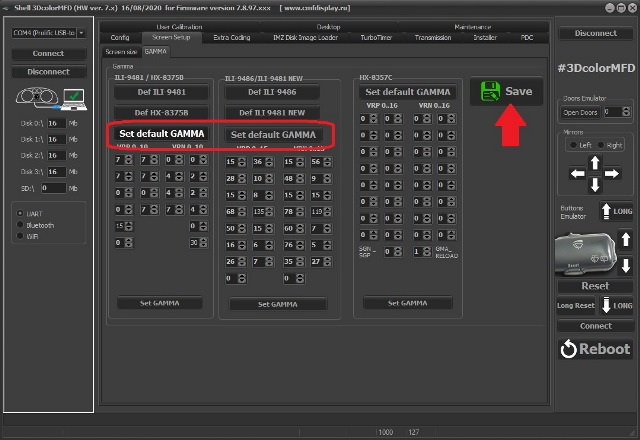
Screen setup, Gamma tab
In this window the colors are adjusted, it is better not to go
there. But sometimes it can be useful if the display settings are
lost: if in the config display type is selected correctly, but the
colors are displayed incorrectly, it is necessary to reset the
colors to the factory settings
|
|
| |
Screen setup, вкладка Gamma
В данном окне настраиваются цвета, лучше туда не лазить. Но иногда
она может быть полезна, если слетели настройки дисплея: если в
конфиге тип дисплея выбран правильно, но цвета отображаются
некорректно, то необходимо произвести сброс цветов к заводским
настройкам
|
|
| |
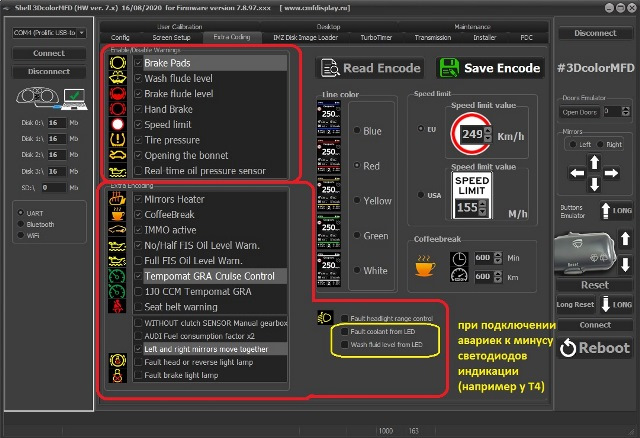
3) Extra coding. Also refers to the main sections, here you
select the types of notifications on the display 1 Enable/Disable
Warnings - alarm notifications, to disable it is necessary to
uncheck
2 Extra alerts - selection of additional alerts, as well as
algorithm of oil level sensor operation according to the type of
dashboard
3 In the right part select the color scheme, the speed threshold of
excess warning and the "coffee break" parameters
|
|
| |
3) Extra coding. Так же относит к основным разделам, здесь
выбираются типы оповещений на дисплее 1 Enable/Disable Warnings –
аварийные оповещения, для отключения галочку необходимо снять
2 Extra encoding – выбор дополнительных оповещений, а так же
алгоритм работы сенсора уровня масла согласно типу приборной панели
3 В правой части выбирается цветовая схема, порог скорости
предупреждения о превышении и параметры «кофебрейка»
|
|
| |
|
|
| |
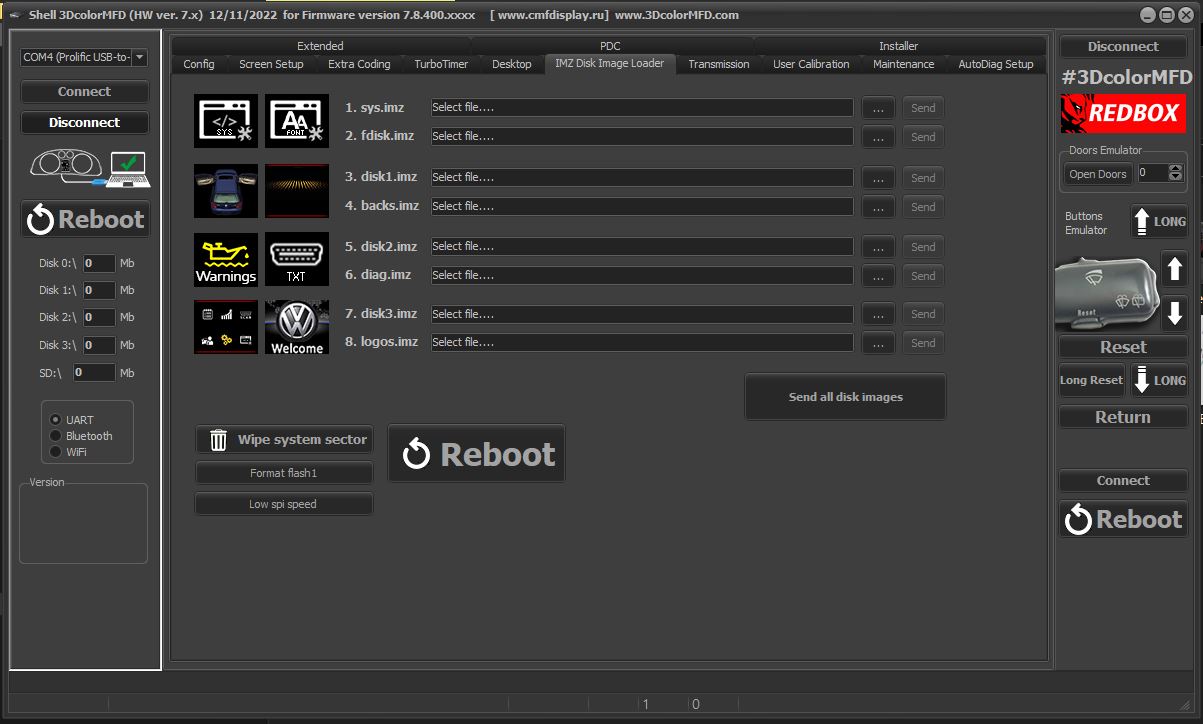
4) IMZ Disk Image Loader. A tool to load graphic disks
(menus, icons, typewriter, logos, etc.). You need to select the
necessary files and load them one by one with the Send button. Be
sure to monitor the progress of the download on the display and at
the bottom of the program, before the process of direct download
there is some pause for formatting the memory area.
Sys - text files
fdisk - fonts
Disk1 - images of
open doors
Backs - background
images
Disk2 - Icons and
Warnings
Diag - decoding
diagnostics
Disk3 – Menu Icons
Logos
- Logos.
Also in this tab there is a "system zeroing" - Wipe System Sector.
It is recommended to use it when installing the display before
operation and in case of any system failures (the config is reset,
the graphical drives remain unchanged).
|
|
| |
4) IMZ Disk Image Loader. Инструмент загрузки графических
дисков (меню, иконки, машинка, логотипы и т.п.). Необходимо выбрать
нужные файлы и по очереди их загружать кнопкой Send. Обязательно
контролировать ход загрузки на дисплее и внизу программы, перед
процессом непосредственной загрузки происходит некоторая пауза для
форматирования области памяти.
Sys –текстовые
файлы
fdisk – шрифты
Disk1
– изображения открытых дверей
Backs
– фоновые изображения
Disk2
– Иконки и предупреждения
Diag
– расшифровка диагностики
Disk3 -
Иконки
Logos –
Логотипы.
Также в этой вкладке есть «обнуление системы» — Wipe System Sector.
Рекомендуется его использовать при установке дисплея перед началом
эксплуатации и в случае каких-либо системных сбоев (конфиг при этом
сбрасывается, графические диски остаются без изменений).
|
|
| |
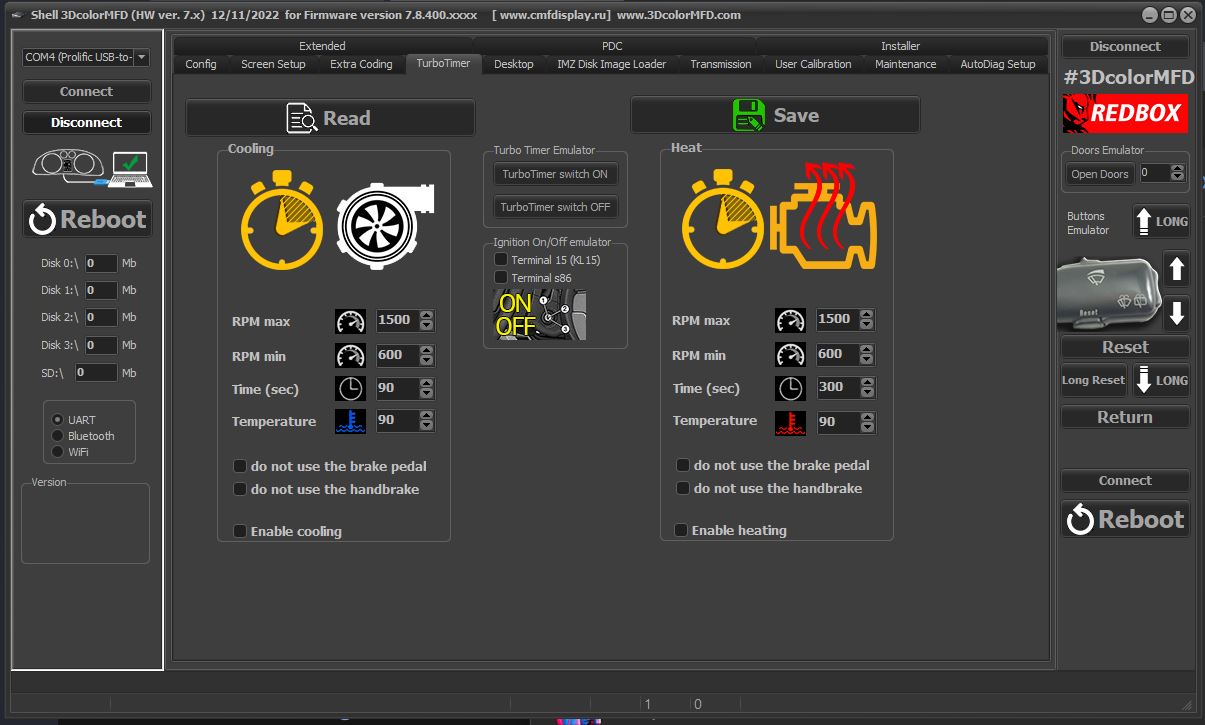
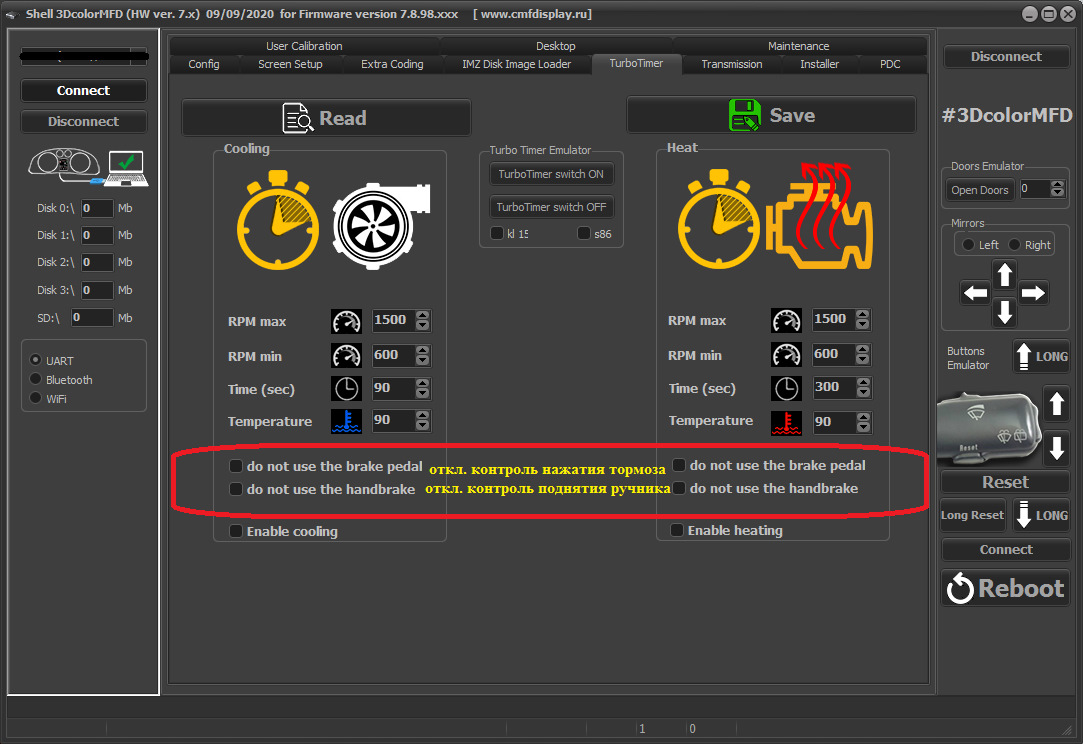
5) TurboTimer.
Setting the parameters of triggering the turbo timer and "heater".
The checkbox Enable means that the function is activated.
Turbotimer connections and settings
|
|
| |
Фdded ability to disable brake pedal and
handbrake control when the turbo timer is running (for START-STOP
button owners). Use at your own risk =) |
|
| |
Добавлена возможность отключения контроля
педали тормоза и ручника при работе турботаймера (для обладателей
кнопок СТАРТ-СТОП). Использование на ваш страх и
риск =) |
|
| |
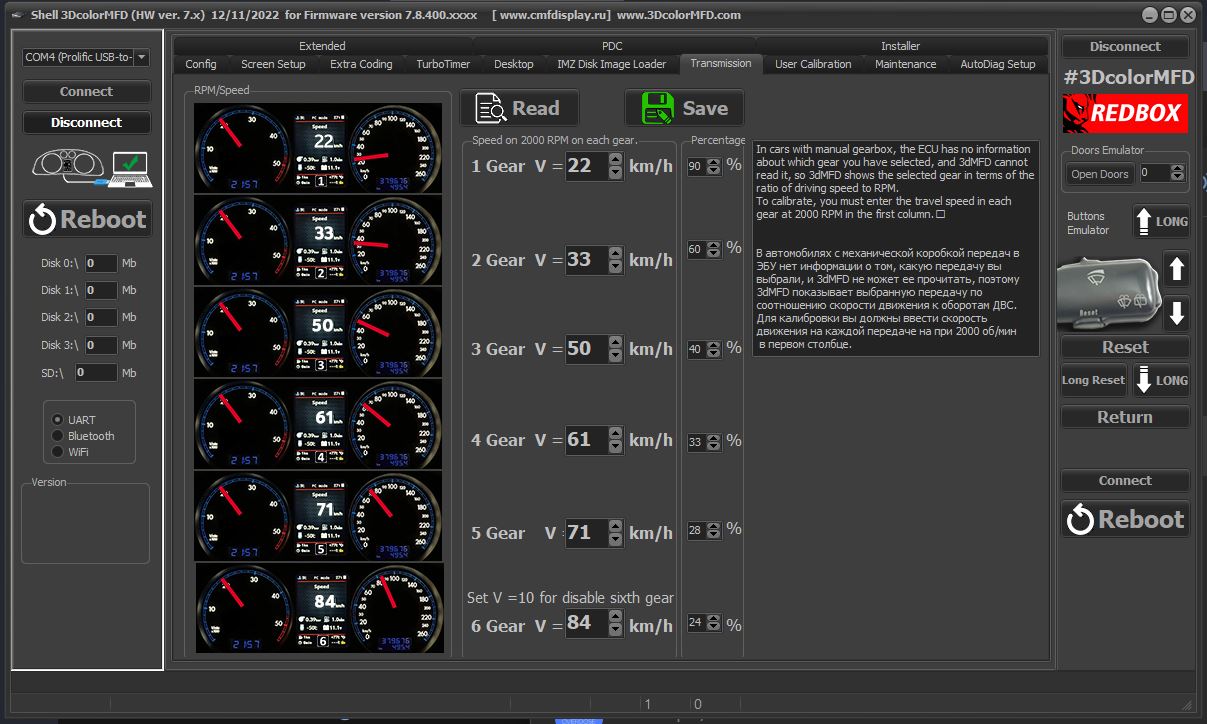
6) Transmission. Relevant for owners of cars with manual
transmission. Instead of pure gear ratios, in this table you
should enter the speedometer readings in each gear at 2000 rpm.
If there is no 6th gear, enter the value of 10 km/h.
In cars with Manual gearbox, the ECU has no information about which
gear you have selected, and 3dMFD cannot read it, so 3dMFD shows the
selected gear in terms of the ratio of driving speed to RPM.
To calibrate, you must enter the travel speed in each gear at 2000
RPM in the first column.
Also, 3dmfd does not mean that neutral gear is engaged.
Only when you press the clutch pedal does the N signal appear.
|
|
| |
6) Transmission. Актуально для владельцев автомобиля с
МКПП. Вместо передаточных чисел в чистом виде, в данной таблице
необходимо внести показания спидометра на каждой передаче при 2000
об/мин. При отсутствии 6 передачи указать значение 10 км/ч.
В автомобилях с механической коробкой передач ЭБУ не имеет
информации о том, какую передачу вы выбрали, и 3dMFD не может ее
прочитать, поэтому 3dMFD показывает выбранную передачу по
соотношению скорости движения и оборотов в минуту.
Для калибровки необходимо ввести в первую колонку скорость движения
на каждой передаче при 2000 об/мин.
Кроме того, 3dmfd не означает, что включена нейтральная передача.
Только при нажатии на педаль сцепления появляется сигнал N.
|
|
| |
|
|
| |
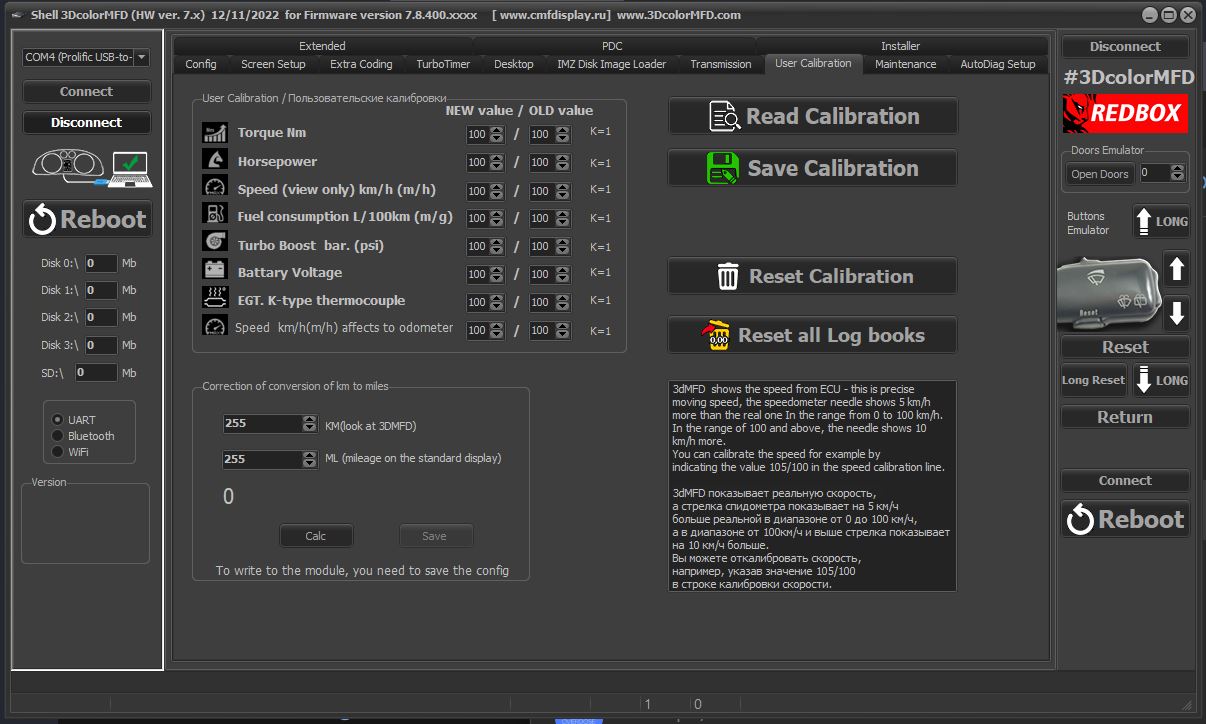
8) User Calibration. The calibration coefficients of some
parameters, it is not recommended to touch them without necessity.
However, after installing the display, before using it, it is
desirable to reset all calibrations and zero the BC
Torque Nm - to calibrate this parameter if you change the
power of your car, you need to specify the new value of your torque
in the first column and the value according to the data sheet of
your car in the second column
Horsepower - it is adjusted in the same way as torque.3dMFD shows the
speed
from EСU - this is
precise moving speed, the speedometer needle shows 5 km/h more than
the real one In the range from 0 to 100 km/h. In the range of 100
and above, the needle shows 10 km/h more.3dMFD
shows the speed from ECU is the exact speed, the speedometer needle
shows 5 km/h more than real speed in the range from 0 to 100 km/h
and in the range from 100 and above the needle shows 10 km/h more.
To calibrate the speed shown by the module, it is necessary in the
program Shell, tab User calibration, line Speed (view only) km/h
(m/h) 105/100
Fuel consumption L/100km (m/g) - you can
enter a coefficient to calculate fuel consumption.
Turbo Boost bar. (psi) - you can enter a factor to display
the turbo boost pressure.
Battary Voltage - 3dMFD measures the onboard voltage inside
the dashboard where the voltage is regulated and filtered, so it is
often below the terminal voltage of the battery. To calibrate this,
measure the battery voltage across the battery terminals with a
multimeter to see what the 3dMFD reads, then divide the reading and
add the factor to the calibration, typically 103 / 100.
EGT. K-type thermocouple - you can calibrate the reading of
the optional EGT sensor connected to pin 28 or 29 of the 3dMFD,
If you calibrate Speed km/h(m/h) affects to odometer / Odometer
speed km/h(m/h) this will change the displayed speed and will be
taken into account when calculating the traveled distance (odometer)
will affect fuel consumption and range.
|
|
| |
8) User Calibration. Коэффициенты калибровок некоторых
параметров, без необходимости трогать их не рекомендуется. Однако,
после установки дисплея, перед его эксплуатацией желательно сбросить
все калибровки и обнулить БК
Torque Nm - крутящий момнет, для калибровки
этого парамтер в случае изменения мощности вашего авто нужно указать
новое значение вашего крутящего момента в первом столбике и
значение по тех. паспорту вашего авто во втором
Horsepower - Лошадиные силы, настраивается
так же как крутящий момент.
Speed (view only) km/h (m/h) -
3dMFD показывает скорость от EСU - это точная скорость движения,
стрелка спидометра показывает на 5 км/ч больше реальной в диапазоне
от 0 до 100 км/ч и в диапазоне от 100 и выше игла показывает на 10
км/ч больше.
Чтобы откалибровать скорость, показываемую модулем, необходимо в
программе Shell, вкладка User calibration, строка Speed (view only)
km/h (m/h) 105/100
Fuel consumption L/100km (m/g) -
вы можете внести коэффициент для расчета расхода
топлива.
Turbo Boost bar. (psi) - вы можете
внести коэффициент для отображения давления наддува
турбины.
Battary Voltage - 3dMFD
измеряет напряжение бортовой сети внутри панели
приборов, в которой напряжением стабилизировано и отфильтровано,
поэтому значение часто ниже реального на клеммах АКБ. для калибровки
нужно измерить напряжение на клеммах АКБ с помощью мультиметра и
посмотреть какое значение показывает 3dMFD,
затем разделить показания и внести этот коэффициент в калибровку,
обычно это 103 / 100.
EGT. K-type thermocouple - вы иможете
калибровать показания дополнительного датчика EGT
подключенного к 28 или 29 пину 3dMFD,
Если калибровать Speed km/h(m/h)
affects to odometer / Odometer speed km/h(m/h) -
это изменит отображаемую скорость и будет учитываться при расчете
пройденного расстояния (одометр) повлияет на расход топлива и запас
хода.
|
|
| |
|
|
| |
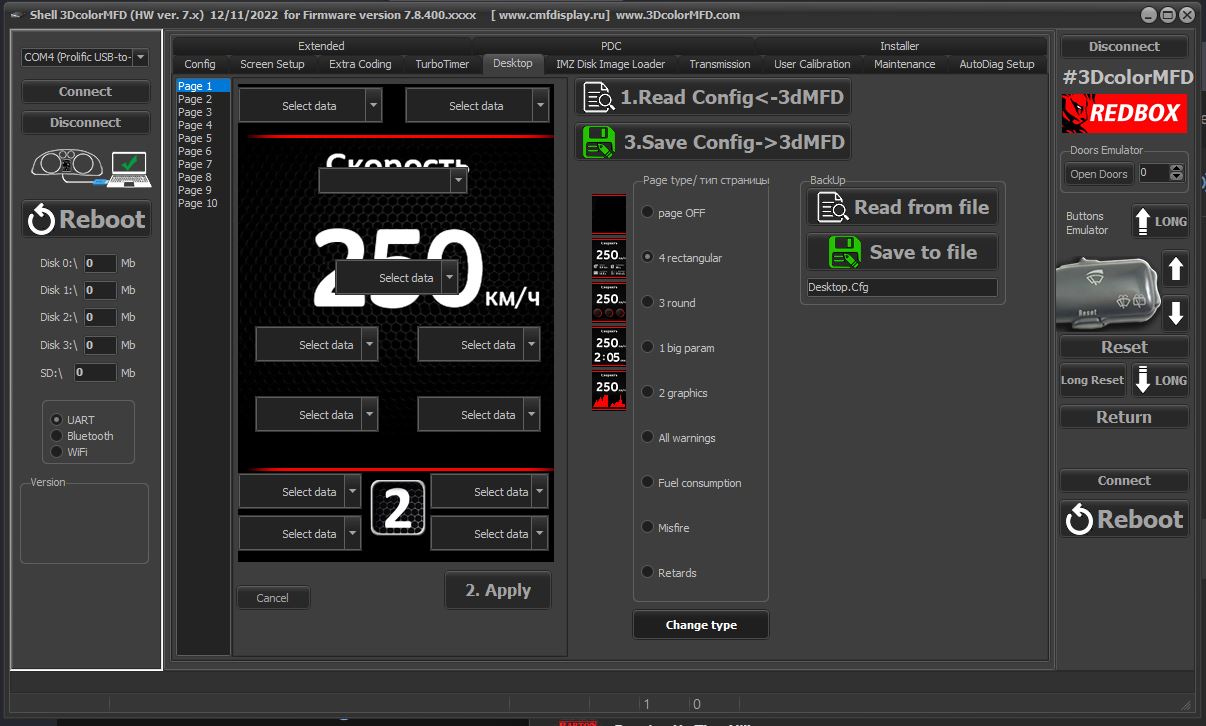
9) Desktop. Mechanism for configuring the location of
displayed parameters on the display. A total of 5 pages of the
desktop are currently available. When you make changes on each page
you need to apply the settings (button "Apply"), and at the end
already save
|
|
| |
9) Desktop. Механизм настройки расположения отображаемых
параметров на дисплее. Всего на данный момент доступно 5 страниц
рабочего стола. При внесении изменений на каждой странице необходимо
применить настройки (кнопка «Apply»), а в конце уже сохранить
|
|
| |
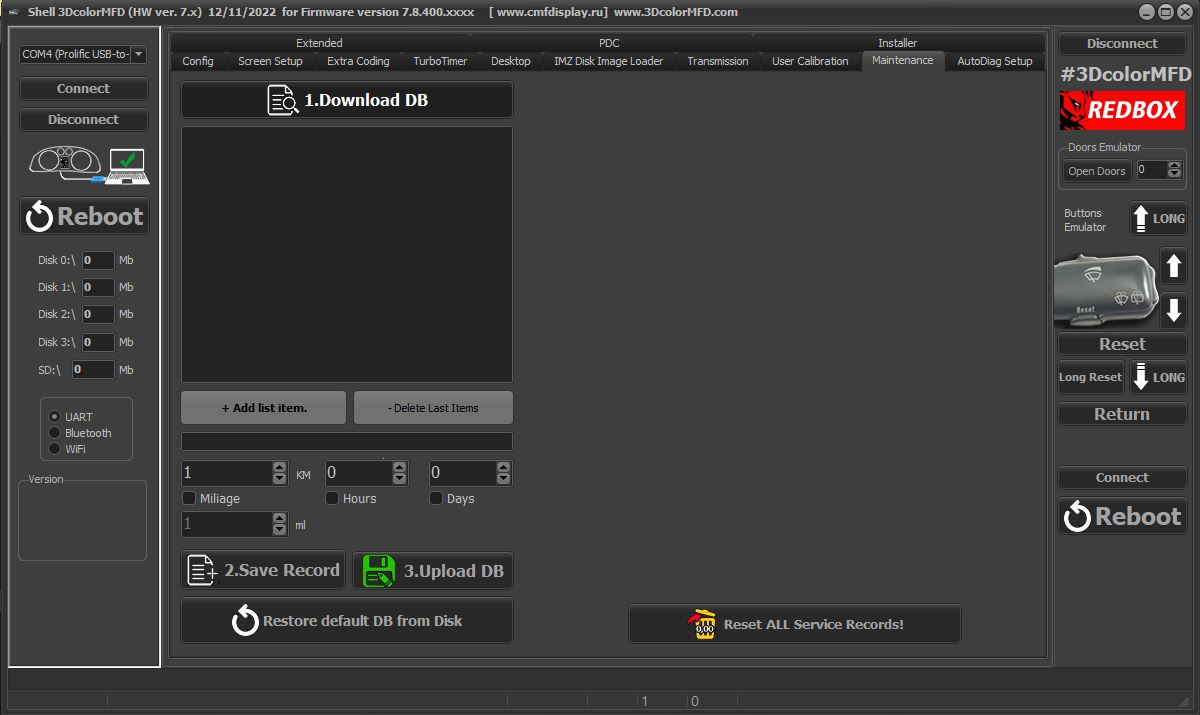
10) Maintenance. The settings tab of the service interval
control mechanism. The mechanism consists of two parts: the service
interval database (left), and the database of the past service
intervals (right).
1 Setting up the service interval database.
To download the database from the module, press the Download DB
button, the data will be loaded into the program window and saved in
a file (in the future, when you run the program, data will be loaded
into this window from the file). File to.bin after reading
(downloading the database from the module) will be saved in the
folder with the program. If the language of the database will be
different from Russian, you need to click Restore default DB from
Disk.
|
|
| |
10) Maintenance. Вкладка настройки механизма контроля за
сервисным интервалом. Механизм состоит из 2х частей: база сервисных
интервалов (слева), и база о прошедших сервисных обслуживаниях (справа).
1 Настройка базы сервисных интервалов.
Для скачивания базы данных из модуля необходимо нажать кнопку
Download DB, данные загрузятся в окно программы и сохранятся в файл
(в дальнейшем при запуске программы данные в это окно будут
подгружаться из файла). Файл to.bin после прочтения (загрузки базы
данных из модуля) сохранится в папке с программой. Если язык базы
данных при скачивании окажется отличным от русского, необходимо
нажать кнопку Restore default DB from Disk.
|
|
| |

|
|
| |
This base can be configured as you wish:
- the selected interval can be changed (name; mileage, moto-hours
and number of days to replacement), click Save Record to save the
changes to the table and file.
- it is possible to add a new TO item, not forgetting to save the
changes, and delete the already existing one
After all changes to the table, it is saved in the file, the base
must be loaded into the module Upload DB.
|
|
| |
Данную базу можно настраивать по своему усмотрению:
— выбранный интервал можно изменить (название; пробег, моточасы и
количество дней до замены), нажать кнопку Save Record для сохранения
изменений в таблице и файле.
— можно добавить новый пункт ТО, не забывая сохранить изменения, и
удалить уже имеющийсяПосле всех изменений таблицы, она сохранена
в файле, базу необходимо загрузить в модуль Upload DB.
|
|
| |
11) Autodiag Set
Now, to display any parameter from the diagnostic line on the
desktop, it is not enough just to select the diagnostic mode, as it
was before.
A small hint on how to configure this function is on the picture of
this tab itself
|
|
| |
11)
Вкладка Autodiag Set
Теперь, чтобы вывести какой-либо параметр из диагностической линии
на рабочий стол, недостаточно лишь выбора режима диагностики, как
это было ранее.
Небольшая подсказка по настройке этой функции есть на картинке
непосредственно этой вкладки
|
|
| |
 |
|
| |
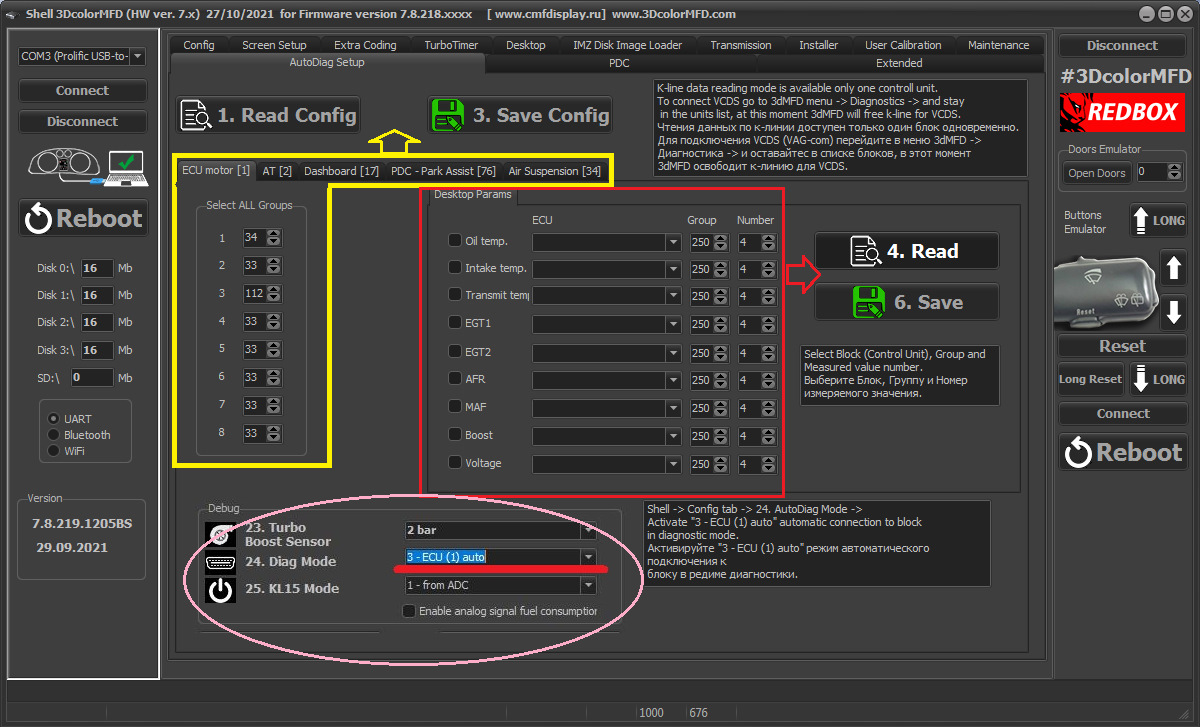
There are 5 blocks available for configuration as a source of
diagnostic data, you can configure all of them, and use them in turn
- as needed.
Perhaps we will add the function of alternate "diagnostics" blocks
in automatic mode.
So how to use the autodiagnosis now:
First, determine via wag-com, or built-in display diagnostics, the
groups and parameters that you need to monitor. Their number (groups)
should not be more than 8 for each block. Then choose the required
block and specify the groups of interest (in what order you specify
them, and in that order they will be read). For example, if you need
groups 2 and 6, it is recommended to alternate them:
2-6-2-6-2-6-2-6.
Do not forget to save the configuration! The buttons Read and Save
on the top work with the block groups' settings. The buttons Read
and Save on the right control the desktop parameters (Desktop params)
directly.
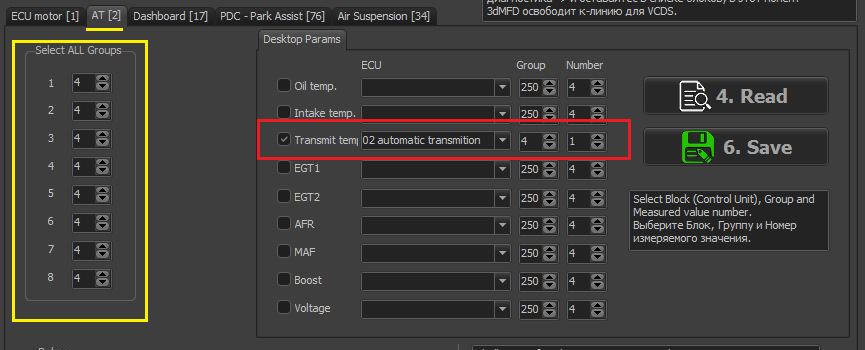
After the group numbers have been loaded, it is necessary to tick
the parameter, select the block (ECU), specify the group number and
the number of the parameter from which to pull data. For example,
for the ATF temperature on the 5hp19 box you need to do the
following |
|
| |
Для настройки в качестве источника диагностических данных доступно 5
блоков, вы можете настроить их все, а пользоваться по очереди — по
мере необходимости.
Возможно, добавим функцию поочередной "диагностики" блоков в
автоматическом режиме.
Значит как сейчас пользоваться автодиагностикой:
сначала определите через ваг-ком, или встроенную диагностику
дисплея, группы и параметры, которые вам нужно контролировать. Их
количество (групп) не должно быть больше 8 для каждого блока. Дальше
выбираем нужный блок и указываем интересующие группы (в каком
порядке их укажите, в той последовательности они и будут читаться).
Например, если нужны группы 2 и 6, то рекомендовано их чередовать:
2-6-2-6-2-6-2-6.
Не забываем сохранять конфигурацию! Верхние кнопки Read и Save
работают с настройками групп блоков, а кнопки Read и Save справа
управляют непосредственно параметрами рабочего стола (Desktop params).
После того, как загрузили номера групп, необходимо напротив
параметра поставить галочку, выбрать блок (ECU), указать номер
группы и номер параметра, откуда тащить данные. Например, для
температуры ATF на коробке 5hp19 нужно сделать так |
|
| |
|
|
| |
Group number 4, parameter 1
Accordingly, this parameter must be placed on the desktop.
It is worth noting that if the source of the parameter is selected
diagnostic channel, it will not be calculated in any other way. This
applies, first of all, to the Boost.
There is a nuance: after you upgrade from the old firmware to the
new one with already revised autodiagnostics, you need to re-save
the Desktop Params settings with unchecked checkboxes.
Next, for the parameter to still work through the diagnostic
channel, you must also enable the autodiagnostics. But there is no
need to enable "permanently" the autodiagnostics of any particular
unit through the config. Now you can change these modes through the
display menu
|
|
| |
Номер группы 4, параметр 1
Соответственно, этот параметр должен быть размещен на
рабочем столе.
Стоит отметить, что, если источником параметра выбран
диагностический канал, то никаким другим образом он уже
высчитываться не будет. Это в первую очередь касается Буста.
Тут есть нюанс: после обновления со старой прошивки на
новую, где уже переработана автодиагностика, нужно пересохранить настройки Desktop Params со снятыми галочками.
Далее, чтобы параметр все же работал по диагностическому
каналу, нужно также включить автодиагностику. Но уже нет
необходимости включать "на постоянку" автодиагностику
какого-то конкретного блока через конфиг. Теперь эти режимы
можно менять через меню дисплея |
|
| |
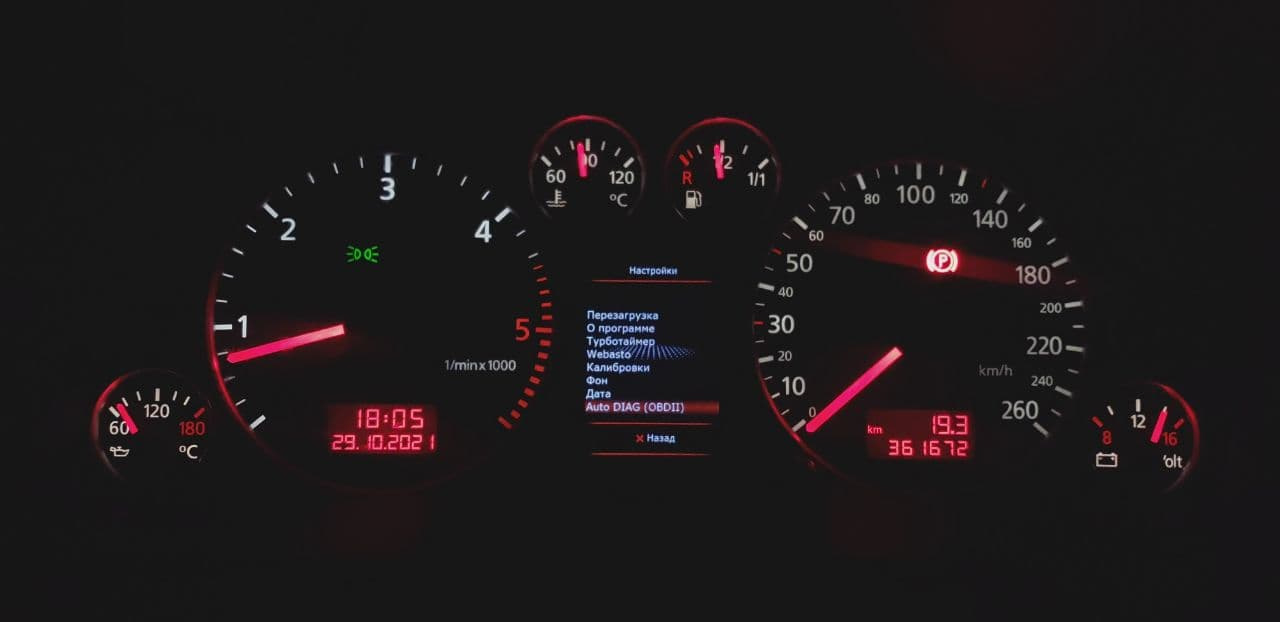
The auto-diagnosis menu is located in the settings
|
|
| |
меню автодиагностики расположено в настройках
|
|
| |
any block is selectable here at any time
That's why I mentioned that you can set up several blocks at once
and switch between them as needed/interested.
|
|
| |
здесь выбирается любой блок в любой момент времени
поэтому я и упомянул то, что можно настроить сразу несколько блоков
и переключаться между ними по мере необходимости/заинтересованности.
|
|
| |
автор статьи
Diaz and cooller01 Денис |
|
|