| |
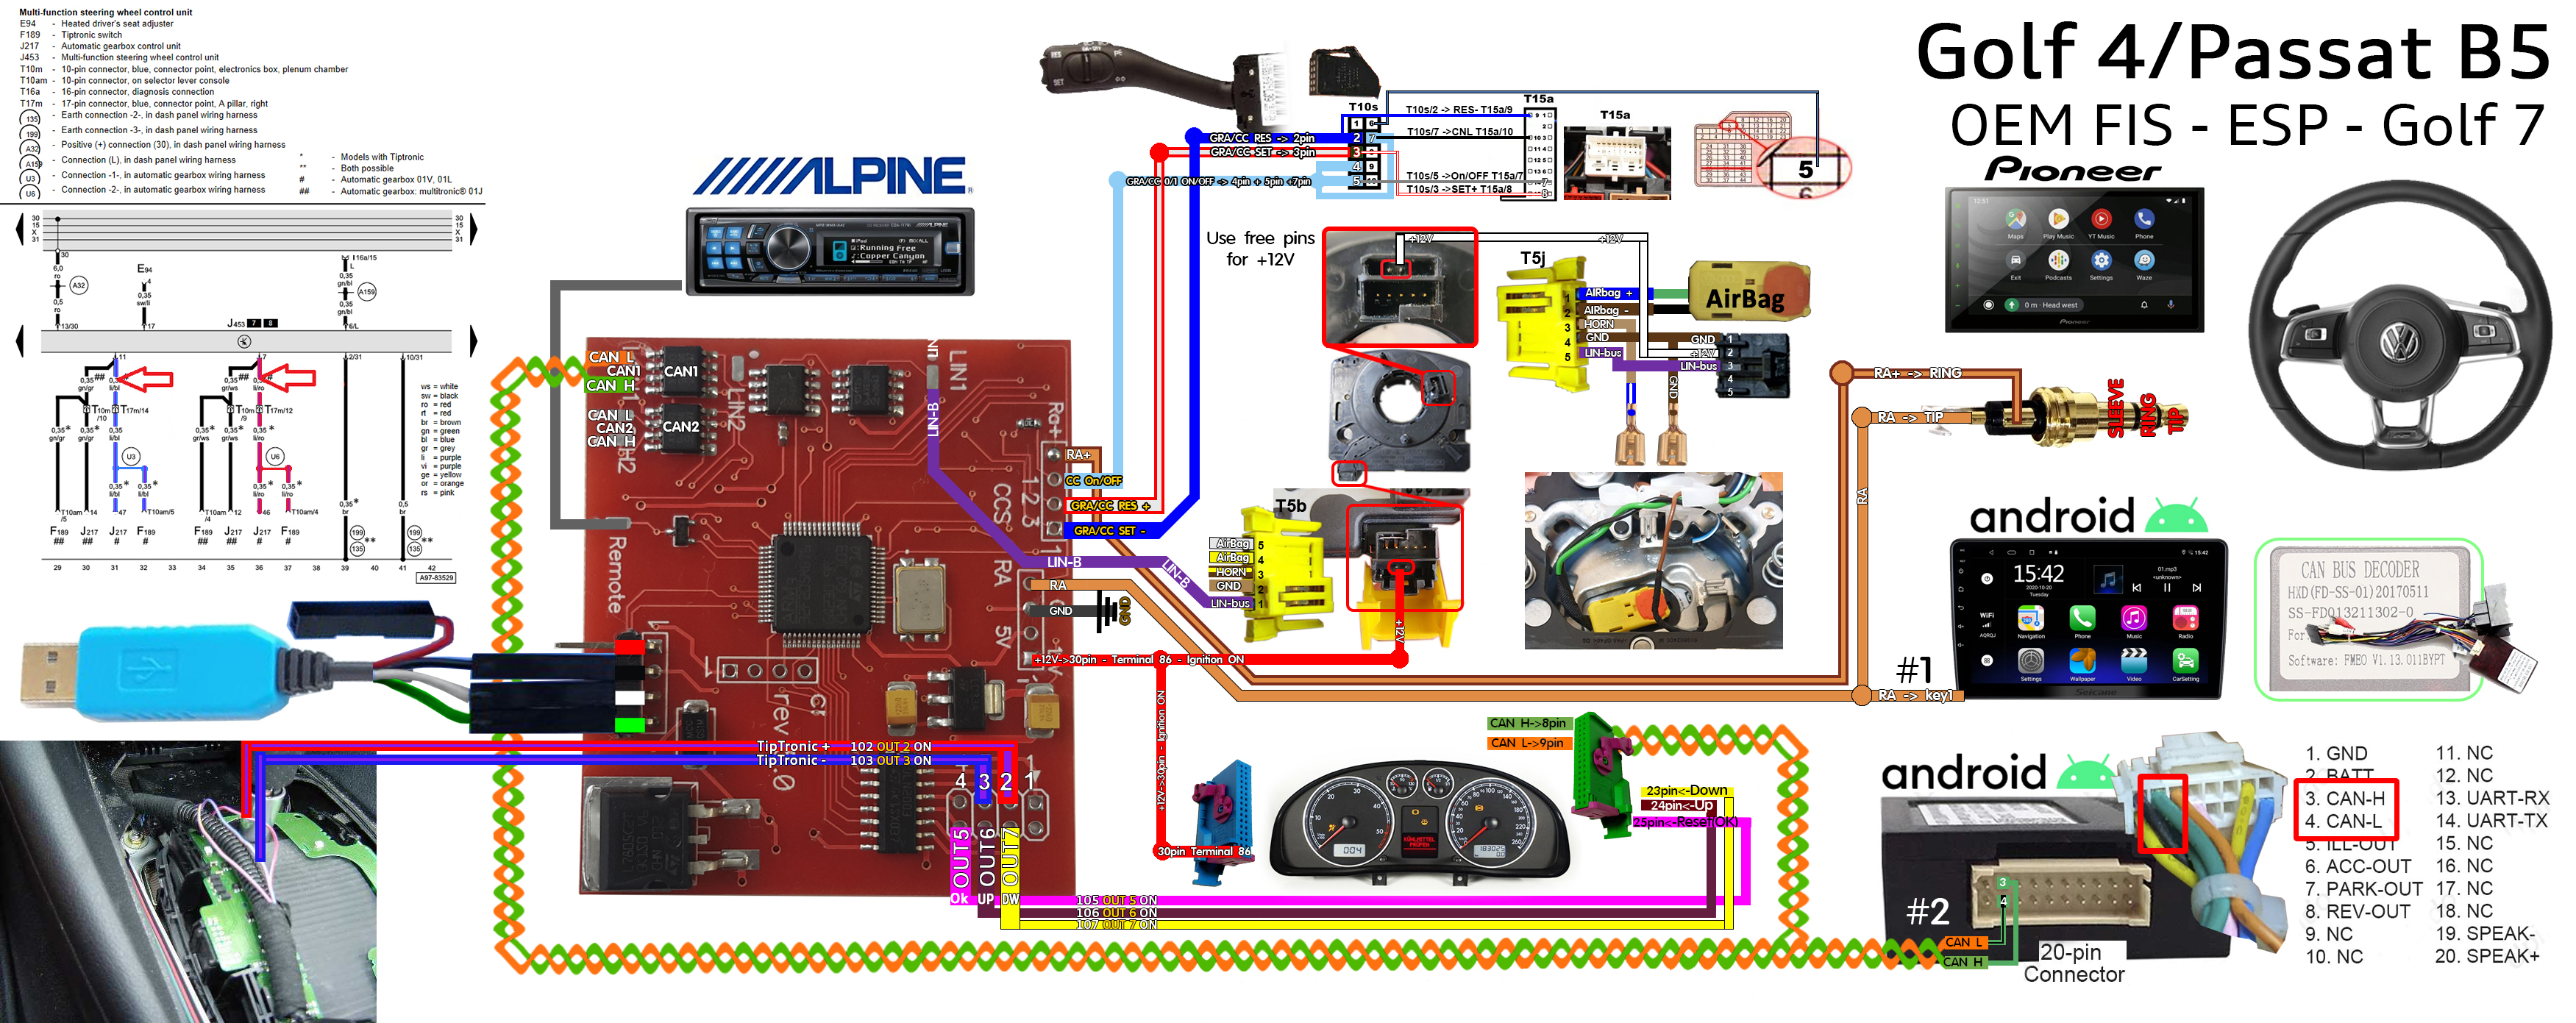
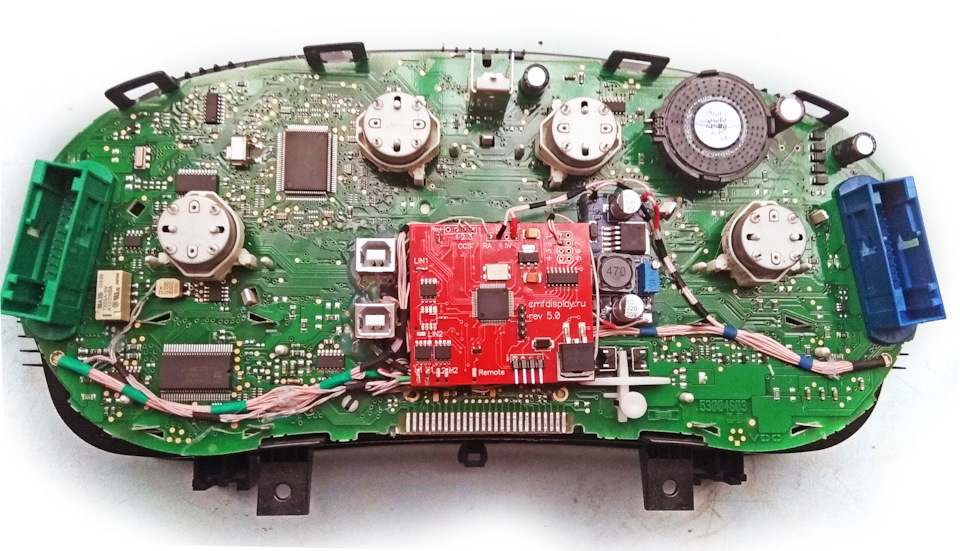
For vehicles with ESP and OEM FIS |
|
| |
Для автомобилей с ESP и штатныйм
дисплеем. |
|
| |
For vehicles with ESP and 3DMFD |
|
| |
Для автомобилей с ESP и 3DMFD |
|
|
| |
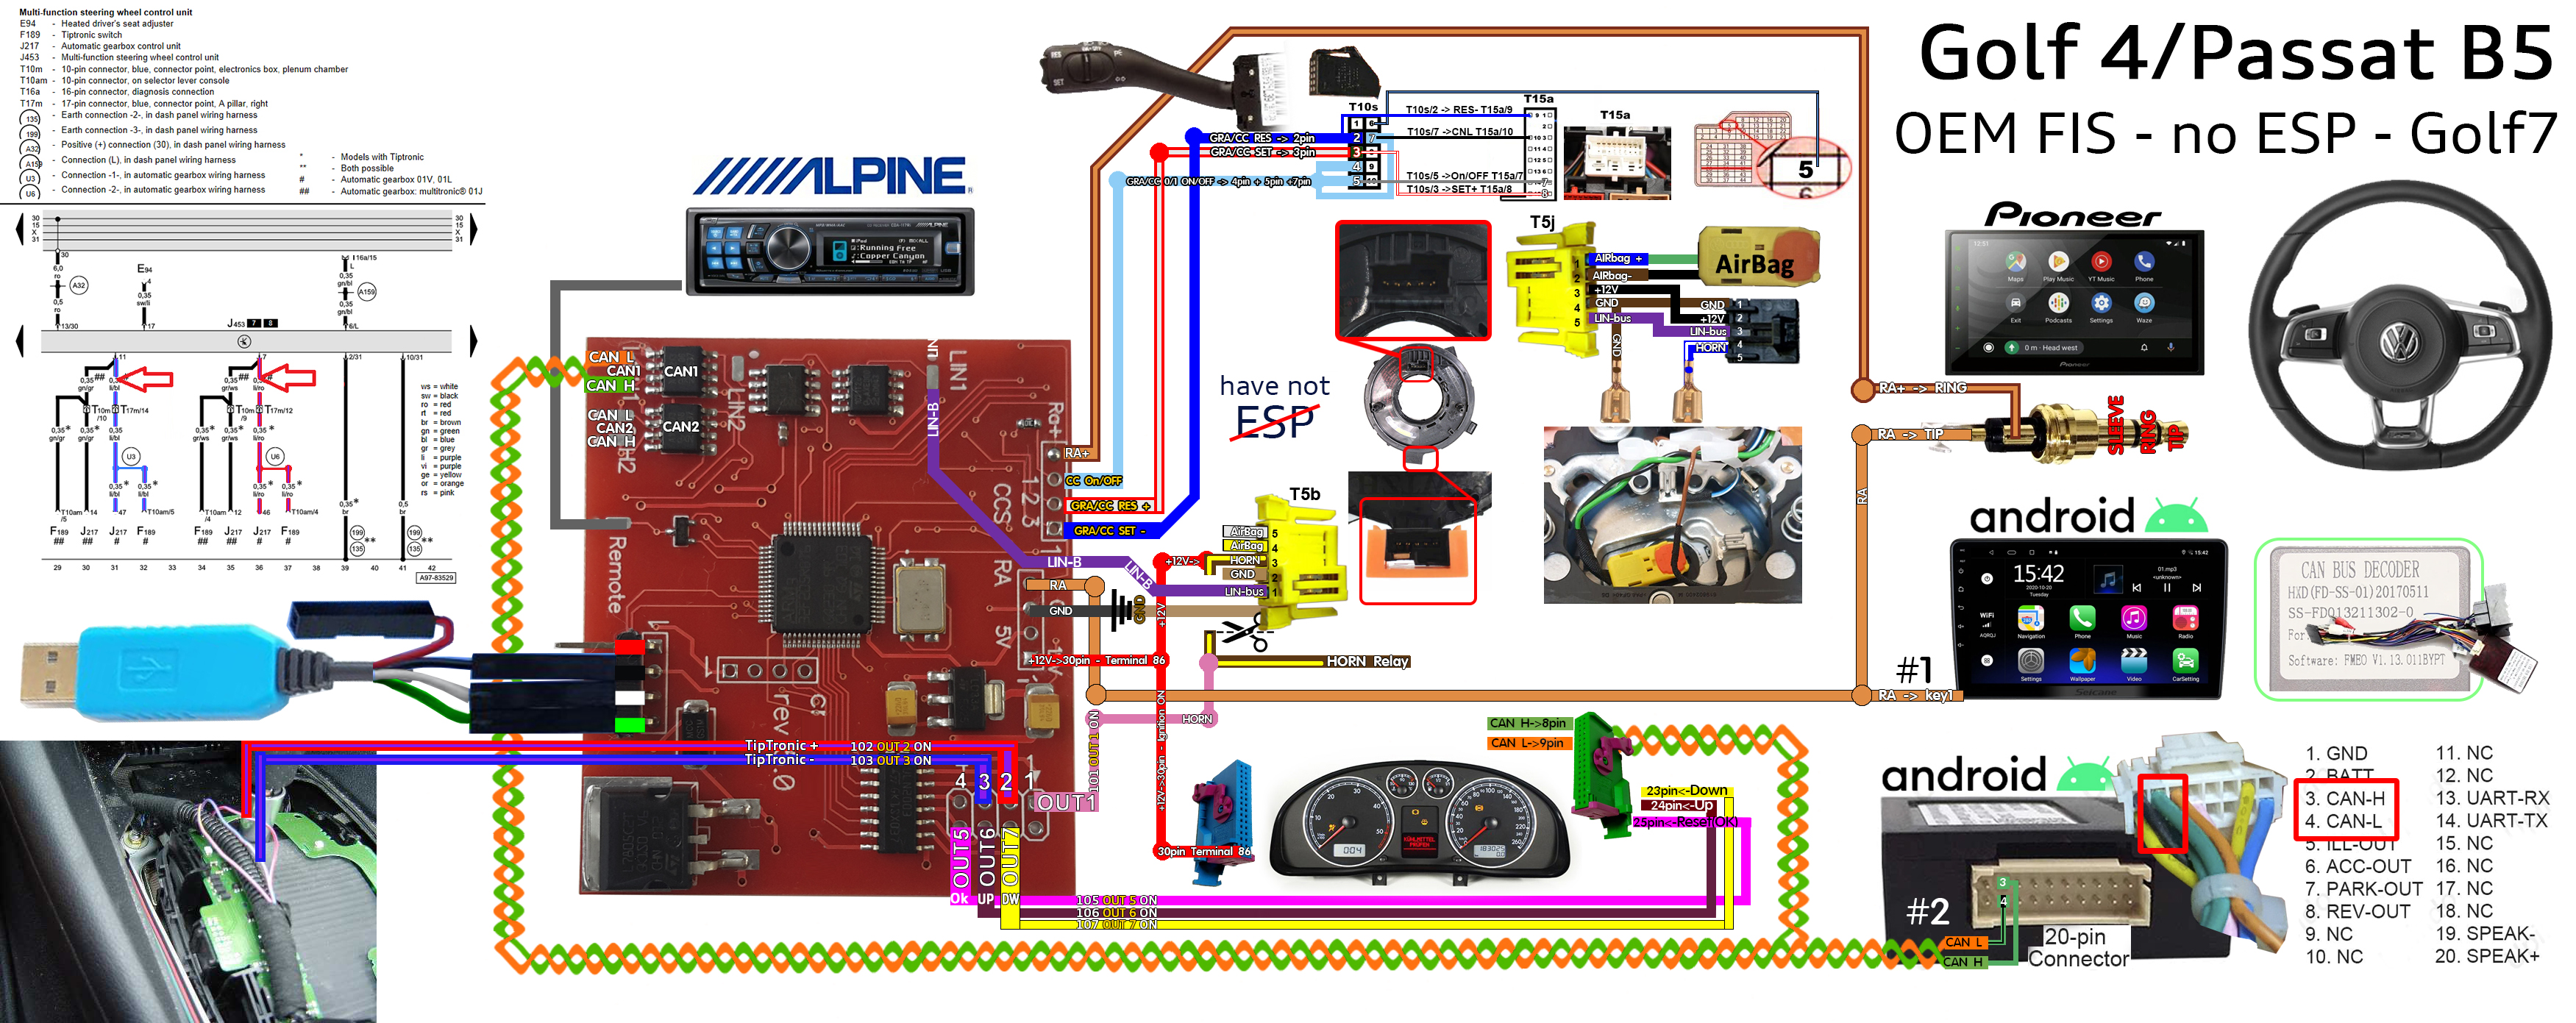
For vehicles without ESP and
OEM FIS |
|
|
| |
Для автомобилей без ESP и штатныйм
дисплеем. |
|
|
| |
For vehicles without ESP and
3DMFD |
|
|
| |
Для автомобилей без ESP и 3DMFD |
|
|
| |
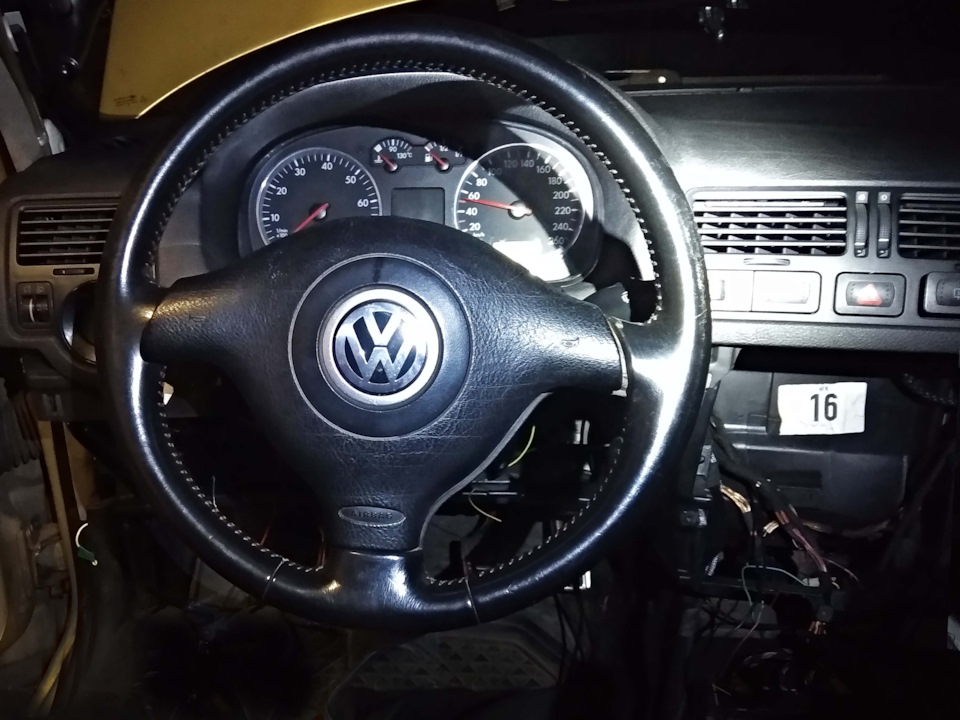
I had a regular steering wheel with three spokes. |
|
| |
Стоял обычный руль с тремя спицами. |
|
| |
But after installing a new stereo |
|
| |
Но после установки новой магнитолы |
|
| |
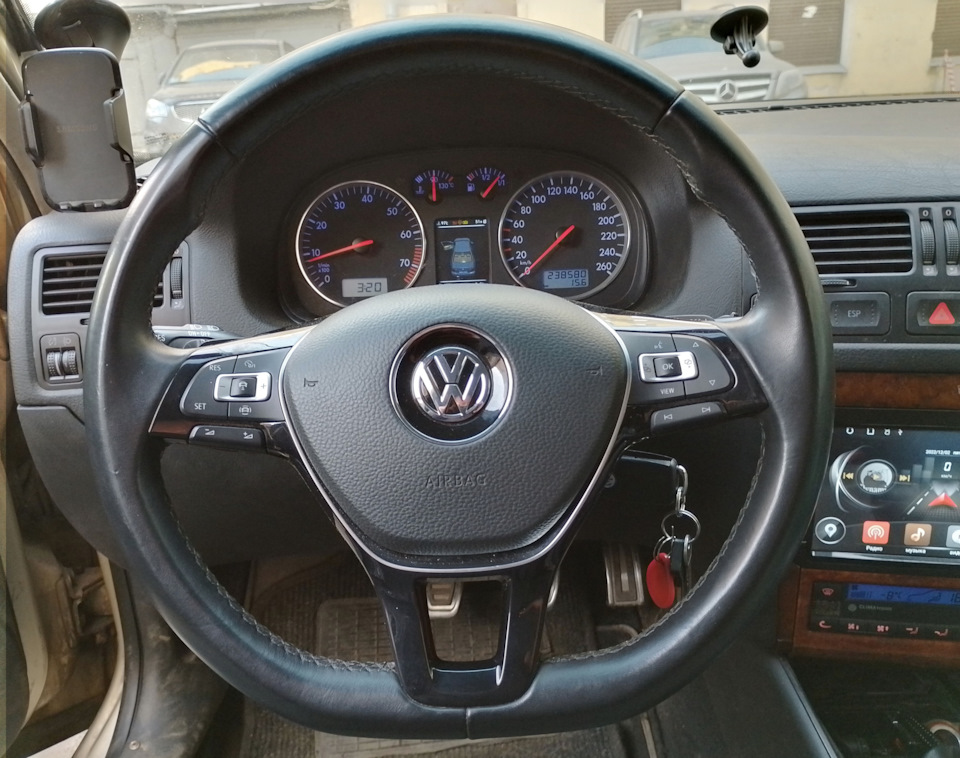
There was a conscious need to install a multi steering wheel. I
found a steering wheel from a 2019 Tiguana. |
|
| |
возникла осознанная необходимость установить мультируль. Нашёл руль
от Tiguana 2019 года. |
|
| |
5TA 419 091 AQ E74 5TA 880 201 AC HVF |
|
| |
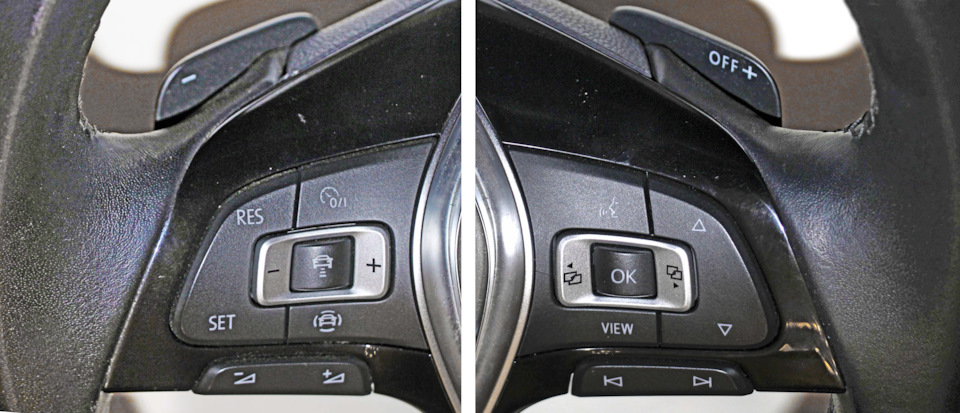
This steering wheel has 18 keys and plus two paddles: |
|
| |
У этого руля 18 клавиш и плюс два лепестка: |
|
| |
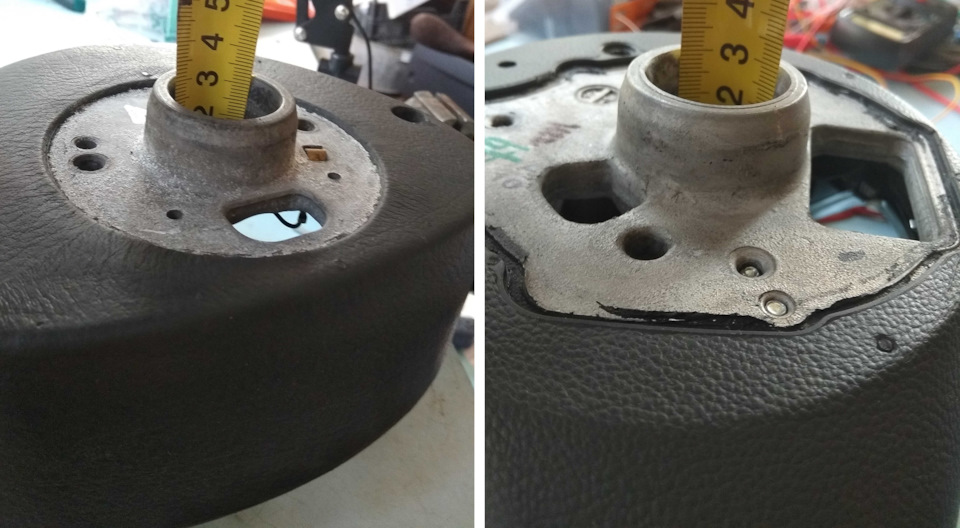
Important: Before removing the steering wheel, you must set the
steering wheel (wheels) straight.
Somehow, I came across an article that said that after replacing the
steering wheel, my hands started to get caught up in the steering
wheel paddles when turning. I decided to compare the two steering
wheels: |
|
| |
Важно! Перед снятием руля необходимо выставить руль (колёса)
прямо.
Как-то наткнулся на статью, где говорилось, что после замены руля на
поворотах руки стали задевать за подрулевые переключатели. Решил
сравнить оба руля: |
|
| |
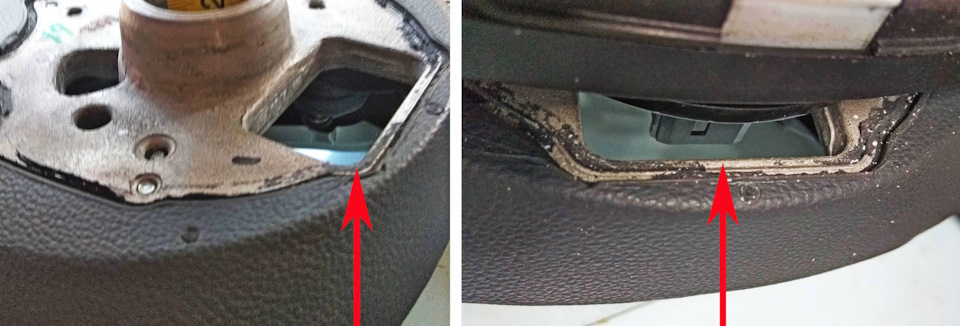
In this case, the steering wheel was the same, but when trying it on,
I noticed that the new steering wheel has a much larger hole for the
connector and it is partially uncovered (protrudes beyond the
undercarriage). |
|
| |
В данном случае рули оказались одинаковыми, но при примерке заметил,
что у нового руля отверстие под разъём значительно больше и оно
частично остаётся не прикрытым (выступает за пределы подрулевого
шлейфа). |
|
| |
That's why I decided to seal the extra part of the hole: I cut a
piece of plastic and for a tighter fit I smeared the ends several
times with dichloroethane and pressed it into the hole. And then on
both sides around the perimeter I glued with a second glue (Monolith,
Cosmofen CA 12) with soda. |
|
| |
Поэтому лишнюю часть отверстия решил заделать: вырезал кусок
пластмассы и для более плотной посадки несколько раз промазал торцы
дихлорэтаном и вдавил его в отверстие. И затем с обоих сторон по
периметру проклеил секундным клеем (Монолит, Cosmofen CA 12) с
содой. |
|
| |
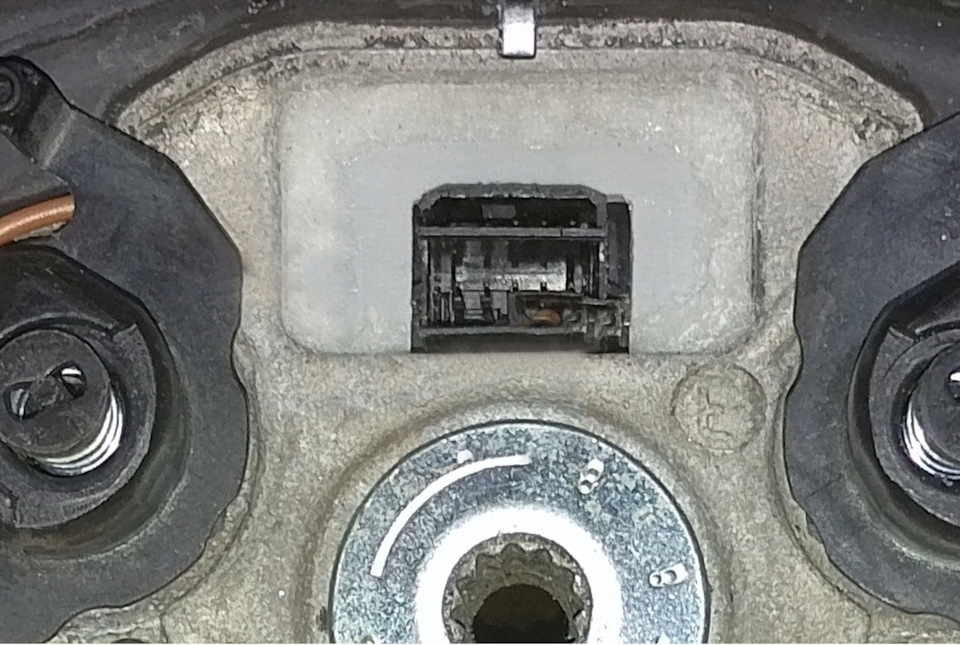
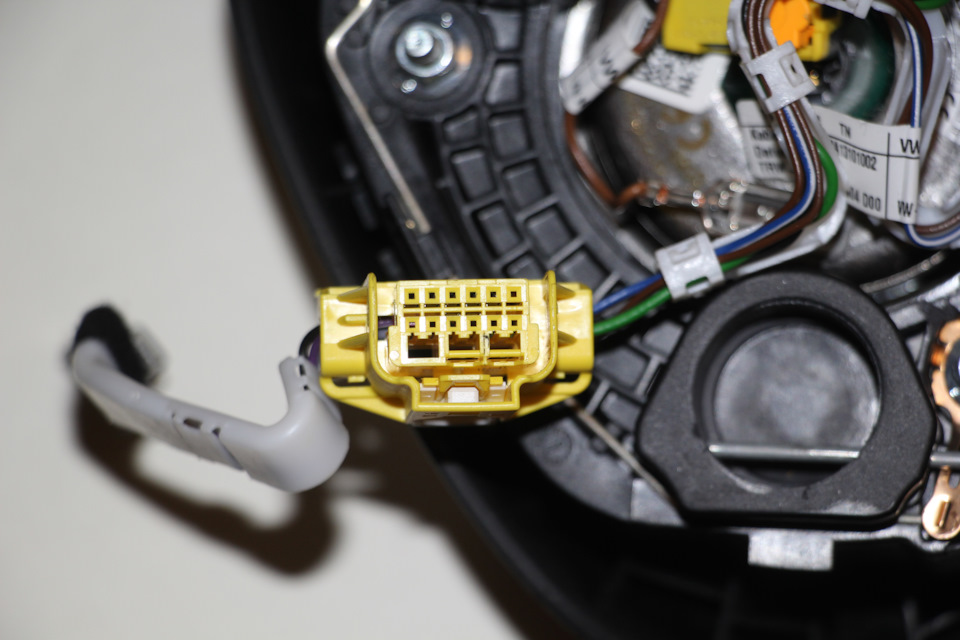
And now you need to connect the native connector of the steering
wheel stub (wiring) |
|
| |
А теперь необходимо соединить родной разъём подрулевого шлейфа
(проводки) |
|
| |
with the wiring (loop) of the new steering wheel: |
|
| |
с проводкой (шлейфом) нового руля: |
|
| |
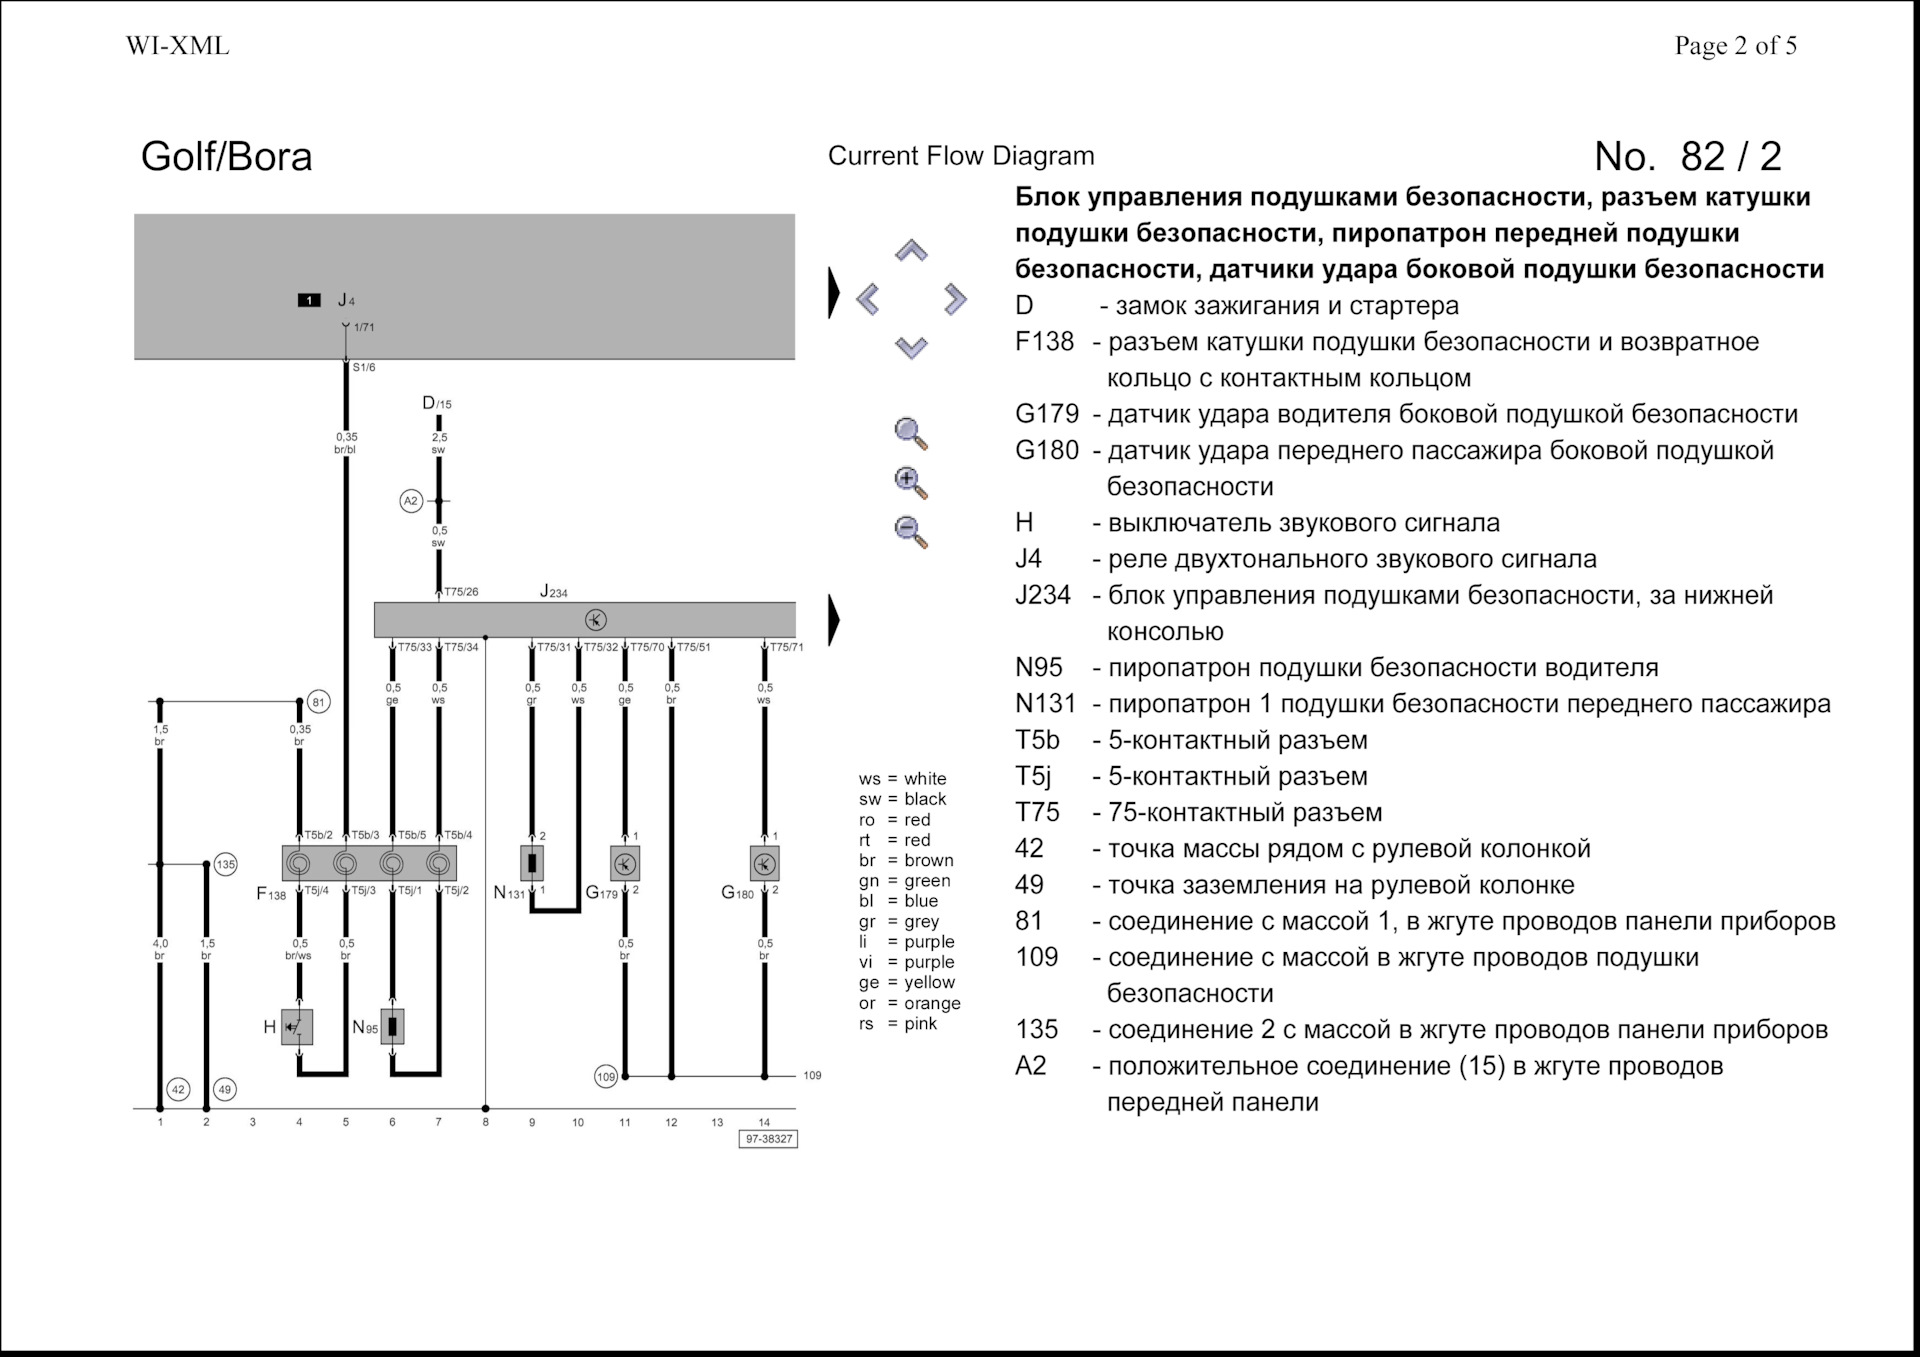
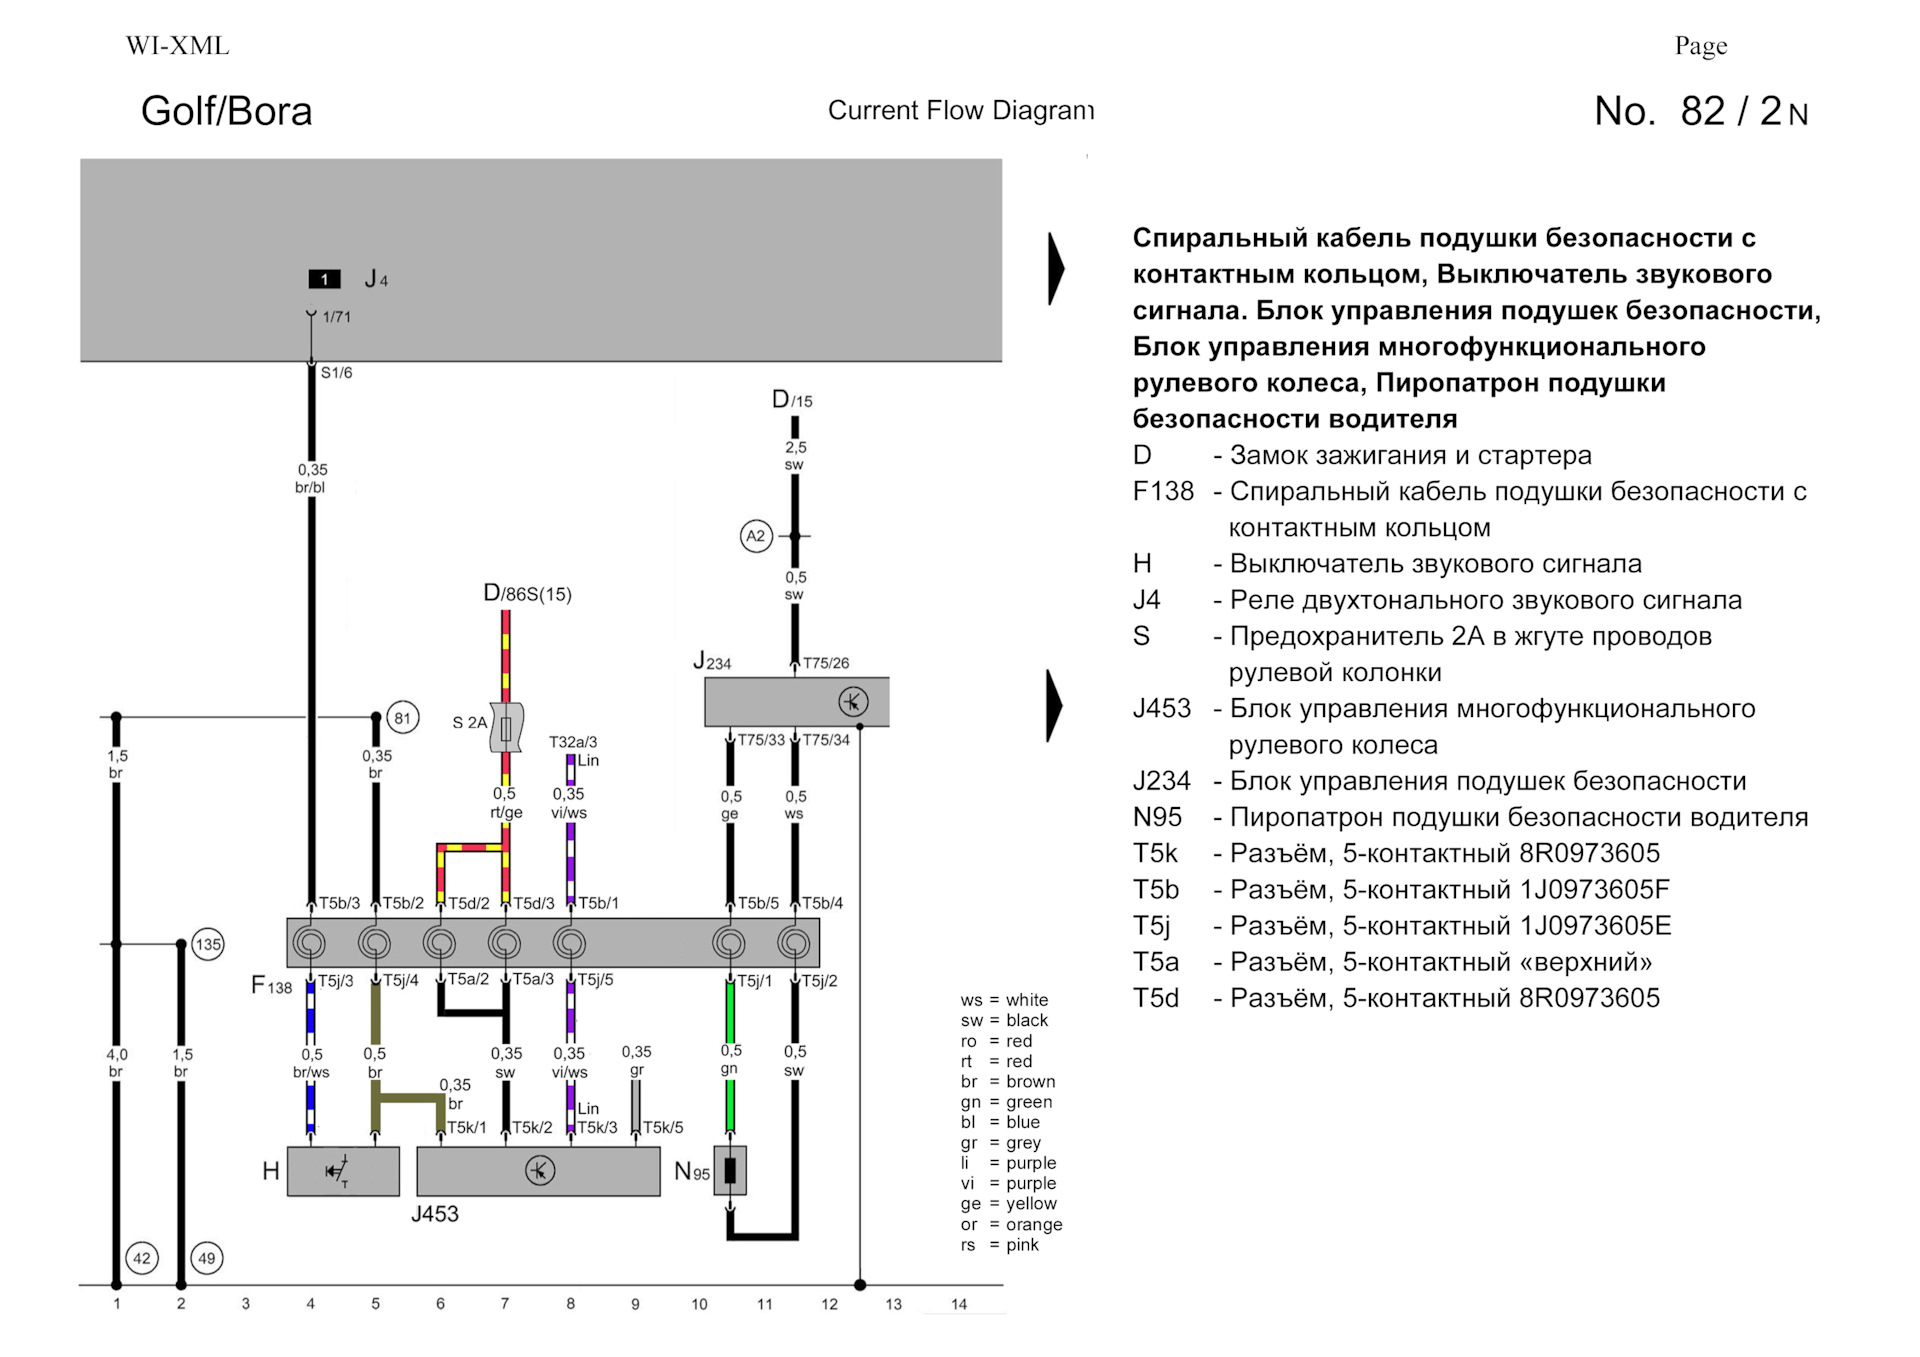
Diagram of the old steering wheel: |
|
| |
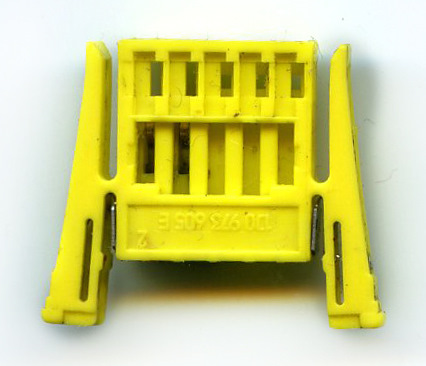
On the steering wheel side, the connector 1J0 973 605E is used to
connect to the steering wheel stub. It is quite difficult to find it
separately. The VW catalogs do not show it. There is only the whole
wiring. I took this connector from the Audi A6/C5 steering wheel
wiring. It has different wire colors than the colors in the diagram.
The colors of the loop wires may be different depending on the
steering wheel, the meaning is the same for all loops. |
|
| |
Со стороны руля для подключения к подрулевому шлейфу используется
разъём 1J0 973 605E. Найти его отдельно достаточно сложно. По
каталогам VW, он не пробивается. Есть только вся проводка целиком. Я
взял этот разъём от проводки руля Audi A6/C5. У него цвета проводов
отличаются от цветов на схеме.
Цвета проводов шлейфа могут быть разными, в зависимости от руля,
смысл один для всех шлейфов. |
|
| |
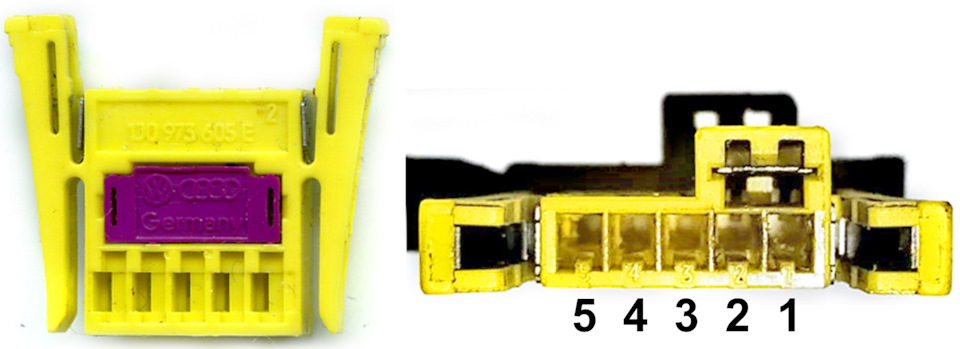
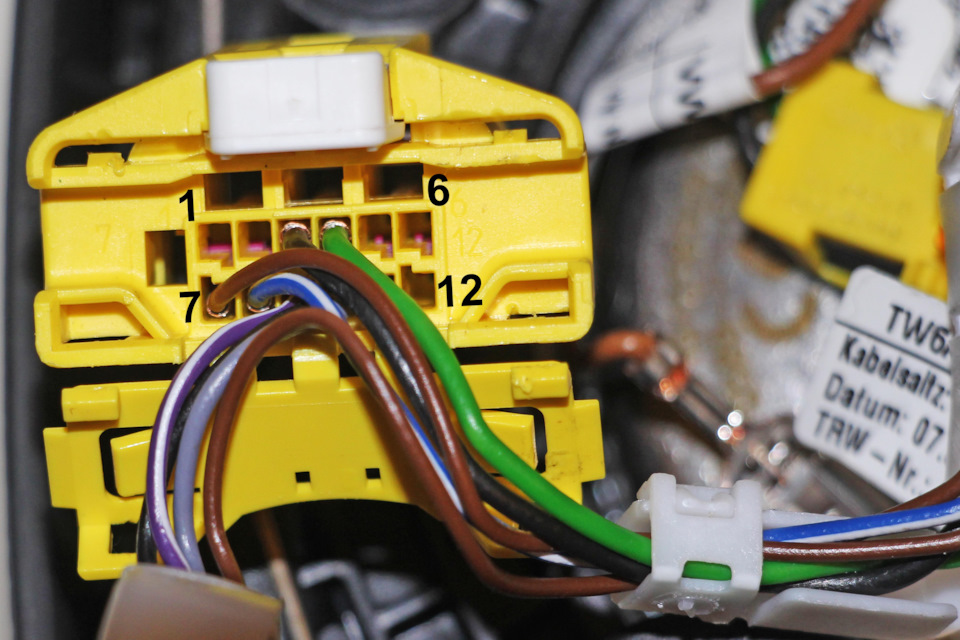
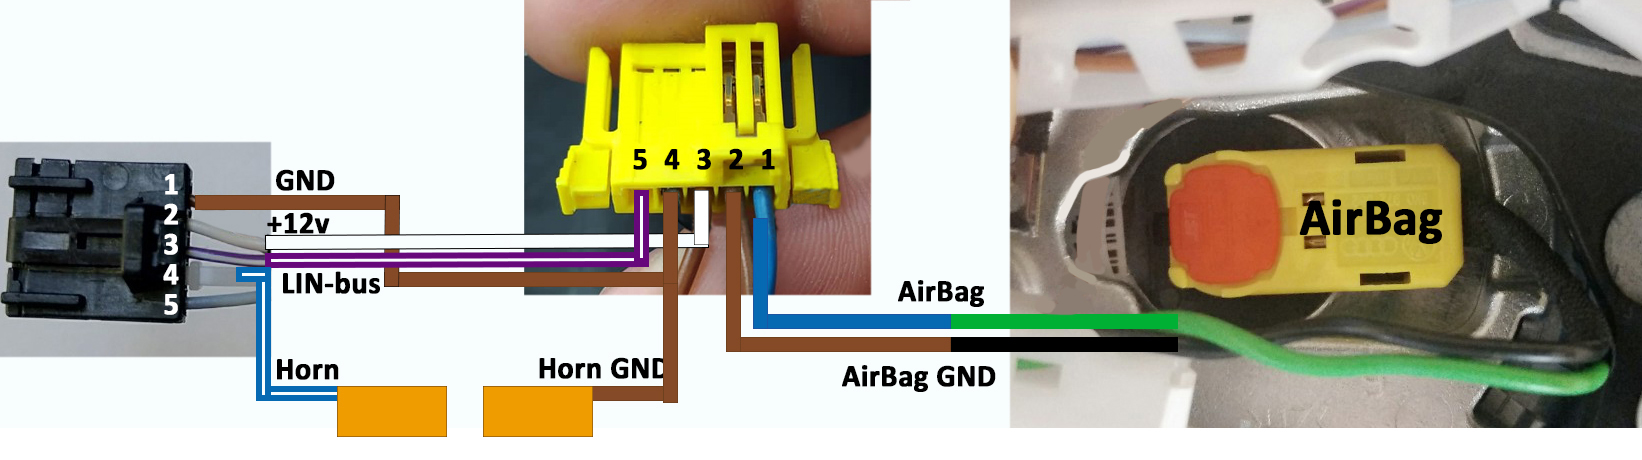
1J0 973 605E Yellow connector (stub cable on UBD (steering wheel)
side):
T5j/1 - blue to UB squib
T5j/2 brown - brown for UB squib
T5j/3 - brown (horn moving part)
T5j/4 - black (earth on shaft)
T5j/5 - free
12 pin connector 4H0 972 208D of the new steering wheel wiring
harness: |
|
| |
1J0 973 605E Жёлтый разъём (подрулевой шлейф со стороны ПБ (руля)):
Т5j/1 — синий на пиропатрон ПБ
Т5j/2 — коричневый на пиропатрон ПБ
Т5j/3 — коричневый (гудок подвижная часть)
Т5j/4 — чёрный (масса на вал)
Т5j/5 — свободный
12 контактный разъём 4H0 972 208D нового шлейфа (проводки) руля: |
|
| |
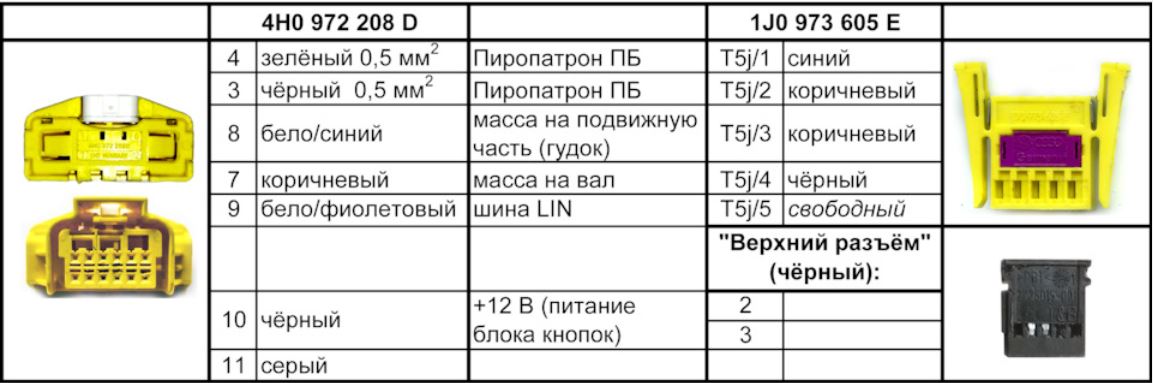
must be replaced with the connector 1J0973605E. Unfortunately, the
connector pins of the new steering wheel connector do not fit
1J0973605E, so we cut it off.
For the 1J0 973 605E connector you can use the pins from the cabin
side steering wheel connector 1J0 973 605F or the repair wire
000979018E (?). The coloured insert must be removed in order to
pinout the connector. |
|
| |
необходимо заменить разъёмом 1J0973605E. К сожалению, контакты
разъёма нового шлейфа руля не подходят для 1J0973605E, поэтому его
отрезаем.
Для разъёма 1J0 973 605E можно использовать контакты от разъёма
подрулевого шлейфа со стороны салона 1J0 973 605F или ремонтный
провод 000979018E (?). Для распиновки разъёма необходимо удалить
цветную вставку. |
|
| |
Connections are made according to the table: |
|
| |
Соединения выполняем согласно таблице: |
|
| |
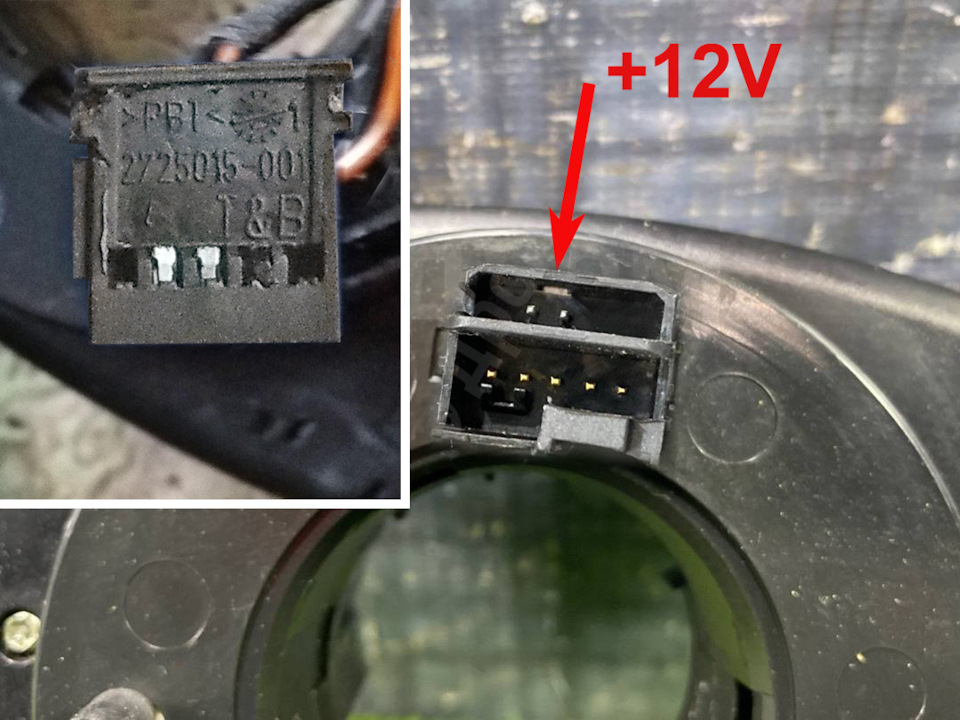
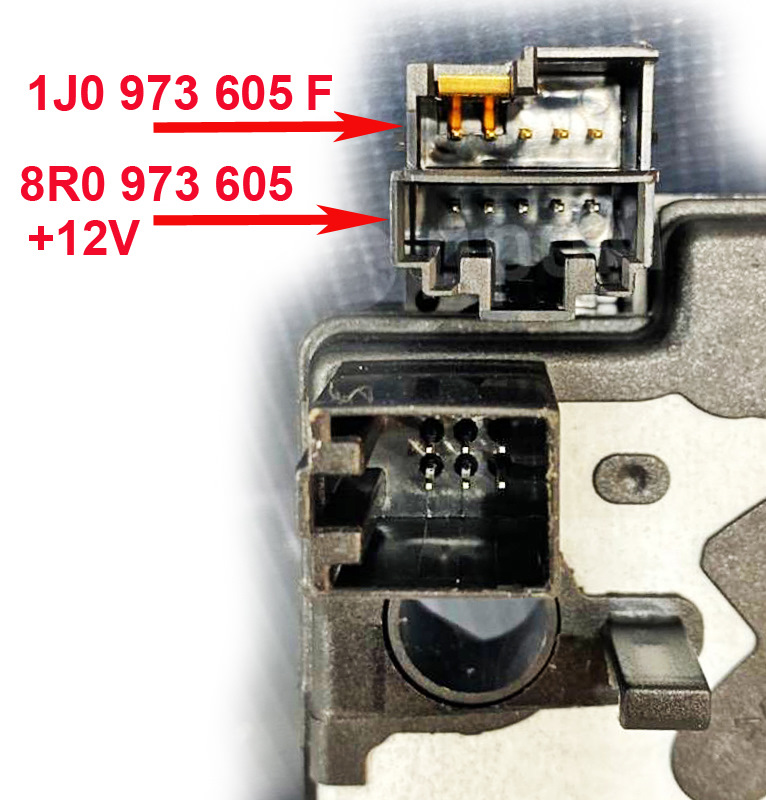
The colors of your wires may be completely different.
The +12V power supply for the multicontrol buttons must be connected
to terminal 15 or 86S. This is done using the second connector of
the control line (there are two and five pins): |
|
| |
Цвета проводов у Вас могут быть совсем другими.
+12V на питание блоков кнопок мультируля необходимо подать с клеммы
15 или 86S. Для этого используется второй разъём подрулевого шлейфа
(он бывает двух и пяти контактный): |
|
| |
It is difficult to find this connector separately. In the VW
catalogs, it is not registered. And the number VW-Audi, it seems,
and does not have. You need to hack or look for a steering wheel
wiring with this connector (it was usually installed on Audi A6,8
around 2000 - 2006 year).
The power (+12V) to the steering wheel is fed through the connector
8R0973605. |
|
| |
Найти этот разъём отдельно достаточно сложно. По каталогам VW, он не
пробивается. Да и номера VW-Audi он вроде, как и не имеет. Нужно
колхозить или искать проводку руля с этим разъёмом (он ставился
обычно на Audi A6,8 в районе 2000 – 2006 года).
Питание (+12V) на подрулевой подаётся через разъём 8R0973605. |
|
| |
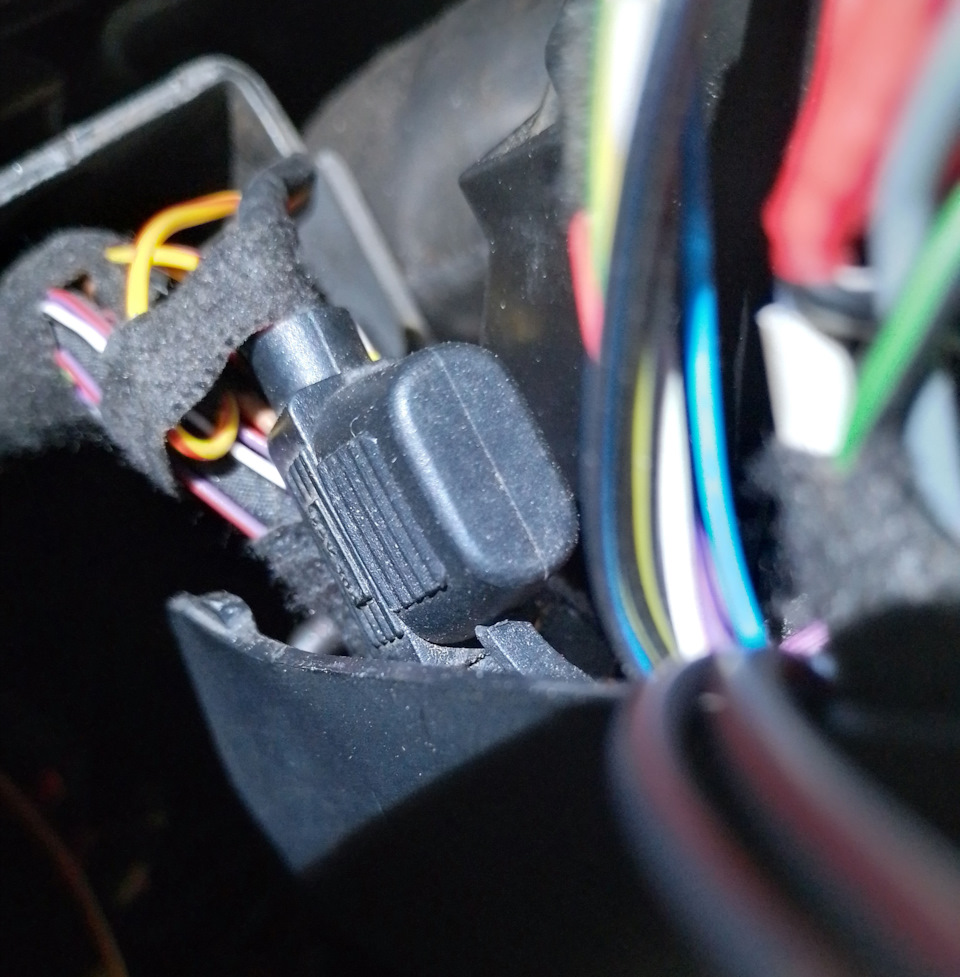
The +12V was taken from the 86S terminal of the ignition connector
through a 2A fuse. |
|
| |
+12V взял с клеммы 86S разъёма замка зажигания через предохранитель
2А. |
|
| |
All new connections soldered and insulated with two layers of heat
shrink tubing. |
|
| |
Все новые соединения пропаял и заизолировал термоусадочной трубкой в
два слоя. |
|
| |
The black connector 8R0973605 (8E0973605) is used in the new
steering wheel stub to connect the multi steering wheel buttons.
Here is the pinout just in case:
1 - brown → ground
2 - black → +12V (terminal 86S)
3 - white/purple → LIN
4 - free
5 - gray
Your wire colors may be completely different.
The new diagram looks like this: |
|
| |
Для подключения блоков кнопок мультируля в шлейфе нового руля
используется чёрный разъём 8R0973605 (8E0973605). На всякий случай
привожу его распиновку:
1 — коричневый → масса
2 — чёрный → +12V (клемма 86S)
3 — бело/фиолетовый → LIN
4 — свободный
5 – серый
Цвета проводов у Вас могут быть совсем иными.
Новая схема выглядит так: |
|
| |
To supply +12V to the power supply blocks of the multilink buttons,
you can not use the second connector of the steering wheel stub, and
use the 3rd pin of the connector T5j/3 (1J0973605E) and control the
sound signal to implement through the bus Lin |
|
| |
Для подачи +12V на питание блоков кнопок мультируля можно не
использовать второй разъём подрулевого шлейфа, а использовать 3-й
контакт разъёма Т5j/3 (1J0973605E) и управление звуковым сигналом
реализовывать через Lin шину |
|
| |
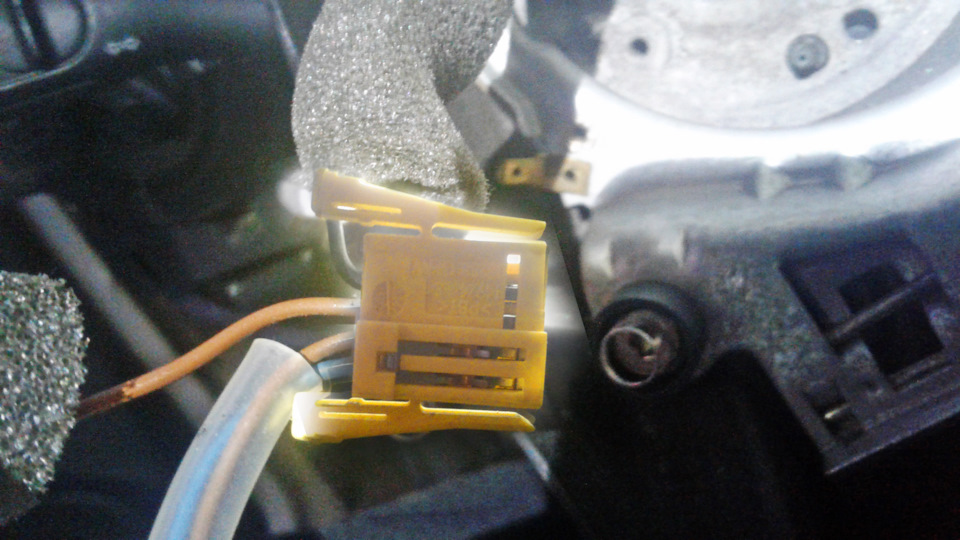
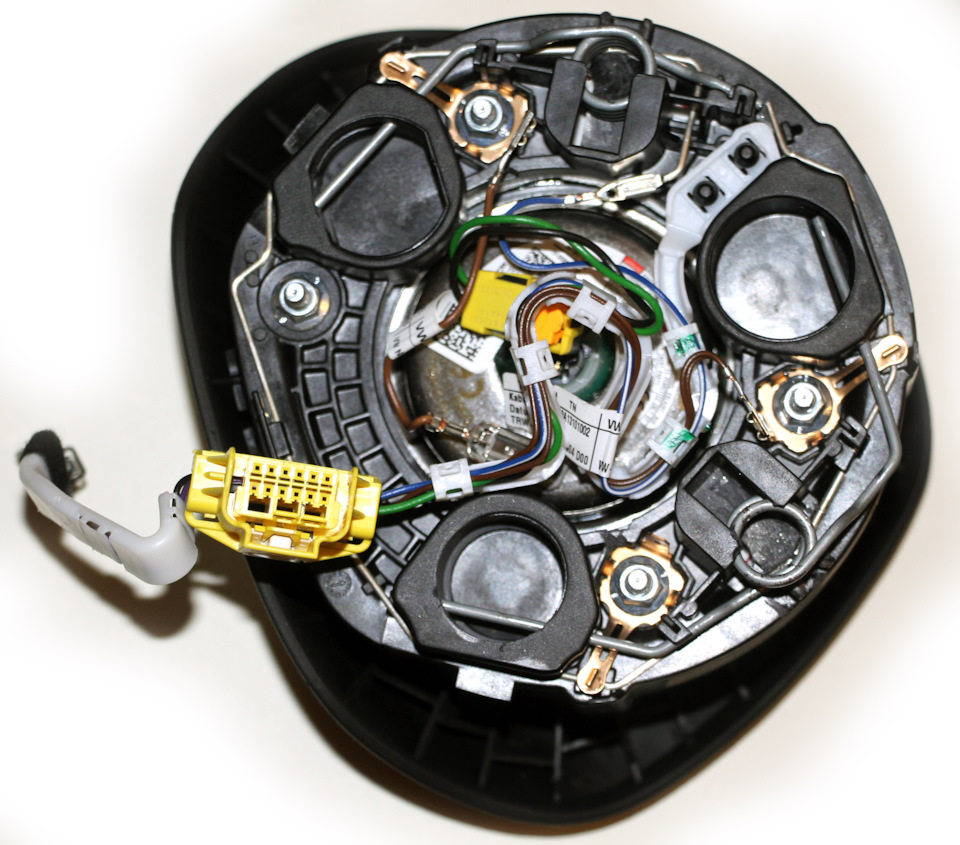
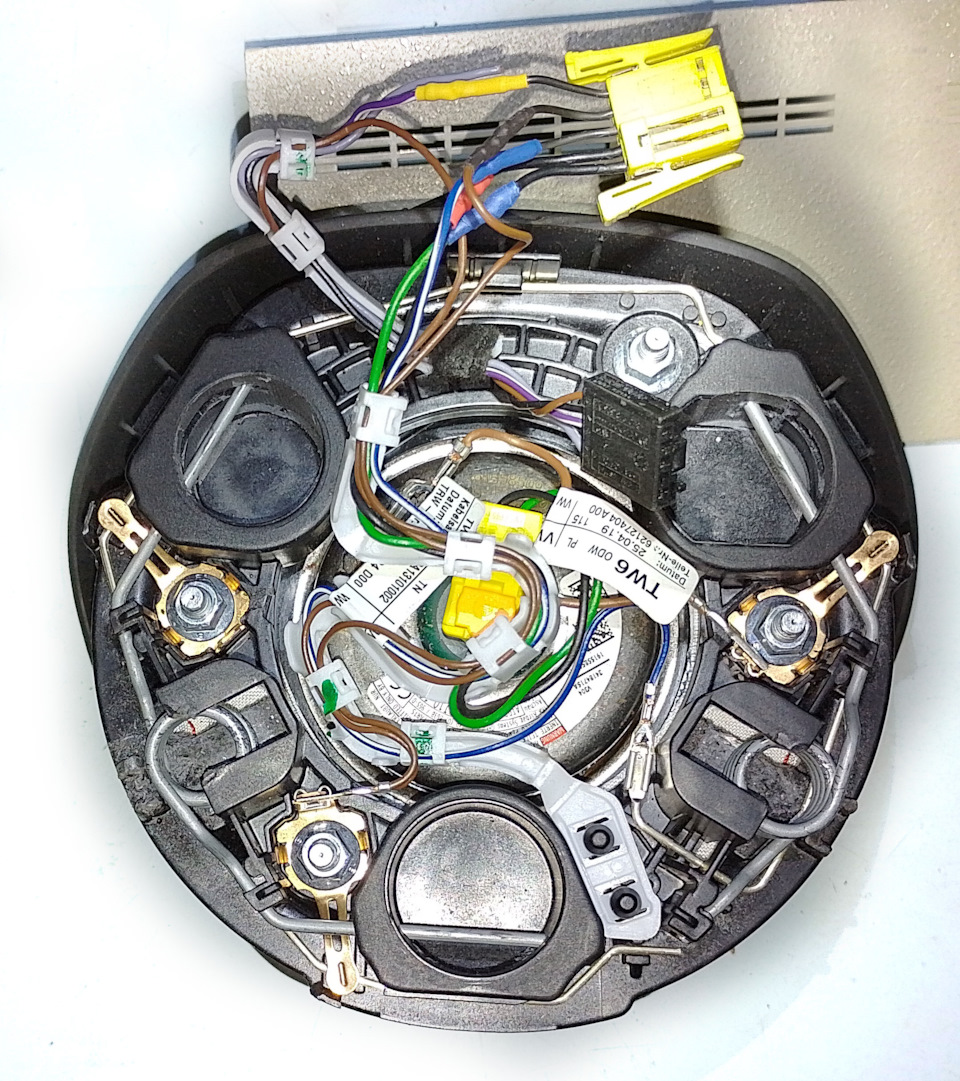
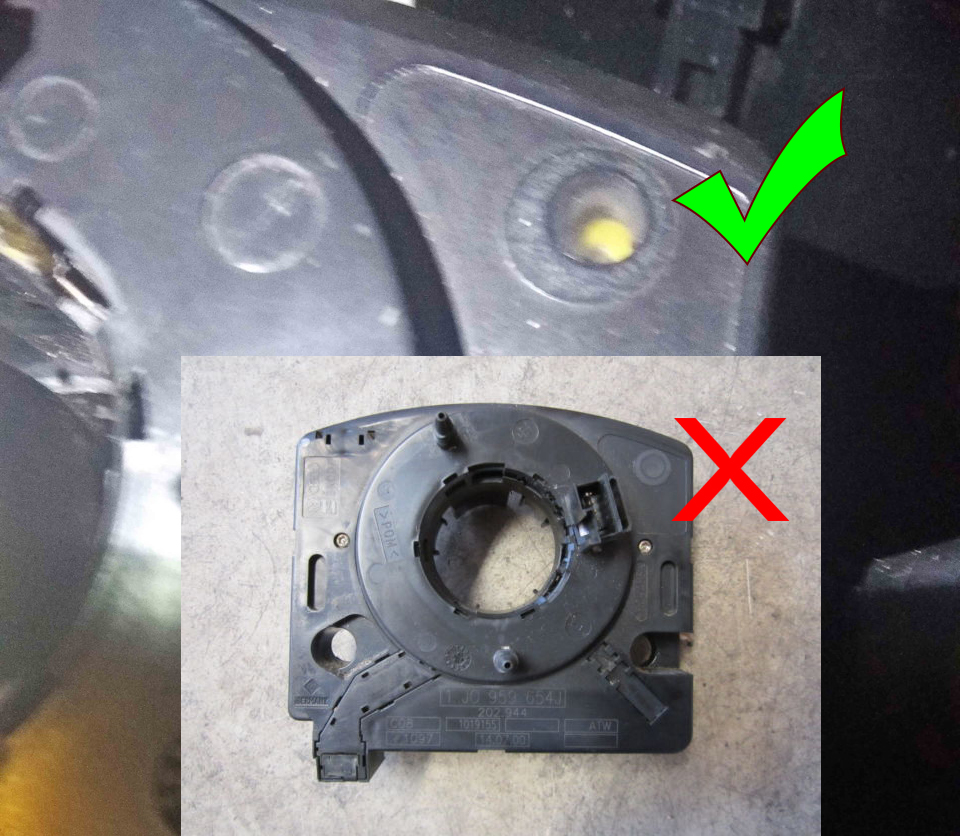
Before installing the new steering wheel, don't forget to check the
yellow indicator in the upper right corner of the steering wheel
stub. |
|
| |
Перед установкой нового руля не забываем проверить наличие жёлтого
индикатора в правом верхнем углу подрулевого шлейфа. |
|
| |
Author / Автор статьи
Dimirty https://www.drive2.ru/l/633367901818084259/ |
|
| |
The adapter box can be placed anywhere convenient for you, there are
many options. |
|
| |
Коробку адаптера можно разместить в любом удобном для вас месте,
есть много вариантов. |
|
| |
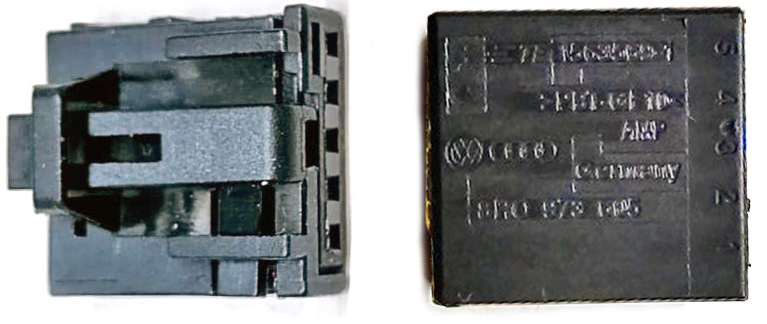
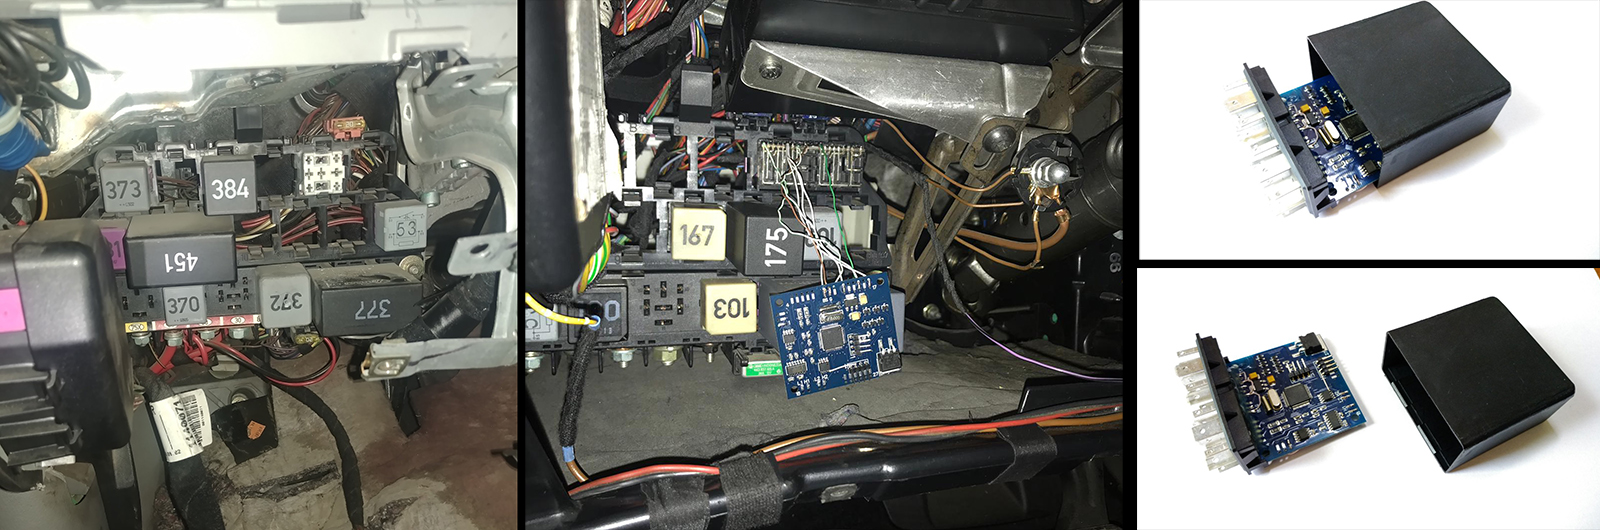
Option 2. Make a concealed installation that will look like an
OEM 451 dual relay for the original MFSW |
|
| |
Вариант 2. Сделать скрытую установку которая будет выглядеть как
OEM двойное реле 451 для оригинального MFSW |
|
| |
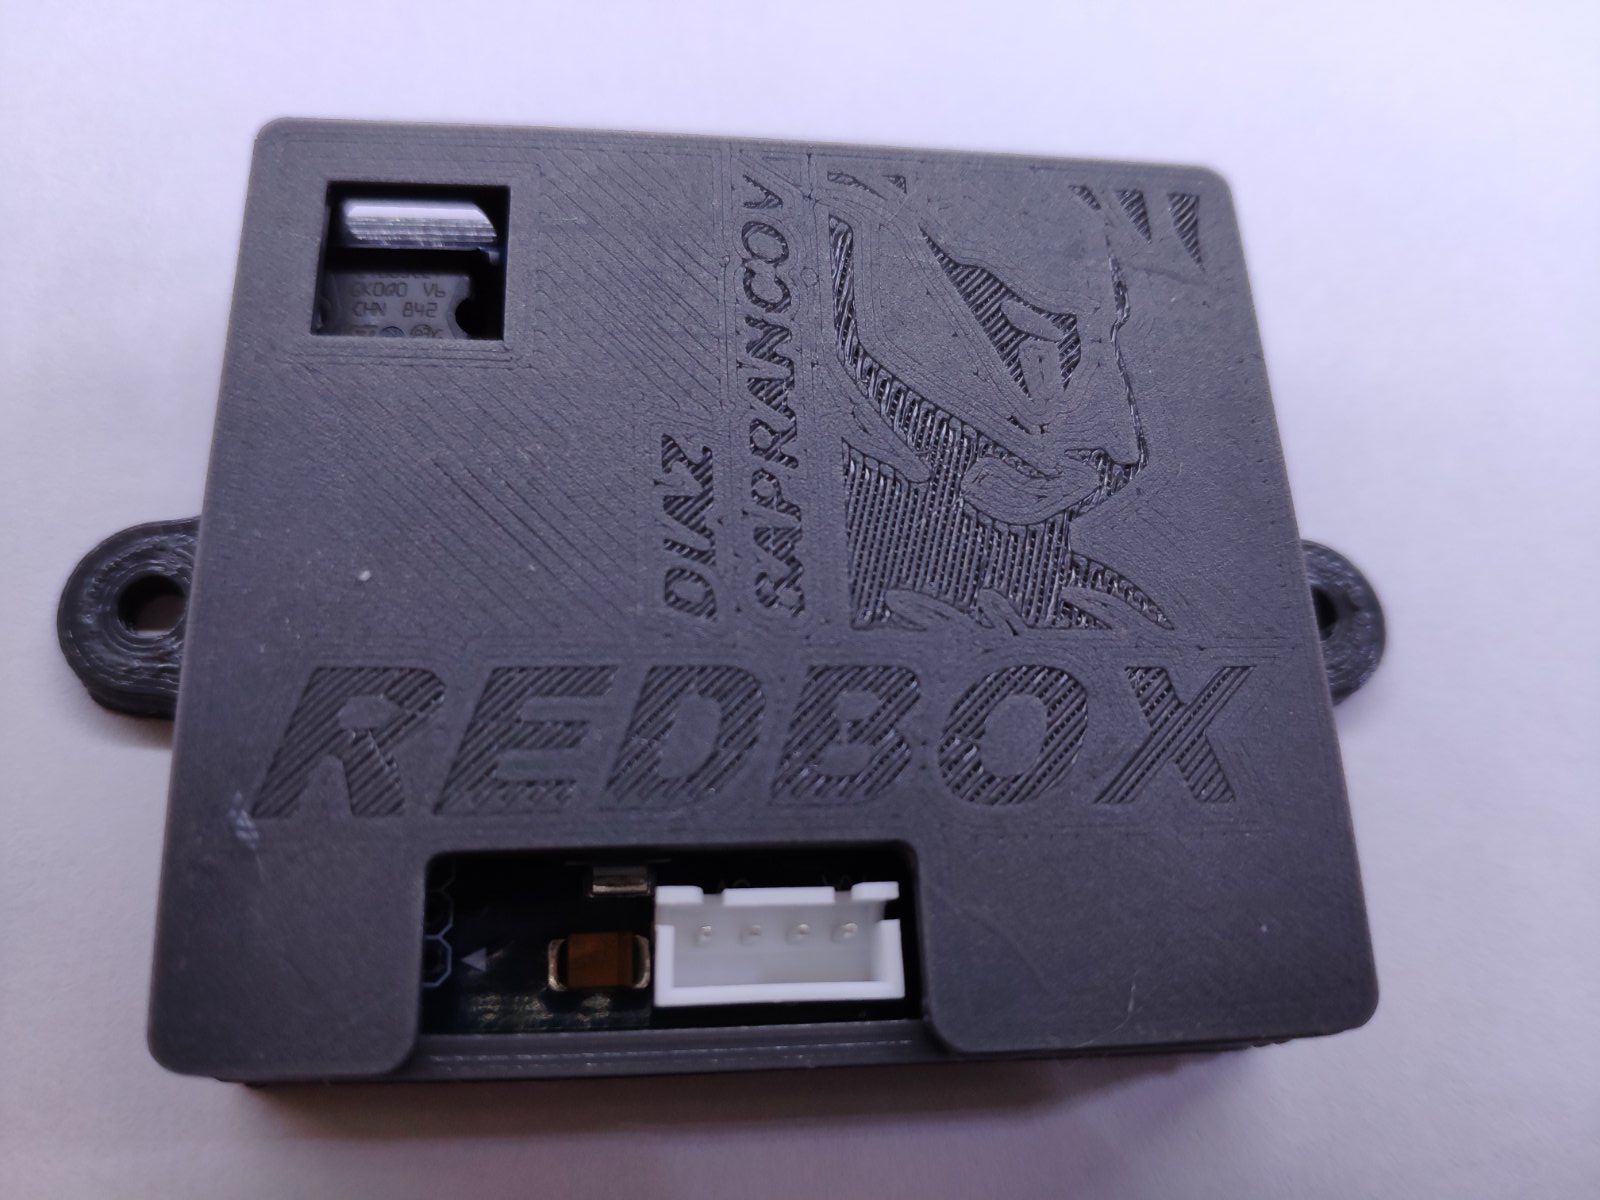
Option 3. Place the adapter box in any location that is
convenient for you. |
|
| |
Вариант 3. Разместить коробку адаптера влюбом удобном для вам
месте. |
|
| |
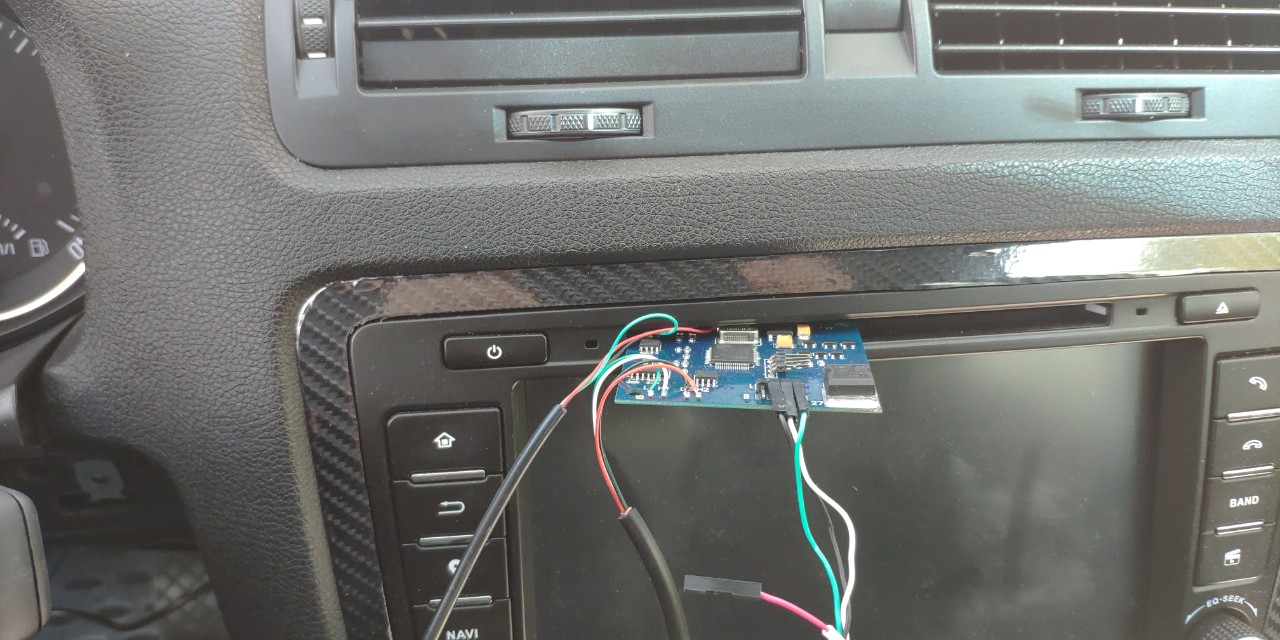
Option 4. Make an installation in the style of modern art. :) |
|
| |
Вариант 4. Сделать инсталяцию в стиле современного искуства. :) |
|
|