| |
To connect the adapter to the computer a cable with a converter (small
USB module emulating a serial interface) USB bus signals into UART (Universal
Asynchronous Transceiver) and vice versa is used. The converter is
built on a chip PL2303 from Prolific, the so-called "blue cord" - on
the chip PL2303TA and earlier "black cord" - on the chip PL2303HX.
The best known of the family of UART protocol RS-232 (popularly -
COM-port).
We start by downloading the
software programs:
- Adapter configurator - file cfgprocv5.exe
- Firmware update of the adapter (if needed) -
xlabs.UNI64.LoaderCD2, as well as
Firmware file and
Instruction for reflashing.
But first we install the blue cord driver on the laptop (computer),
if it was not installed earlier (also used to connect 3DColorMFD to
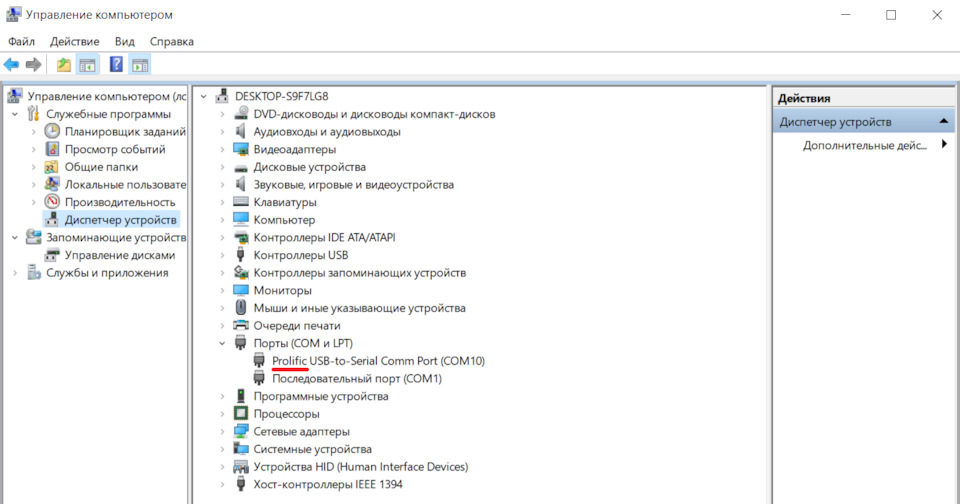
the laptop). And if you want to check: on the Desktop, right-click
on the icon This computer, then select:
1. - Manage,
2. - Device Manager,
3. - Ports (COM - LPT),
4. - Then plug in the Blue cord
And happily contemplate the appearance of the coveted word Prolific. |
|
| |
Для подключения адаптера к компьютеру используется кабель с
преобразователем (небольшой USB модуль, эмулирующий последовательный
интерфейс) сигналов шины USB в UART (универсальный асинхронный
приемопередатчик) и наоборот. Преобразователь выполнен на микросхеме
PL2303 от компании Prolific, так называемый, «синий шнурок» — на
микросхеме PL2303TA и более ранний «чёрный шнурок» — на микросхеме
PL2303HX. Наиболее известен из семейства UART протокол RS-232 (в
народе – COM-порт).
Начинаем с загрузки
программного обеспечения программ:
• Конфигуратор адаптера – файл cfgprocv5.exe
• Перепрошивка адаптера (если вдруг возникнет такая необходимость) —
xlabs.UNI64.LoaderCD2, а также
Файла прошивки и
Инструкции по перепрошивке.
Но сначала устанавливаем на ноутбук (компьютер) драйвер синего
шнурка, если он не был установлен ранее (используется также для
подключения к ноутбуку 3DColorMFD). И при желании проверяем: на
Рабочем столе правой кнопкой мышки щёлкаем по значку Этот компьютер,
затем выбираем:
1. – Управление,
2. – Диспетчер устройств,
3. – Порты (COM — LPT),
4. – далее вставляем Синий шнурок
И радостно созерцаем появление заветного слова Prolific. |
|
| |
 |
|
| |
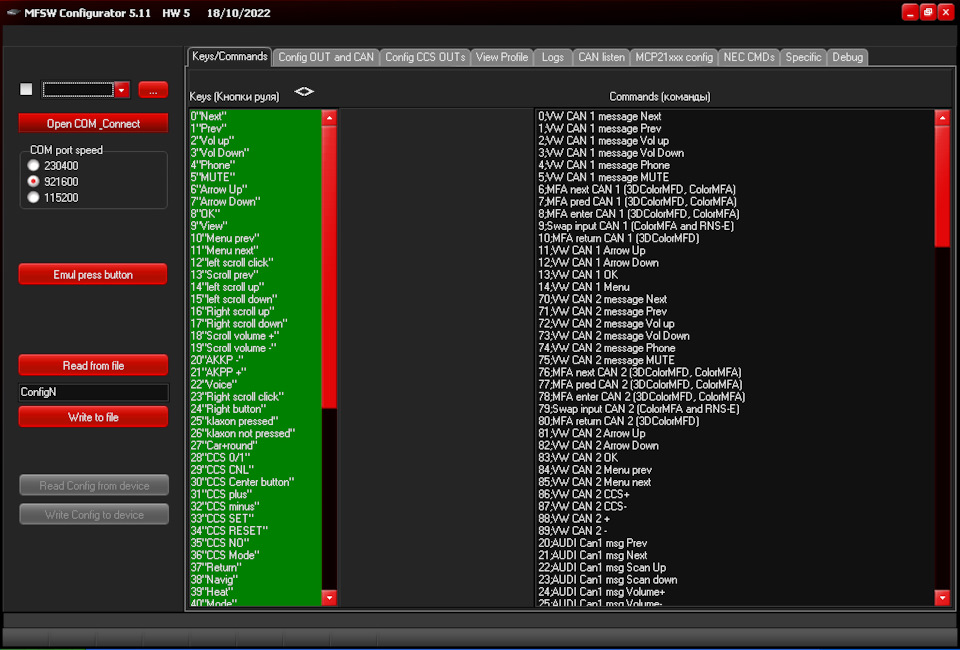
The number of the COM port may be different.
Then install the Adapter Configurator program. The program does not
require installation. Connect the cable (blue cord) on one side to
the adapter, on the other side to the laptop and run the Adapter
Configurator: |
|
| |
Номер COM порта может быть другим.
Затем устанавливаем программу Конфигуратор адаптера. Программа не
требует инсталляции. Подключаем кабель (синий шнурок) с одной
стороны к адаптеру, с другой – к ноутбуку и запускаем Конфигуратор
адаптера: |
|
| |
The cable must be connected before starting the program.
Select the COM port and press Open COM Connect: |
|
| |
Кабель необходимо подключить до запуска программы.
Выбираем COM порт и нажимаем Open COM Connect : |
|
| |
 |
|
| |
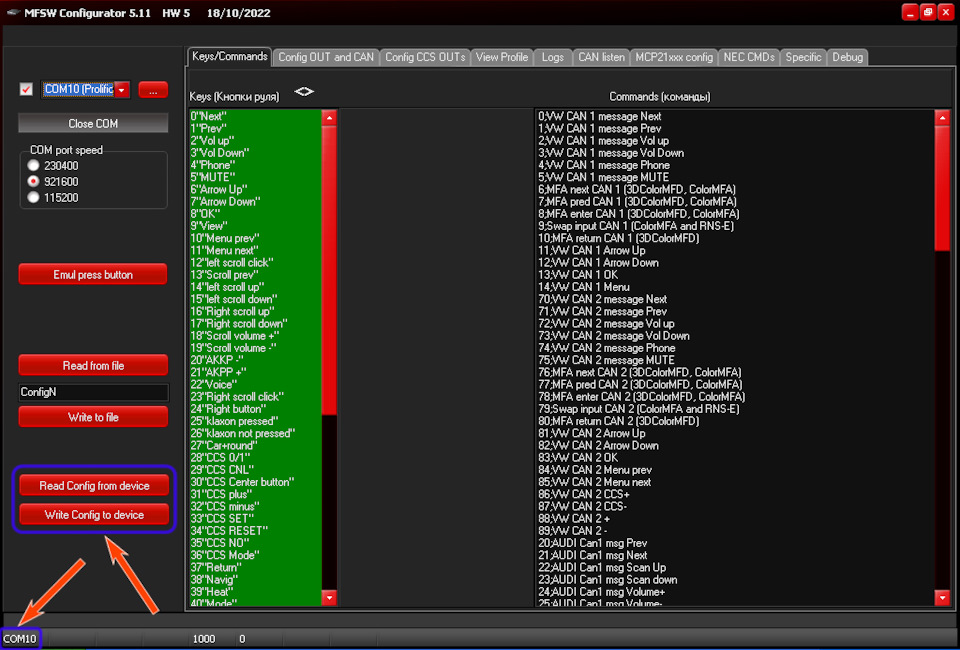
Buttons:
"Read Config from Adapter" ( Read Config from device ) and
"Write Config to device" buttons
become active, and in the lower left corner appears the number of
the selected COM port. |
|
| |
Кнопки:
«Чтение конфигурации из адаптера» ( Read Config from device ) и
«Запись конфигурации в адаптер» (Write Config to device)
становятся активными, а в левом нижнем углу появляется номер
выбранного COM порта. |
|
| |
Then you need to read the original configuration of the adapter and
save it to a file.
Press the Read Config from device button and in the lower left
corner the message "Config read" (Config rea d ) appears. |
|
| |
Затем нужно прочитать исходную конфигурацию адаптера и сохранить её
в файл.
Нажимаем кнопку Read Config from device и в левом нижнем углу
появляется надпись: «Конфигурация прочитана» (Config rea d ). |
|
| |
Next, enter a name (e.g., Initial Configuration) to save the initial
configuration to file and press the Write to file key.
If Config rea d does not appear, then something went wrong.
Important: you have to read the original configuration before you do
anything.
Then go to the second tab (Config Out&Can), where we check if the
rudder platform is set correctly: |
|
| |
Далее вводим имя (например, Исходная конфигурация) для сохранения
исходной конфигурации в файл и нажимаем клавишу Write to file.
Если надпись Config rea d не появилась, значит что-то пошло не так.
Важно: прежде чем что-либо делать — необходимо прочитать исходную
конфигурацию.
Далее переходим во вторую вкладку (Config Out&Can), где проверяем
правильность выставленной платформы руля: |
|
| |
 |
|
| |
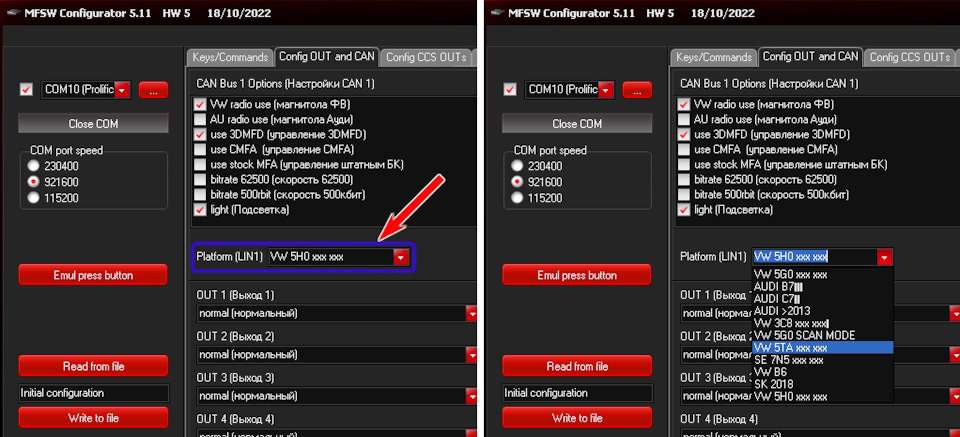
If necessary, change: select from the drop-down list the desired
type of steering wheel, controlled by the adapter and write it in
the adapter. My steering wheel is 5TA 419 091 AQ E74, and the
platform was 5H0. I didn't change it.
The adapter comes pre-flashed and pre-configured. When ordering you
specify the car, steering wheel and type of radio. So it is better
not to change anything without a special need. Especially as many of
the platforms do not differ much from each other (e.g. 5G0, 5H0 and
5TA). The difference is in one or two buttons and in the protocol of
the additional buttons for adaptive cruise control, which we should
not be interested in general. The main thing is that the adapter can
see the presses of all existing steering wheel buttons.
The list will be updated in the process of firmware development.
The types of supported steering wheels.
The first activation of the adapter and saving the initial
configuration to a file, it is desirable to make before installing
the adapter in the car (on the table). |
|
| |
При необходимости меняем: выбираем из выпадающего списка нужный тип
руля, управляемого адаптером и записываем в адаптер. У меня руль —
5TA 419 091 AQ E74, а платформа была — 5Н0. Менять не стал.
Адаптер приходит прошитый и предварительно настроенный. При заказе
Вы указываете автомобиль, тип руля и магнитолы. Так что без особой
необходимости лучше ничего не менять. Тем более, что многие
платформы мало чем отличаются друг от друга (например: 5G0, 5H0 и
5TA). Отличие заключается в одной-двух кнопках и в протоколе
дополнительных кнопок адаптивного круиз-контроля, что нас не должно
вообще интересовать. Главное, чтобы адаптер видел нажатие всех
существующих кнопок руля.
Список в процессе развития прошивки пополняется.
Типы поддерживаемых рулей.
Первое включение адаптера и сохранение исходной конфигурации в файл,
желательно произвести до установки адаптера в автомобиль (на столе). |
|
| |
 |
|
| |
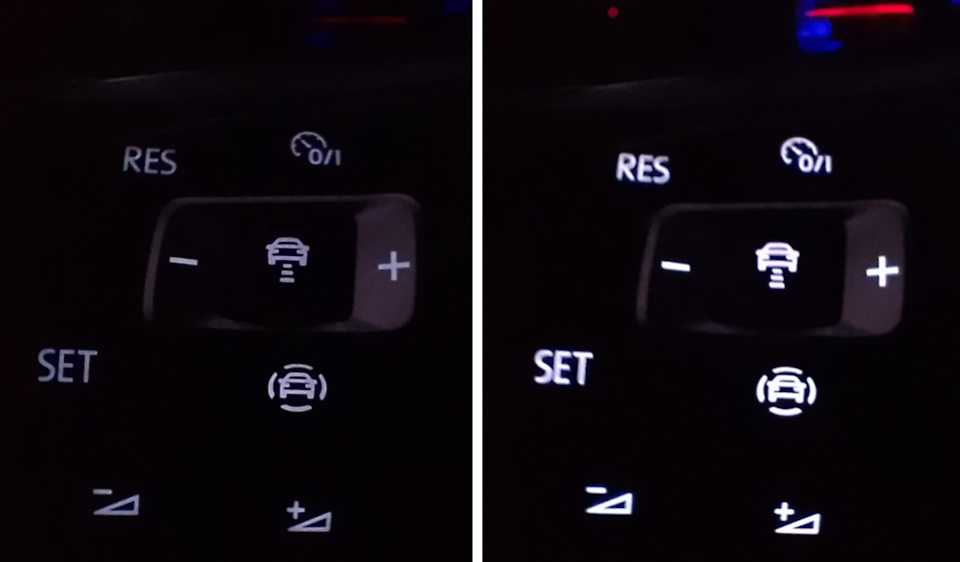
Since in this case the adapter will be without external power, it is
necessary to connect the red USB wire for a while.
Then install the adapter in the car. Connect the laptop, turn on the
ignition and lights. Rotate the wheel of the backlight regulator and
check the smooth change in the brightness of the steering wheel keys
backlight: |
|
| |
Так как в этом случае адаптер окажется без внешнего питания, то на
время необходимо подключить красный провод USB.
Затем устанавливаем адаптер в автомобиль. Подключаем ноутбук,
включаем зажигание и габариты. Вращаем колёсико регулятора подсветки
и проверяем плавное изменение яркости подсветки клавиш руля: |
|
| |
Then start the Adapter Configurator, select the desired COM port and
click Open COM Connect.
Go to the first tab (Keys/Commands).
In the left column is a list of possible buttons on the steering
wheel.
The right column contains a list of available commands that can be
linked to the button.
When you select a button, an additional panel appears in the central
part of the tab: |
|
| |
Затем запускаем программу Конфигуратор адаптера, выбираем нужный COM
порт и нажимаем Open COM Connect.
Переходим к первой вкладке (Keys/Commands).
В левом столбце находится список возможных кнопок на руле.
В правом столбце находится список доступных команд, которые можно
привязать к кнопке.
При выборе кнопки, в центральной части вкладки появится
дополнительная панель: |
|
| |
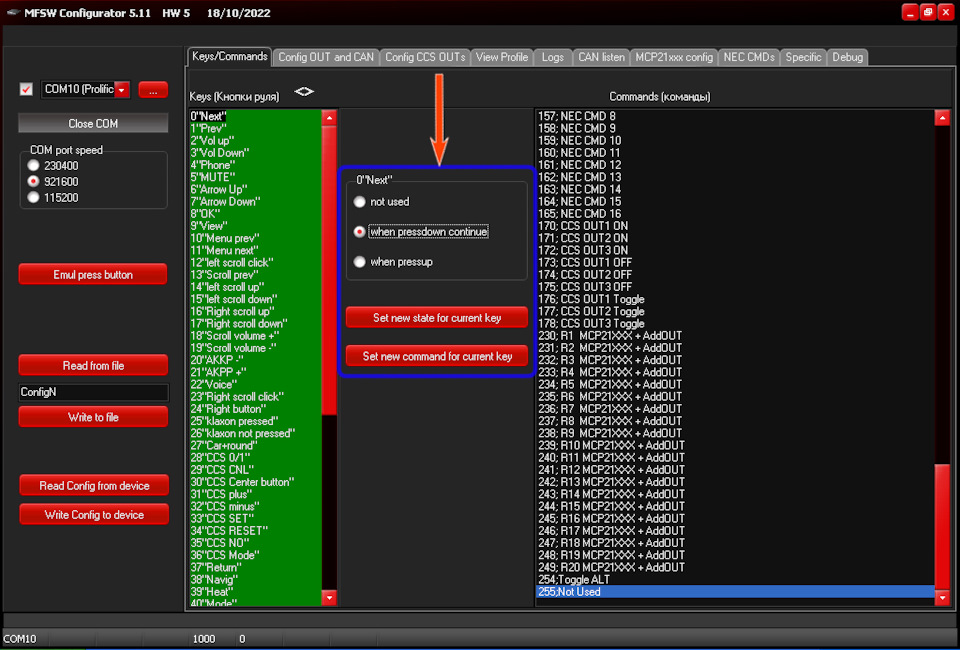
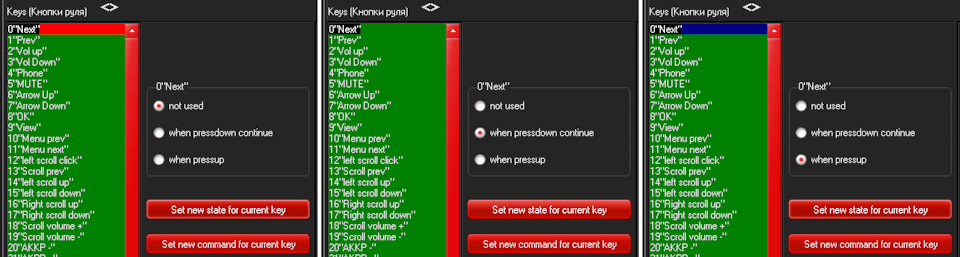
Button 0 "Next" is selected
with the number and name of the steering wheel button and the modes
of operation of the steering wheel buttons and keys:
Set new mode for current key (Set new state for current key) and
Set new command for current key (Set new command for current key) |
|
| |
Выбрана кнопка 0”Next”
с номером и названием кнопки руля и режимами работы кнопок руля и
клавишами:
Установить новый режим для текущей кнопки (Set new state for current key)
и
Установить новую команду для текущей
кнопки (Set new command for current key) |
|
| |
 |
|
| |
Button operation modes:
o not used - the button is forbidden, nothing happens when you press
it. It is highlighted in red.
o when pressdown continue - as long as the button is pressed with
the frequency of several times per second the command bound to this
button is executed. It is highlighted in green.
o when pressup - the command is executed once only when the button
is released. It is highlighted in blue.
This mode is recommended to enable/disable, for example, the
steering wheel heating or cruise control).
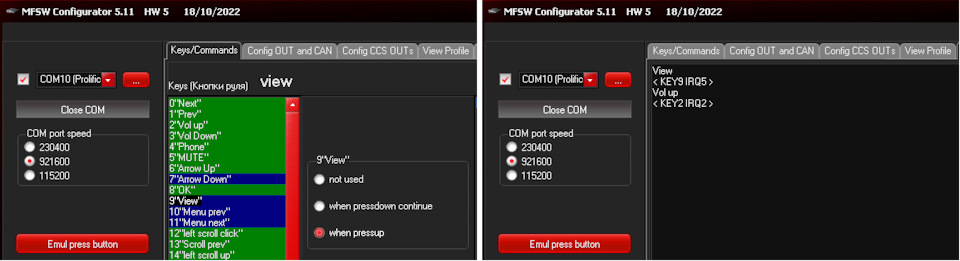
When you press any button on the steering wheel, at the top of the
left column (with a list of possible steering wheel buttons), the
name of this button appears. The Logs tab also displays all button
presses (button name and number), including repeated presses: |
|
| |
Режимы работы кнопок:
o not used — кнопка запрещена, при ее нажатии ничего не происходит.
Подсвечивается красным.
o when pressdown continue — пока кнопка нажата с частотой несколько
раз в секунду выполняется команда, привязанная к этой кнопке.
Подсвечивается зеленым.
o when pressup — команда выполниться однократно только при
отпускании кнопки. Подсвечивается синим.
Данный режим рекомендуется для включения/выключения, например,
обогрева руля или Круиз контроля).
При нажатии какой-либо кнопки на руле в верней части левого столбца
(со списком возможных кнопок на руле), появляется название этой
кнопки. Также во вкладке Logs отображаются все нажатия кнопки
(название и номер кнопки) в том числе и повторные: |
|
| |
 |
|
| |
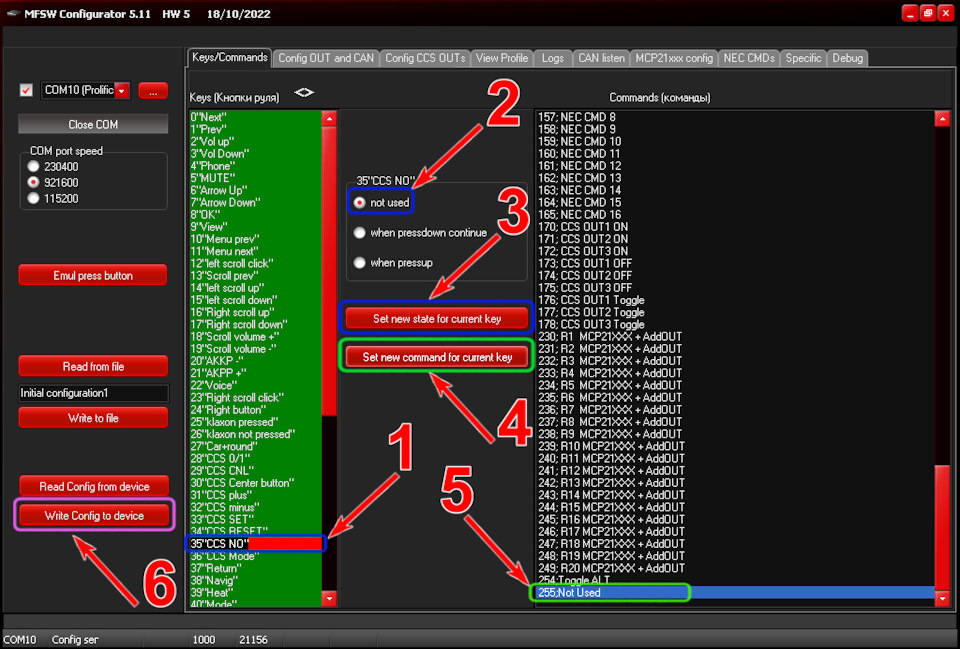
Sometimes the multifunction steering wheel control unit signals that
the steering wheel button (not existing) is pressed continuously and
the Logs tab cyclically displays (runs) this button. I had a button
36 "CCS Mode", with the steering wheel platform - 5G0 and a button
35 "CCS NO", with the steering wheel platform - 5H0, and with the
steering wheel platform - 5TA I have not worked out. This button
needs to be locked:
1. In the left column select this button (1),
2. set it to not used (2),
3. press Set new state for current key (3),
4. then in the right column select the command 255.Not Used (4),
5. press Set new command for current key (5)
6. Send (write) this configuration to the adapter by pressing Write
Config to device (writes the full configuration to the adapter) (6). |
|
| |
Иногда c блока управления многофункционального рулевого колеса идет
сигнал о постоянном нажатии кнопки руля (не существующей) и во
вкладке Logs циклично
отображается (бегает) эта кнопка. У
меня была кнопка 36“CCS Mode”, при установленной платформе руля
— 5G0 и кнопка
35“CCS NO”, при платформе руля — 5H0, а с платформой руля – 5TA
у меня отношения не сложились. Эту кнопку нужно заблокировать:
1. В левом столбце выбираем эту кнопку (1),
2. присваиваем ей значение not
used (2),
3. нажимаем Set
new state for current key (3),
4. далее в правом столбце выбираем команду 255.Not
Used (4),
5. нажимаем Set
new command for current key (5)
6. отправляем (записываем) эту конфигурацию в адаптер нажав клавишу Write
Config to device (записывает
полную конфигурацию в адаптер) (6). |
|
| |
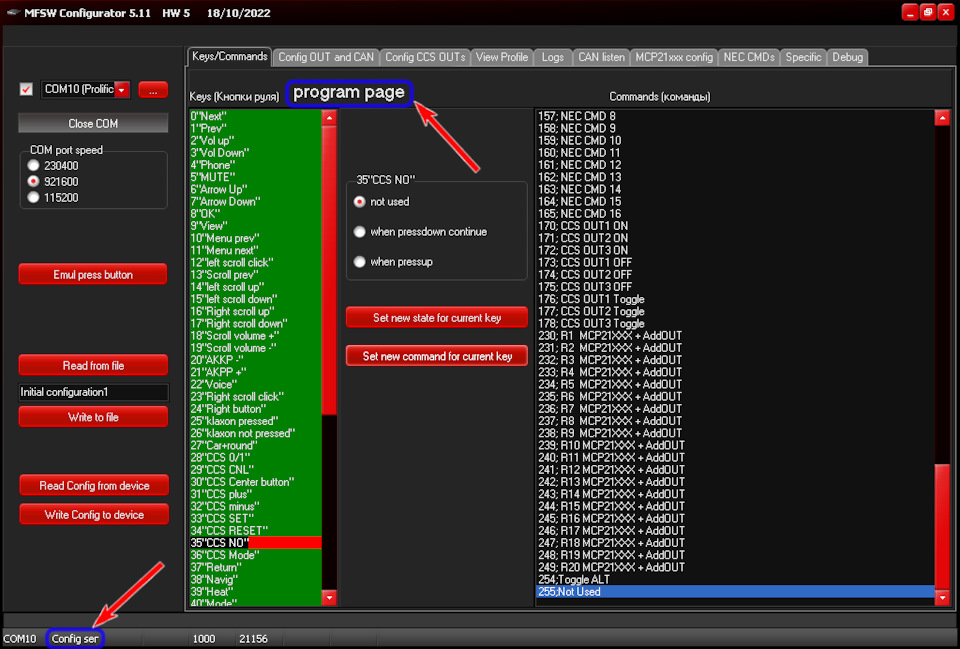
And in the lower left corner it says: "Config se nd sent" and at the
top it says: "program page". |
|
| |
И в левом нижнем углу появляется надпись: “Конфигурация отправлена”
(Config
se nd),
а сверху — “program
page” |
|
| |
It would not hurt at all to save this configuration to a file on
disk, as one of the original.
If the signal from the steering wheel button is constantly coming,
it is not always possible to block it simply, so go to the tab
Config Out&Can and temporarily change the steering wheel platform to
another (say, 5G0), so that the adapter did not see this button.
Save, reboot, lock the button, return the desired platform, save and
reboot (it worked for me without rebooting).
Or you could go another way - power off the multifunction steering
wheel control box, lock the desired button and save the
configuration, reload the adapter and power it up again.
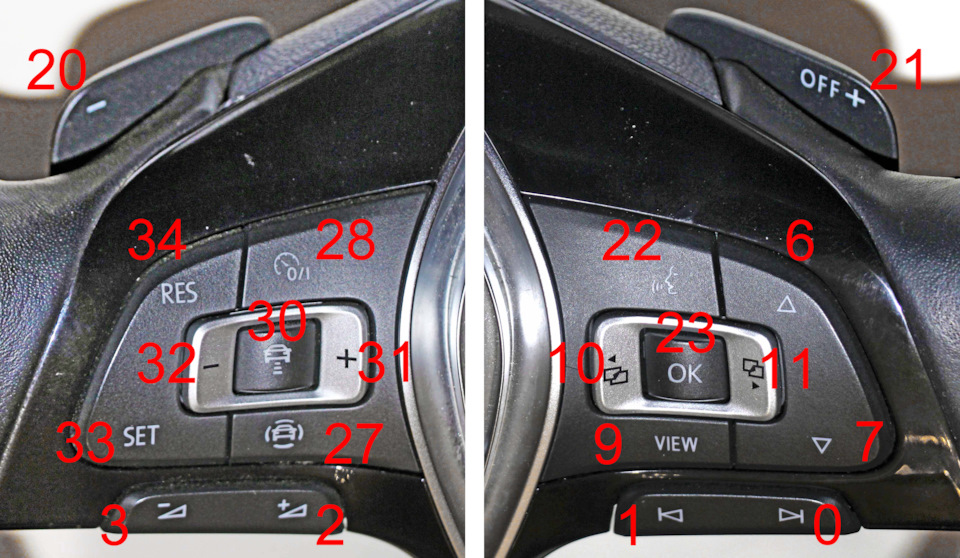
Then, one by one, we press all the available buttons on the steering
wheel and write down their numbers: |
|
| |
Совсем не помешает сохранить эту конфигурацию в файл на диск, как
одну из исходных.
При постоянно идущем сигнале от кнопки руля заблокировать её просто
так, не всегда удастся, поэтому переходим во вкладку Config
Out&Can и временно меняем платформу руля на другую (скажем
5G0), чтобы адаптер не видел этой кнопки. Сохраняем,
перезагружаем, блокируем кнопку, возвращаем нужную платформу,
сохраняем и перезагружаем (У
меня работало и без перезагрузки).
Или можно пойти другим путём – отключить питание блока управления
многофункционального рулевого колеса, заблокировать нужную кнопку и
сохранив конфигурацию, перезагрузить адаптер и снова подать питание.
Затем по очереди нажимаем все имеющиеся кнопки на руле и записываем
их номера: |
|
| |
And go critically rethink the information received (what commands
should be executed when you press the corresponding button).
After that we go to the settings of controlling the Android car
radio (in the next entry).
Have a nice trip and good roads! |
|
| |
И идём критически переосмысливать полученную информацию (какие
команды должны выполняться при нажатии на соответствующую кнопку).
После чего переходим к настройкам управления Андроид магнитолой (в
следующей записи).
Всем приятных поездок и хороших дорог! |
|
| |
Author / Автор статьи
Dimirty https://www.drive2.ru/l/637101568428091209/ |
|
|