| |
To connect the Android radio there are two options without can-bus
decoder you need to use kye1 wire. if the radio has a built-in
can-bus decoder or an external one you need to connect the can-bus
wires to this decoder. |
|
| |
Для подключения Андроид магнитолы
есть два варианта без can-bus decoder нужно
использовать провод kye1. если магнитола
имеет встроенный can-bus decoder или внешний
нужно подключить провода can-bus к этому
декодеру. |
|
| |
To do this, you need to contact the seller and clarify whether it
has a radio to support the original buttons on the steering wheel.
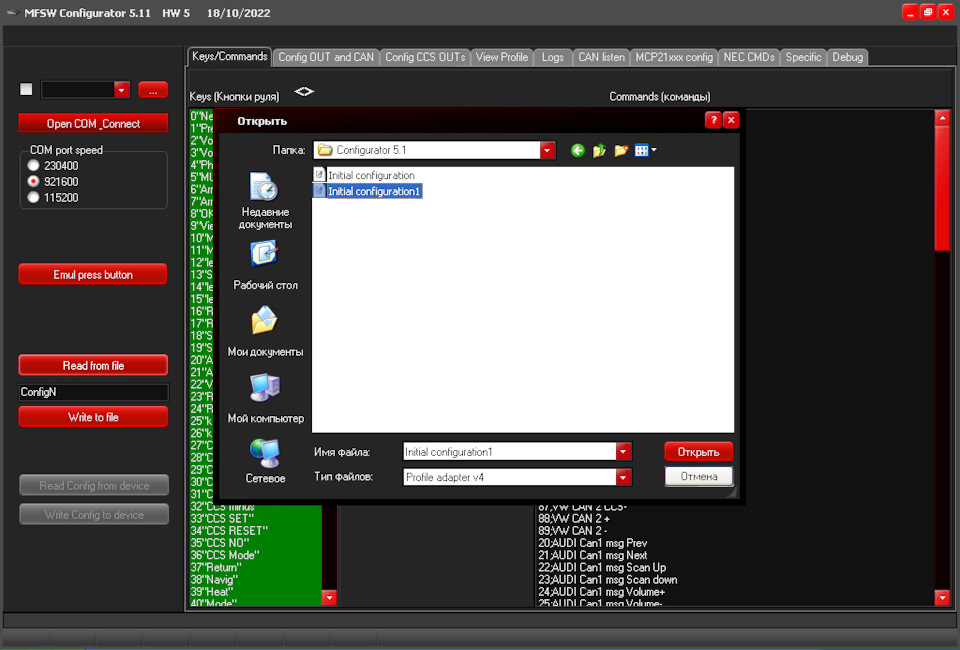
Run the program Adapter Configurator - file
Config_Lin-2-Can_v5_(RED)_5.12.exe . This program allows you to
generate a configuration file without connecting to the adapter and
then writing it to the adapter.
Read the previously saved original configuration file (press Read
from file and select the original configuration file plus the locked
button): |
|
| |
Для этого нужно связатся с продавцом и уточнить имеет ли это
радиоcanbus для поддержки оригинальных кнопок на рулевом колесе.
Запускаем программу Конфигуратор адаптера – файл
Config_Lin-2-Can_v5_(RED)_5.12.exe . Эта программа позволяет
сформировать файл конфигурации без соединения с адаптером и с его
последующей записью в адаптер.
Считываем, сохранённый ранее файл исходной конфигурации (нажимаем
Read from file и выбираем файл исходной конфигурации плюс
заблокированная кнопка): |
|
| |
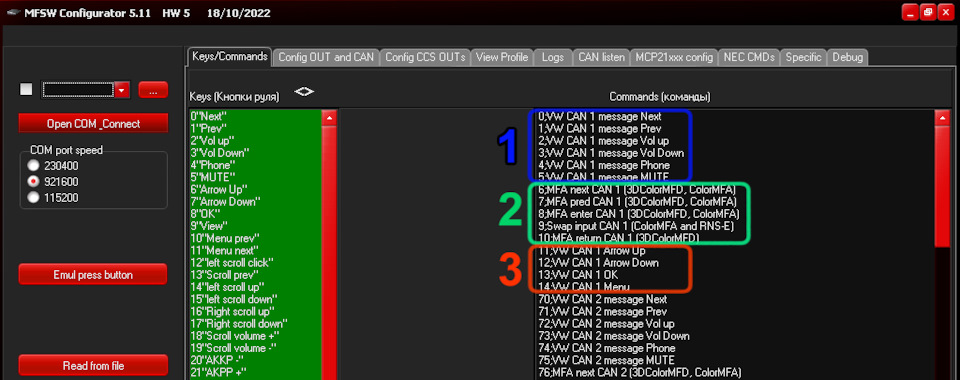
In the first tab (Keys/Commands) in the right column Commands there
are 15 standard VW commands for CAN1 bus control: |
|
| |
В первой вкладке (Keys/Commands)
в правом столбце Commands(команды) имеется
15 стандартных команд VW для управления по CAN1 шине: |
|
| |
 |
|
| |
Group 1 commands 0 - 5 - control of the car radio,
Group 2 commands 6 - 10 - on-board computer control,
Group 3 commands 11 - 14 - radio control
When you select a button, an additional panel appears in the central
part of the tab with the number and name of the steering wheel
button and the modes of operation of the steering wheel buttons and
keys:
Set new state for current key and
Set new command for current key (Set new command for current key) |
|
| |
Группа 1 команды 0 – 5 – управление магнитолой,
Группа 2 команды 6 – 10 – управление бортовым компьютером,
Группа 3 команды 11 – 14 – управление магнитолой
При выборе кнопки, в центральной части вкладки появится
дополнительная панель с номером и названием кнопки руля и режимами
работы кнопок руля и клавишами:
Установить
новый режим для текущей кнопки (Set new state for current key) и
Установить
новую команду для текущей кнопки (Set new command for current
key) |
|
| |
 |
|
| |
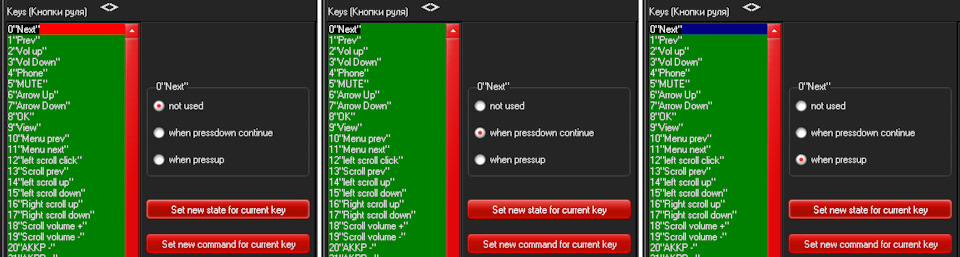
Button operation modes:
o not used - the button is forbidden, nothing happens when you press
it. It is highlighted in red.
o when pressdown continue - as long as the button is pressed with
the frequency of several times per second the command bound to this
button is executed. It is highlighted in green.
o when pressup - the command is executed once only when the button
is released. It is highlighted in blue.
This mode is recommended to enable/disable, for example, the
steering wheel heating or cruise control.
Let's move on to the assignment of the steering wheel buttons: |
|
| |
o not
used — кнопка запрещена, при ее нажатии ничего не происходит.
Подсвечивается красным.
o when
pressdown continue — пока кнопка нажата с частотой несколько
раз в секунду выполняется команда, привязанная к этой кнопке.
Подсвечивается зеленым.
o when
pressup — команда выполниться однократно только при
отпускании кнопки. Подсвечивается синим.
Данный режим рекомендуется для включения/выключения, например,
обогрева руля или Круиз контроля.
Переходим к назначению кнопок руля: |
|
| |
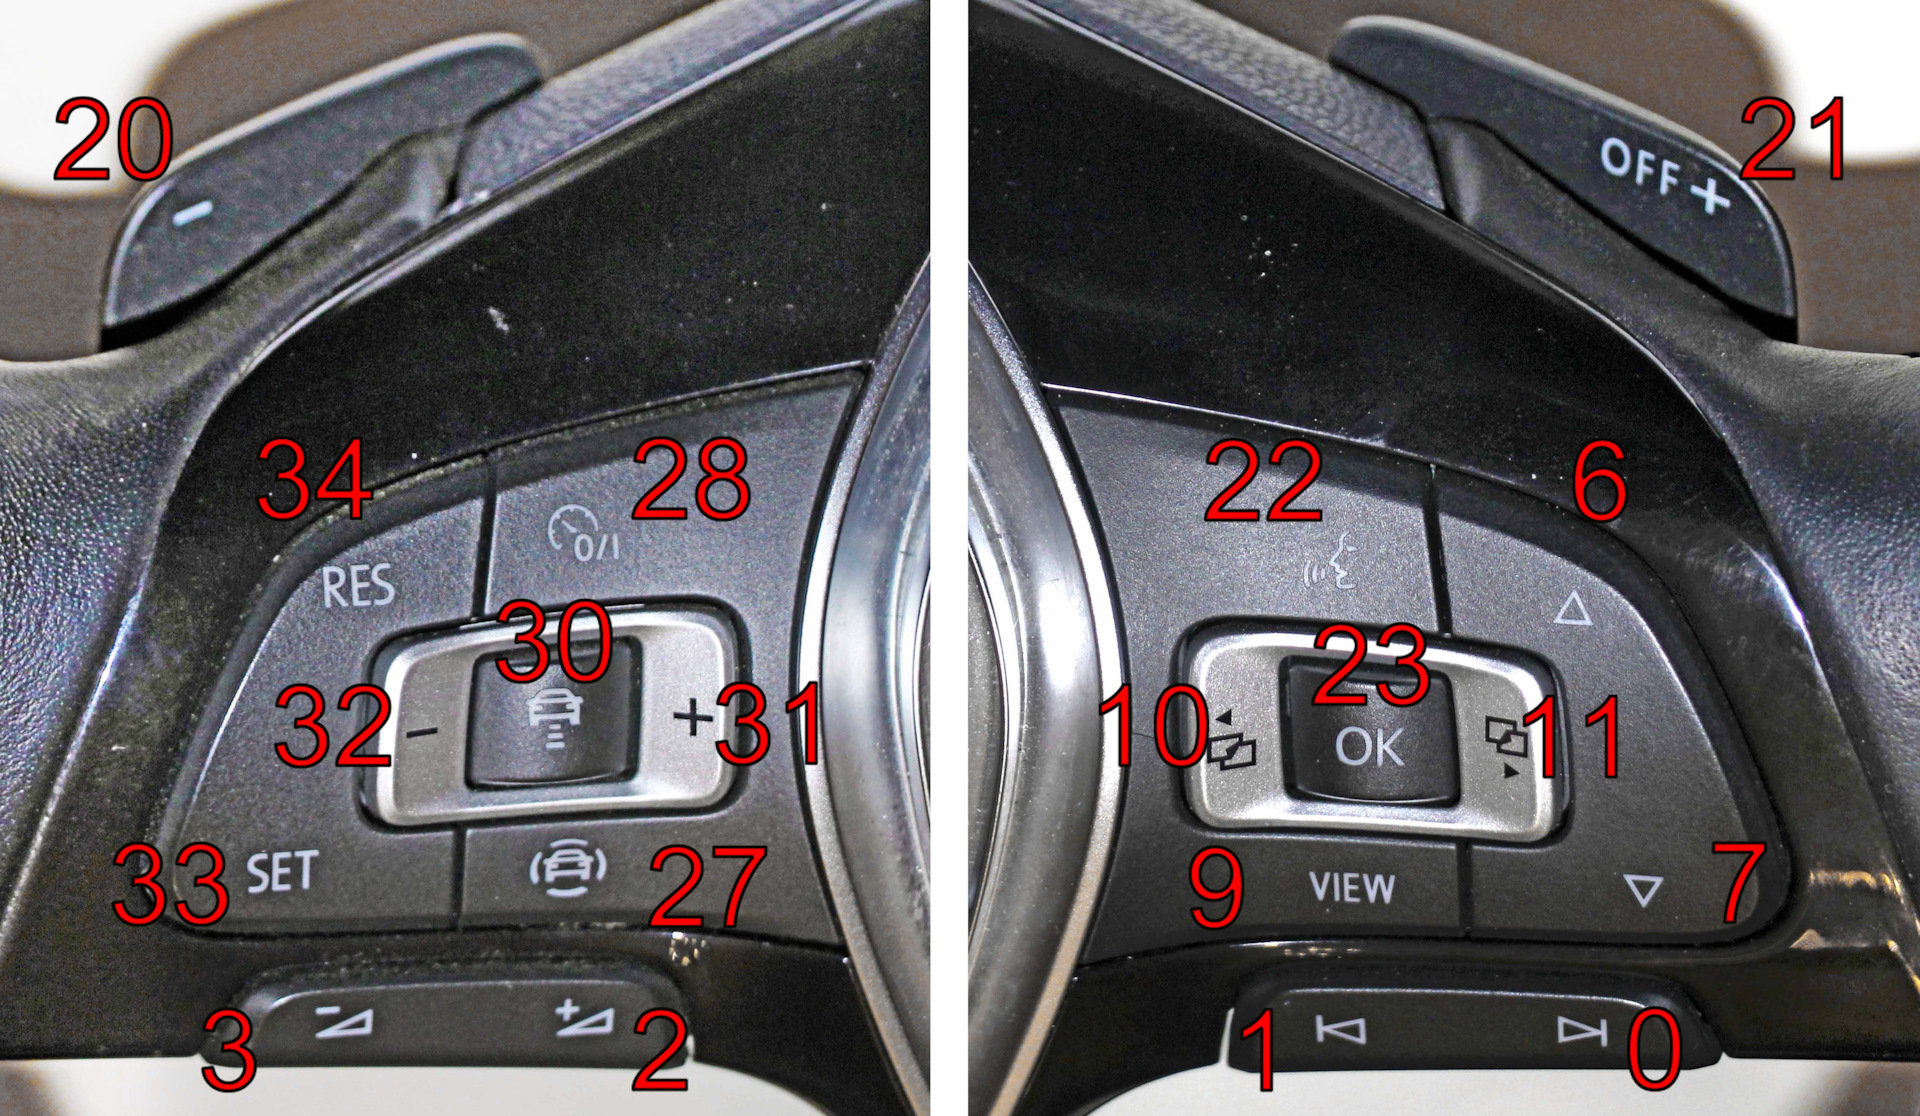
Steering wheel buttons
1. Select the steering wheel button 0 "Next".
2. Set it to when pressdown continue
Press Set new state for current key
4. Assign the command - 0.VW CAN1 message Next
5. Press Set new command for current key
Repeat these operations for the buttons: 1, 2, 3, 9, 22, but for the
buttons 9 (silent) and 22 (telephone) select the mode - when pressup. |
|
| |
1. Выбираем кнопку руля 0”Next”
2. Присваиваем ей значение when
pressdown continue
3. Нажимаем Set
new state for current key
4. Присваиваем команду — 0.VW
CAN1 message Next
5. Нажимаем Set
new command for current key
Повторяем эти операции для кнопок: 1, 2, 3, 9, 22, но для кнопок 9 (тихо)
и 22 (телефон) выбираем режим — when
pressup. |
|
| |
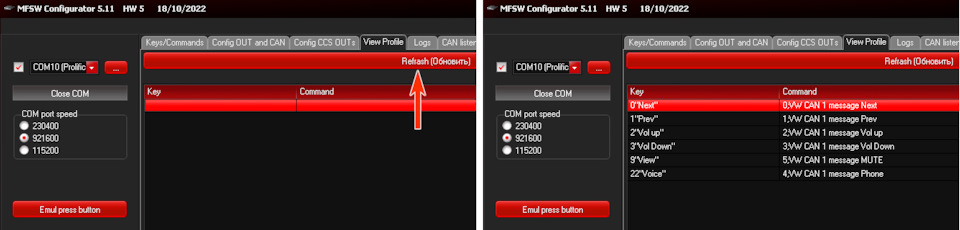
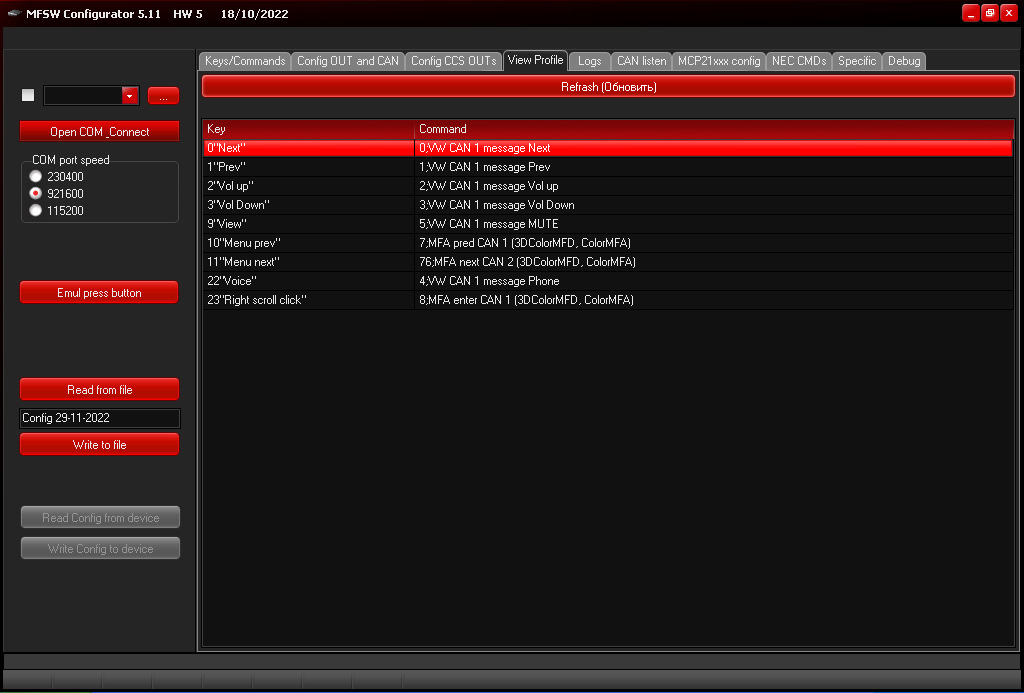
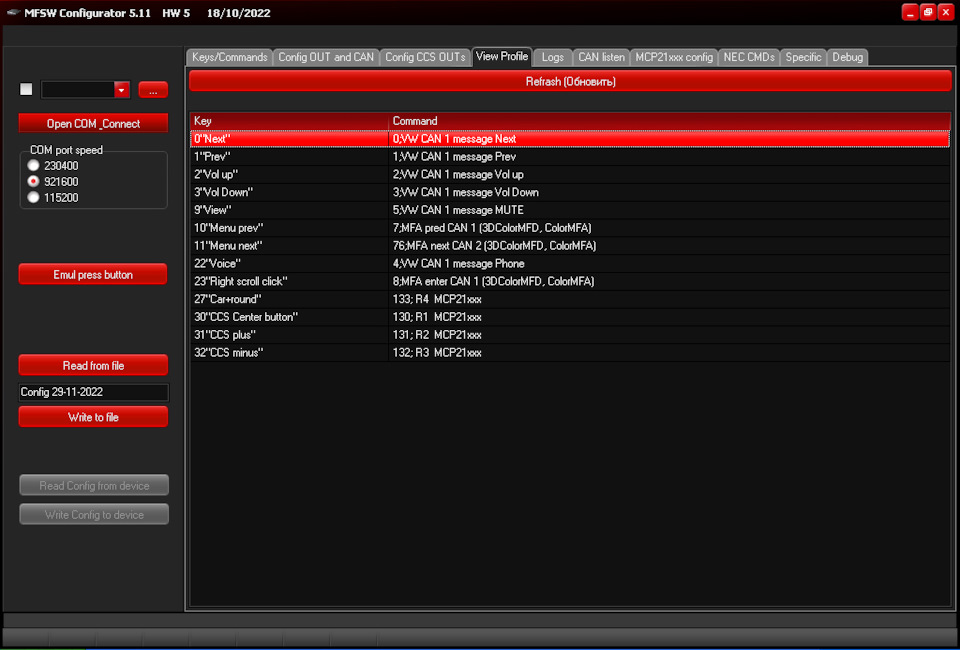
Go to the View Profile tab and click Refresh to view the generated
(current) configuration: |
|
| |
Переходим во вкладку View
Profile и
нажимаем Refresh
(Обновить),
чтобы просмотреть сформированную (текущую) конфигурацию: |
|
| |
Next are the commands to control the On-Board Computer:
If desired, assign them, for example, to the following steering
wheel buttons:
10 → 7;MFA pred CAN 1 (3DColorMFD, ColorMFA)
11 → 6;MFA next CAN 1 (3DColorMFD, ColorMFA)
23 → 8;MFA enter CAN 1 (3DColorMFD, ColorMFA)
For the command 8;MFA enter CAN we select the mode - when pressup,
because 3DColorMFD perceives a long press of the Reset (Enter) key.
These three commands correspond to the keys of the steering wheel
switch. |
|
| |
Дальше идут команды управления Бортовым
компьютером:
При желании назначаем их, например, следующим кнопкам руля:
10 → 7;MFA
pred CAN 1 (3DColorMFD, ColorMFA)
11 → 6;MFA
next CAN 1 (3DColorMFD, ColorMFA)
23 → 8;MFA
enter CAN 1 (3DColorMFD, ColorMFA)
Для команды 8;MFA
enter CAN выбираем режим — when
pressup, т.к. 3DColorMFD воспринимает
длинное нажатие клавиши Reset
(Enter). Эти три команды соответствуют клавишам подрулевого
переключателя. |
|
| |
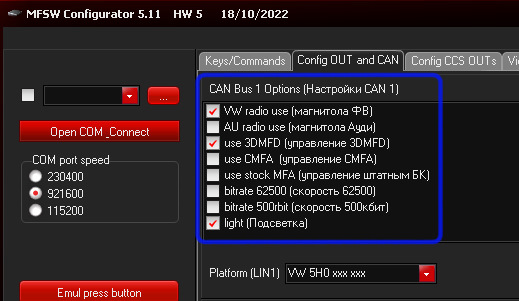
Add the key to be locked, if it has not been added earlier to the
initial configuration file.
Go to the second tab (Config Out&Can) and in CAN Bus 1 Options
activate the following items:
- VW radio use
- use 3DMFD
- light
and save this configuration to file. And then send (write) it to the
adapter.
Note: items
- bitrate 62500
- bitrate 500kbit (bitrate 500kbit)
should not be activated for MK4 (with unchecked speed will be 100
kbit/s) |
|
| |
Добавляем клавишу, которую нужно заблокировать, если она не была
добавлена ранее в файл исходной конфигурации.
Переходим во вторую вкладку (Config
Out&Can) и в CAN
Bus 1 Options (Настройки
CAN 1) активируем следующие пункты:
• VW
radio use (магнитола ФВ)
• use
3DMFD (управление 3DMFD)
• light (Подсветка)
и сохраняем эту конфигурацию в файл. И далее отправляем (записываем)
её в адаптер.
Примечание: пункты
• bitrate 62500 (скорость 62500)
• bitrate 500rbit (скорость 500кбит)
не должны быть активированы для МК4 (при снятых галочках скорость
будет 100 кбит/с) |
|
| |
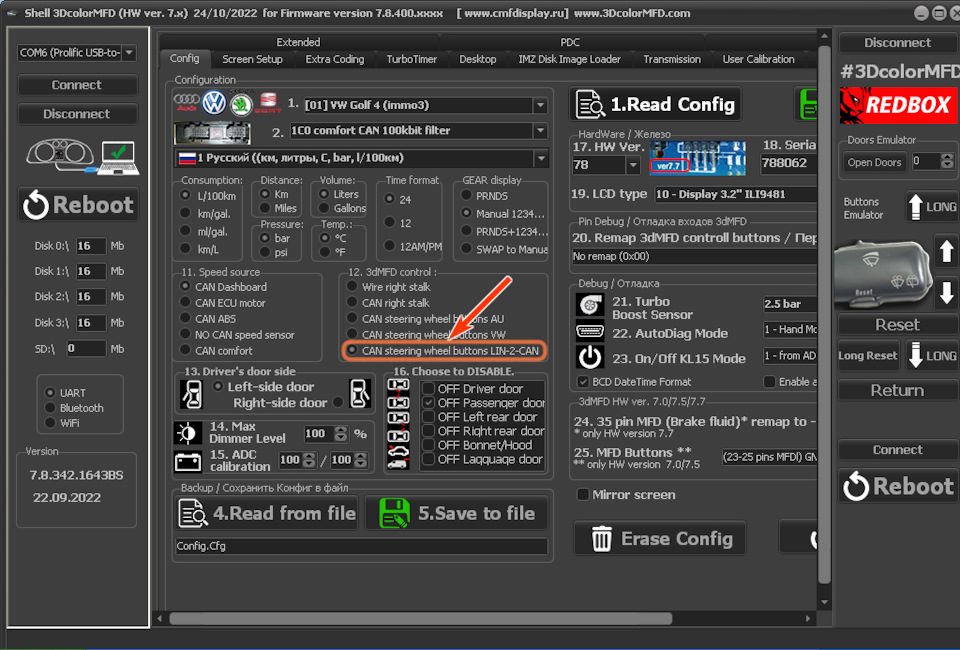
Then connect the laptop to 3DColorMFD , go to the Config tab and in
the group
12. 3dMFD Control activate the item CAN steering wheel buttons
LIN-2-CAN. |
|
| |
Затем подключаем ноутбук к 3DColorMFD ,
идём во вкладку Config и
в группе
12. 3dMFD Control активируем
пункт CAN
steering wheel buttons LIN-2-CAN . |
|
| |
That's it. The head unit should immediately start receiving
commands. There is no need to teach the steering wheel buttons. The
steering column switch buttons continue to work as well.
The commands of group 3:
11, VW CAN 1 Arrow Up
12;VW CAN 1 Arrow Down
13;VW CAN 1 OK
14;VW CAN 1 Menu
My head unit (or its CAN module) refused to accept these commands or
not as I would like it, but I did not really try to figure it out.
That's it! ?So little?
Is it? I decided to check.
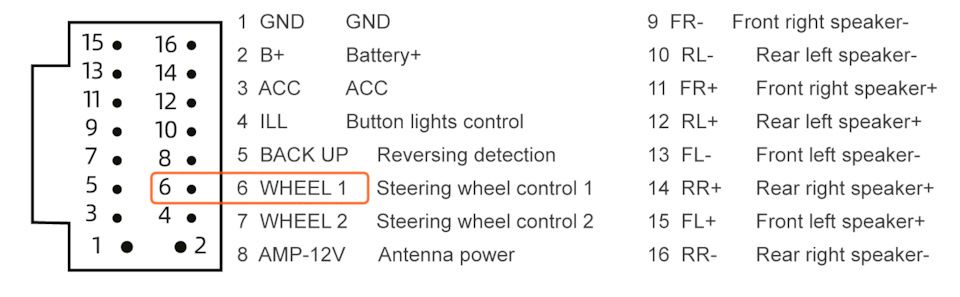
I added a missing wire KEY1 with a contact in the jack of the
boombox. |
|
| |
Всё. Магнитола должна сразу начать воспринимать команды. Обучение
кнопок руля не требуется. Клавиши подрулевого переключателя также
продолжают работать.
Команды группы
3:
11, VW CAN 1 Arrow Up
12;VW CAN 1 Arrow Down
13;VW CAN 1 OK
14;VW CAN 1 Menu
Моя магнитола (или её CAN модуль) отказалась воспринимать эти
команды или воспринимала не так как хотелось бы, но я и не особо
старался разобраться с этим.
И это всё! ?
Так мало?
Так ли это? Решил проверить.
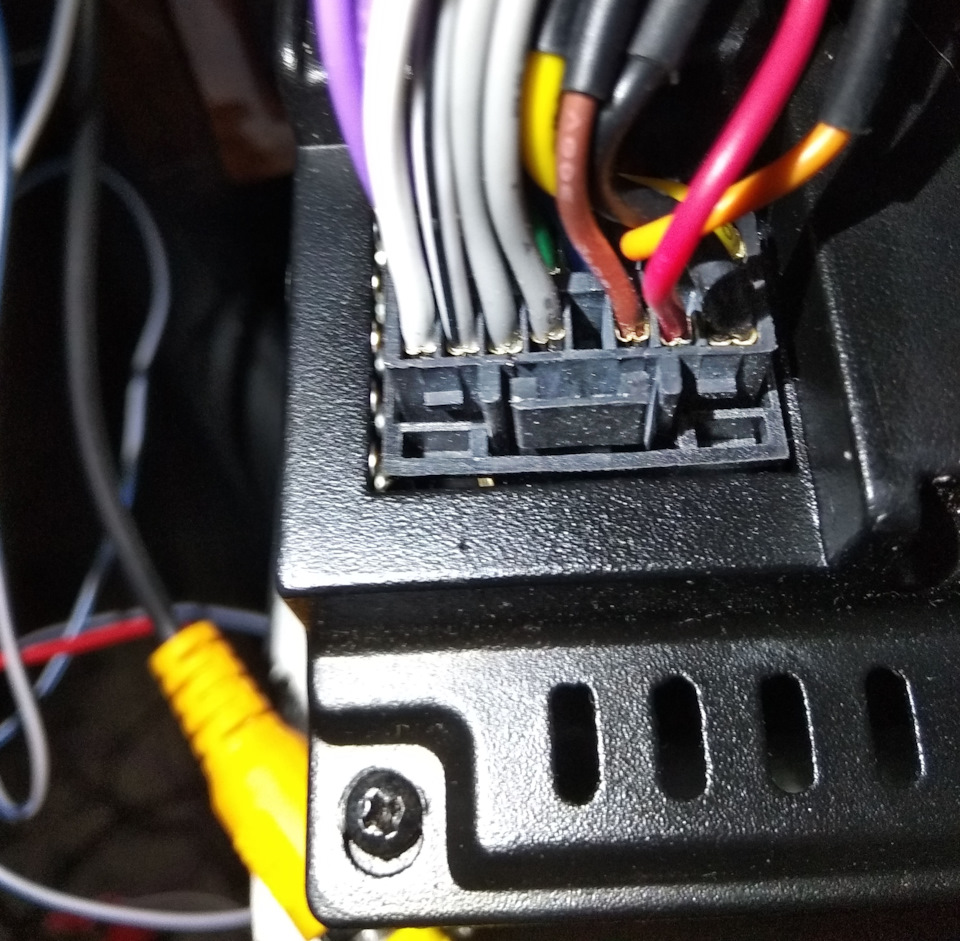
В разъём магнитолы добавил не достающий провод KEY1 с
контактом.
|
|
| |
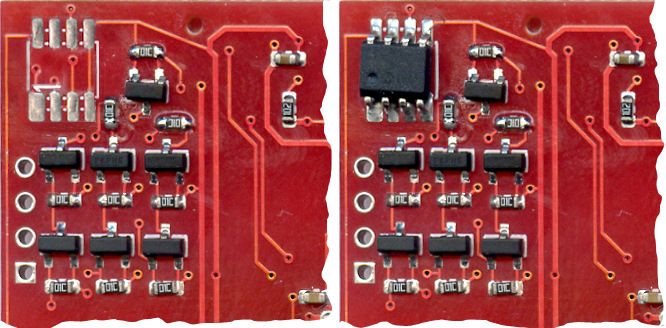
And I connected it to the output of the Ra adapter.
I added the missing digital potentiometer chip to the adapter board,
because I ordered an adapter with only CAN bus control: |
|
| |
И соединил его с выходом Ra адаптера.
На плату адаптера добавил недостающую микросхему цифрового
потенциометра, т.к. я заказывал адаптер с управлением только по CAN
шине: |
|
| |
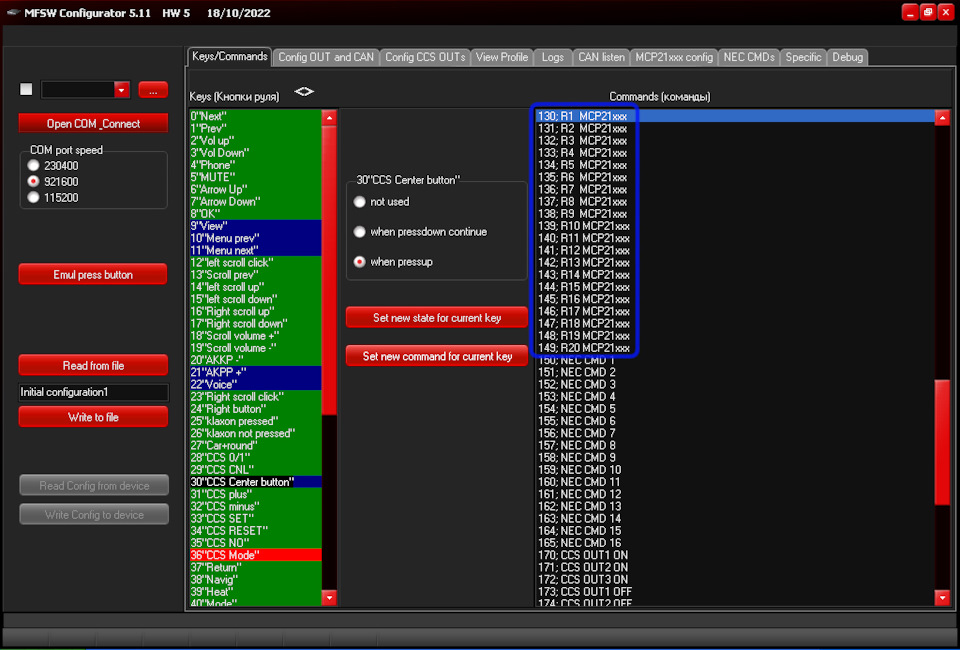
In the first tab (Keys/Commands) in the right column Commands there
are 20 commands of the digital potentiometer: |
|
| |
В первой вкладке (Keys/Commands)
в правом столбце Commands(команды) имеется
20 команд цифрового потенциометра: |
|
| |
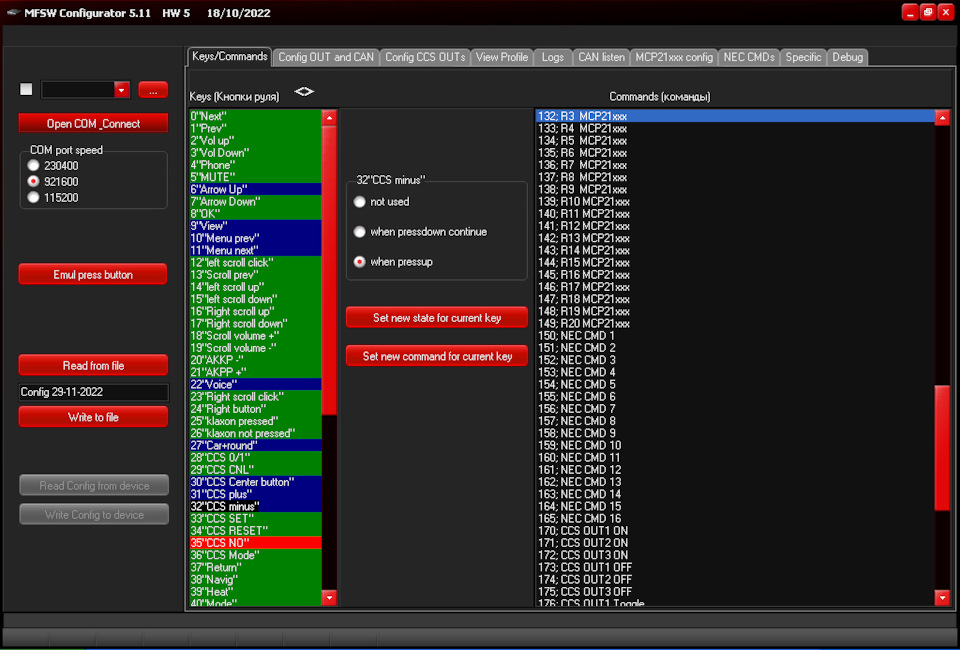
Now let's move on to the assignment of the other buttons to the
resistance ratings:
1. Select the next rudder button, for example - 30 "CSS Center
button".
2. Set it to when pressup.
Press Set new state for current key
4. Assign the command - 130; R1 MCP21xxx
5. Press Set new command for current key
In total you can set up to 20 different resistance values. |
|
| |
Ну а теперь переходим к назначению остальным кнопкам номиналов
сопротивлений:
1. Выбираем следующую кнопку руля, например — 30”CSS
Center button”
2. Присваиваем ей значение when
pressup
3. Нажимаем Set
new state for current key
4. Присваиваем команду — 130;
R1 MCP21xxx
5. Нажимаем Set
new command for current key
Всего можно установить до 20 различных номиналов сопротивлений. |
|
| |
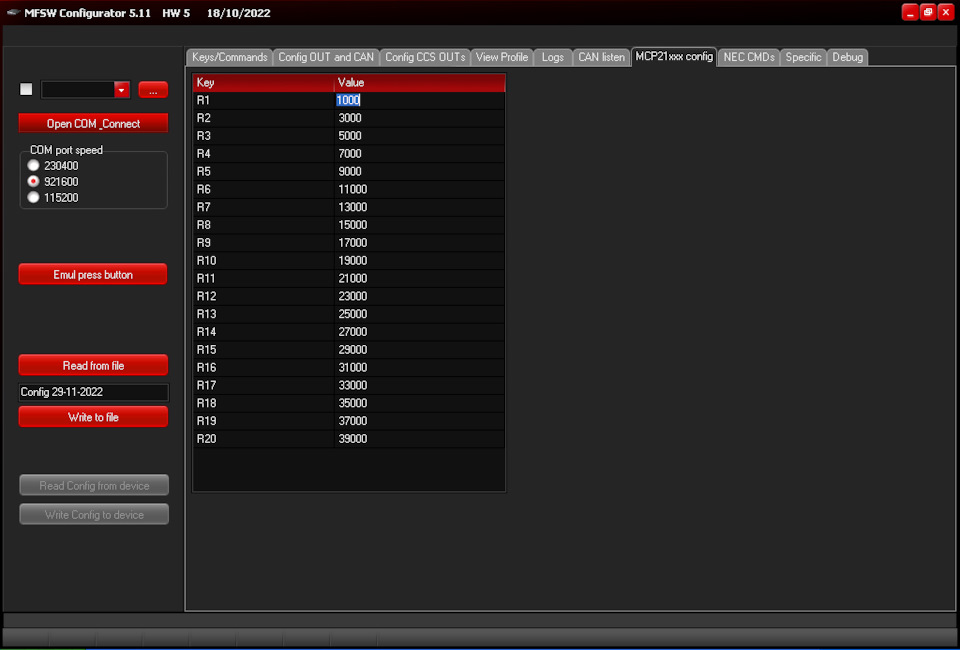
Go to the MCP21xxx config tab to set the digital potentiometer.
Assign R1 to 1000 Ohm (1kOhm) and then to 2000 Ohm:
3000, 5000...
The maximum resistance value must not exceed 50 kOhm. |
|
| |
Переходим во вкладку MCP21xxx
config для
настройки цифрового потенциометра. Присваиваем R1 значение 1000 Ом
(1кОм) и далее через 2000 Ом:
3000, 5000…
Максимальное значение сопротивления не должно превышать 50 кОм. |
|
| |
Assign the remaining steering wheel buttons and paddles.
Save the configuration to a file on the laptop and write it to the
adapter.
Check - everything works (the radio sees the "resistive" steering
wheel buttons). Teach the steering wheel buttons on the head unit
and enjoy.
The commands of the third group are not needed anymore.
Note: I had a much simpler and older android boombox which accepted
commands via CAN bus. |
|
| |
Назначаем оставшиеся кнопки руля и лепестки.
Сохраняем конфигурацию в файл на диск ноутбука и записываем в
адаптер.
Проверяем – всё работает (магнитола видит нажатия “резистивных” кнопок
руля). Проводим обучение кнопок руля на магнитоле и наслаждаемся.
И команды третьей группы вроде как уже и не нужны.
Примечание: команды по CAN шине у меня воспринимала значительно
более простая и старая андроид магнитола. |
|
| |
Author / Автор статьи
Dimirty https://www.drive2.ru/l/637494643835021400/ |
|
|