| |
If the steering wheel is heated, it is necessary to use it. I never
wanted to install the steering wheel heating, and I considered it as
a very dubious thing, and I connected it on the basis of the
opinion: if it's there, then it's necessary to use it. But it turned
out that I was very mistaken: the steering wheel heating is a very
pleasant and comfortable thing.
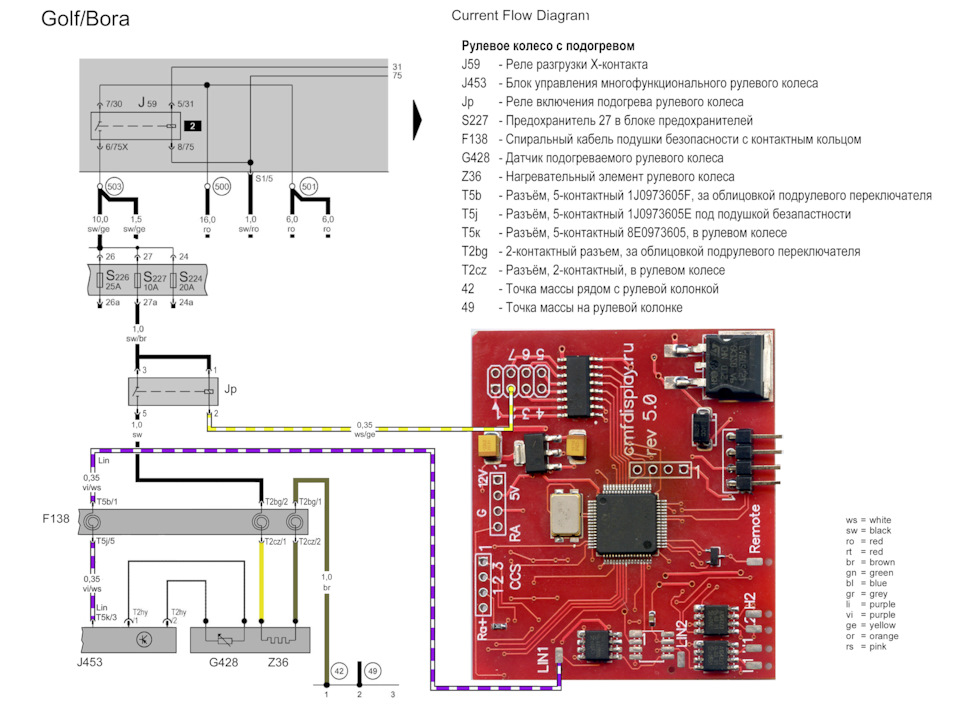
The steering wheel from the MQB platform has a built-in heating
element (Z36) and heated steering wheel temperature sensor (G428),
connected to the control unit of the multifunction steering wheel.
Resistance of the heating element winding in cold state is about 2.5
Ohm, i.e. at maximum voltage of 14.5V on-board network, the current
will be about 6A (5.8A).
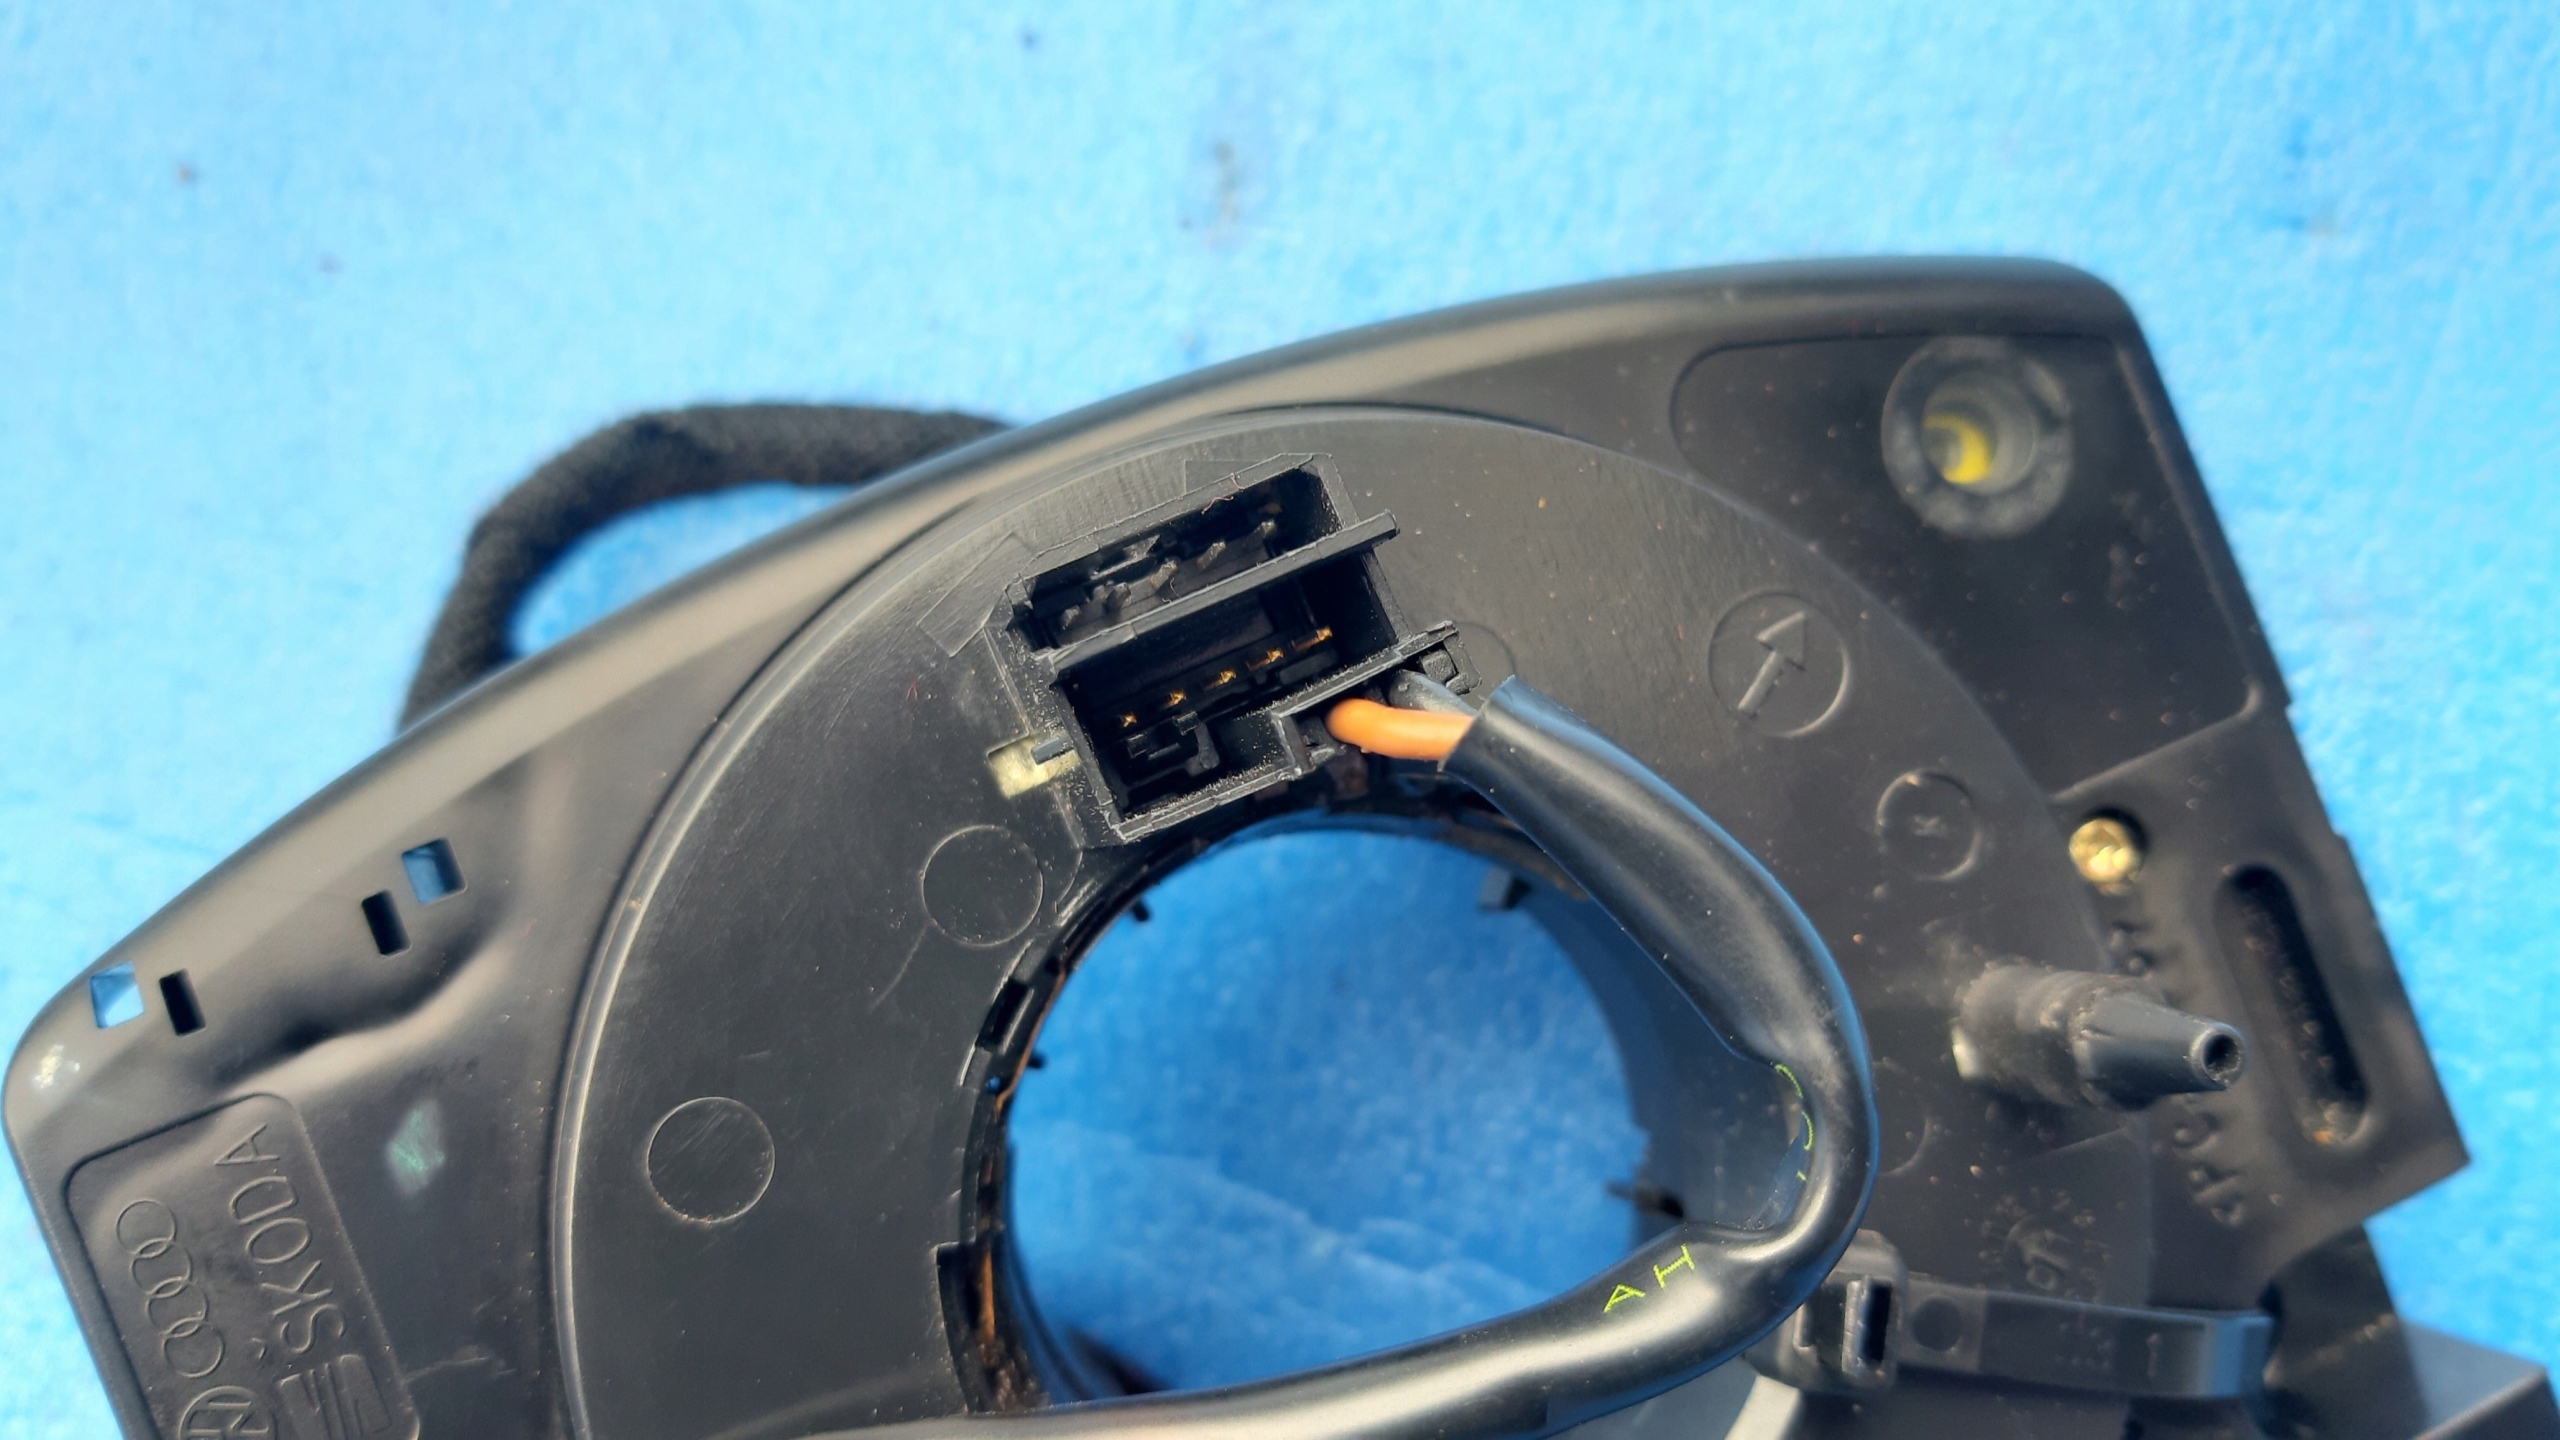
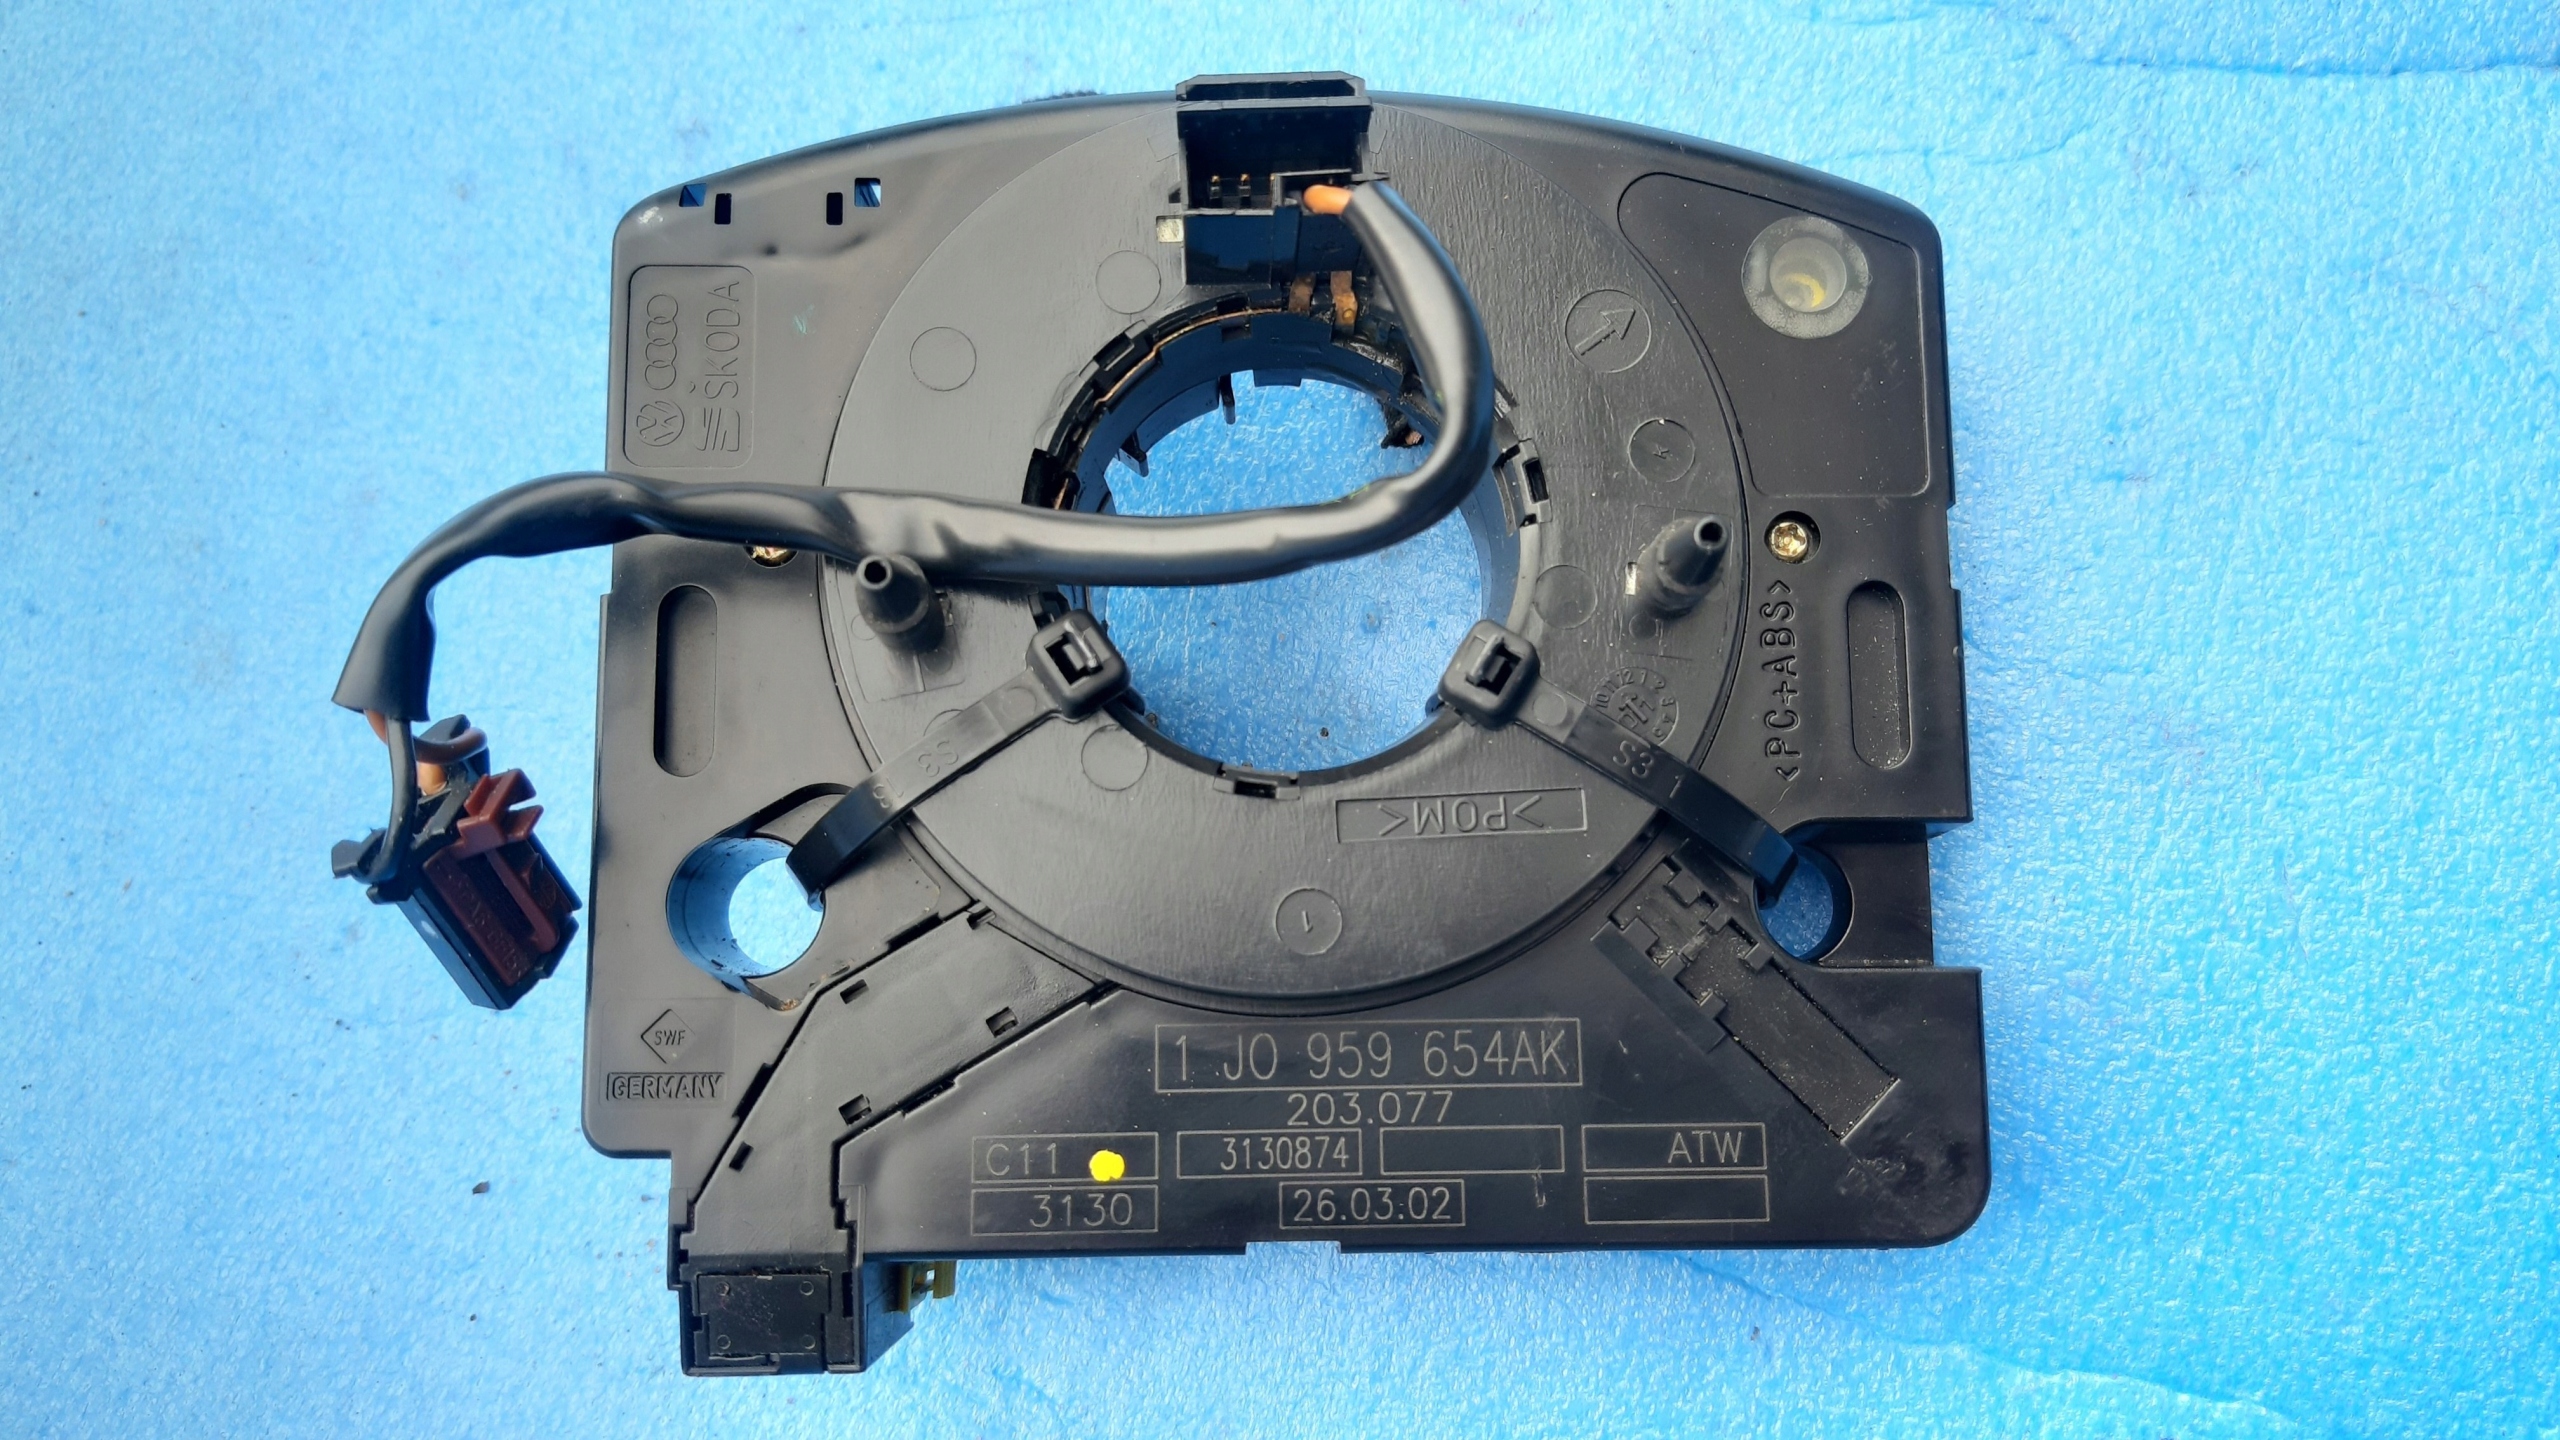
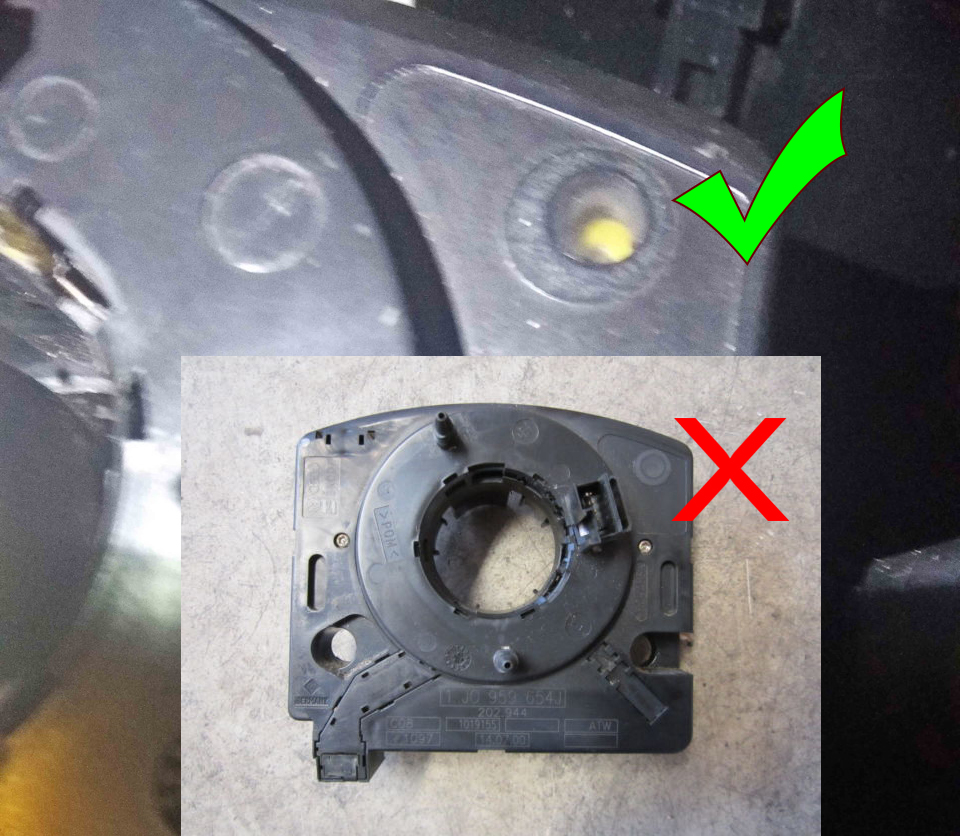
To heat the steering wheel, you need to use a special steering wheel
control loop with a coiled power cable designed for steering wheel
heating -
1J0 959 654 AL
1J0959654AK
1J0959654Q |
|
| |
Раз руль имеет подогрев, то нужно его использовать. Никогда не
стремился к установке подогрева руля, да и считал его весьма
сомнительной вещью, а подключил исходя из соображений: раз есть, то
нужно использовать. Но оказалось, что сильно ошибался: подогрев руля
– весьма приятная и комфортная штучка.
Руль от платформы MQB имеет встроенные нагревательный элемент (Z36)
и датчик температуры подогреваемого рулевого колеса (G428),
соединенный с блоком управления многофункциональным рулевым колесом.
Сопротивление обмотки нагревательного элемента в холодном состоянии
порядка 2,5 Ом, т.е при максимальном напряжении бортовой сети 14,5В
ток будет порядка 6А (5,8А).
Для подогрева руля нужно использовать специальный подрулевой шлейф с
силовым спиральным кабелем, рассчитанным на подогрев руля —
1J0 959 654 AL
1J0959654AK
1J0959654Q |
|
| |
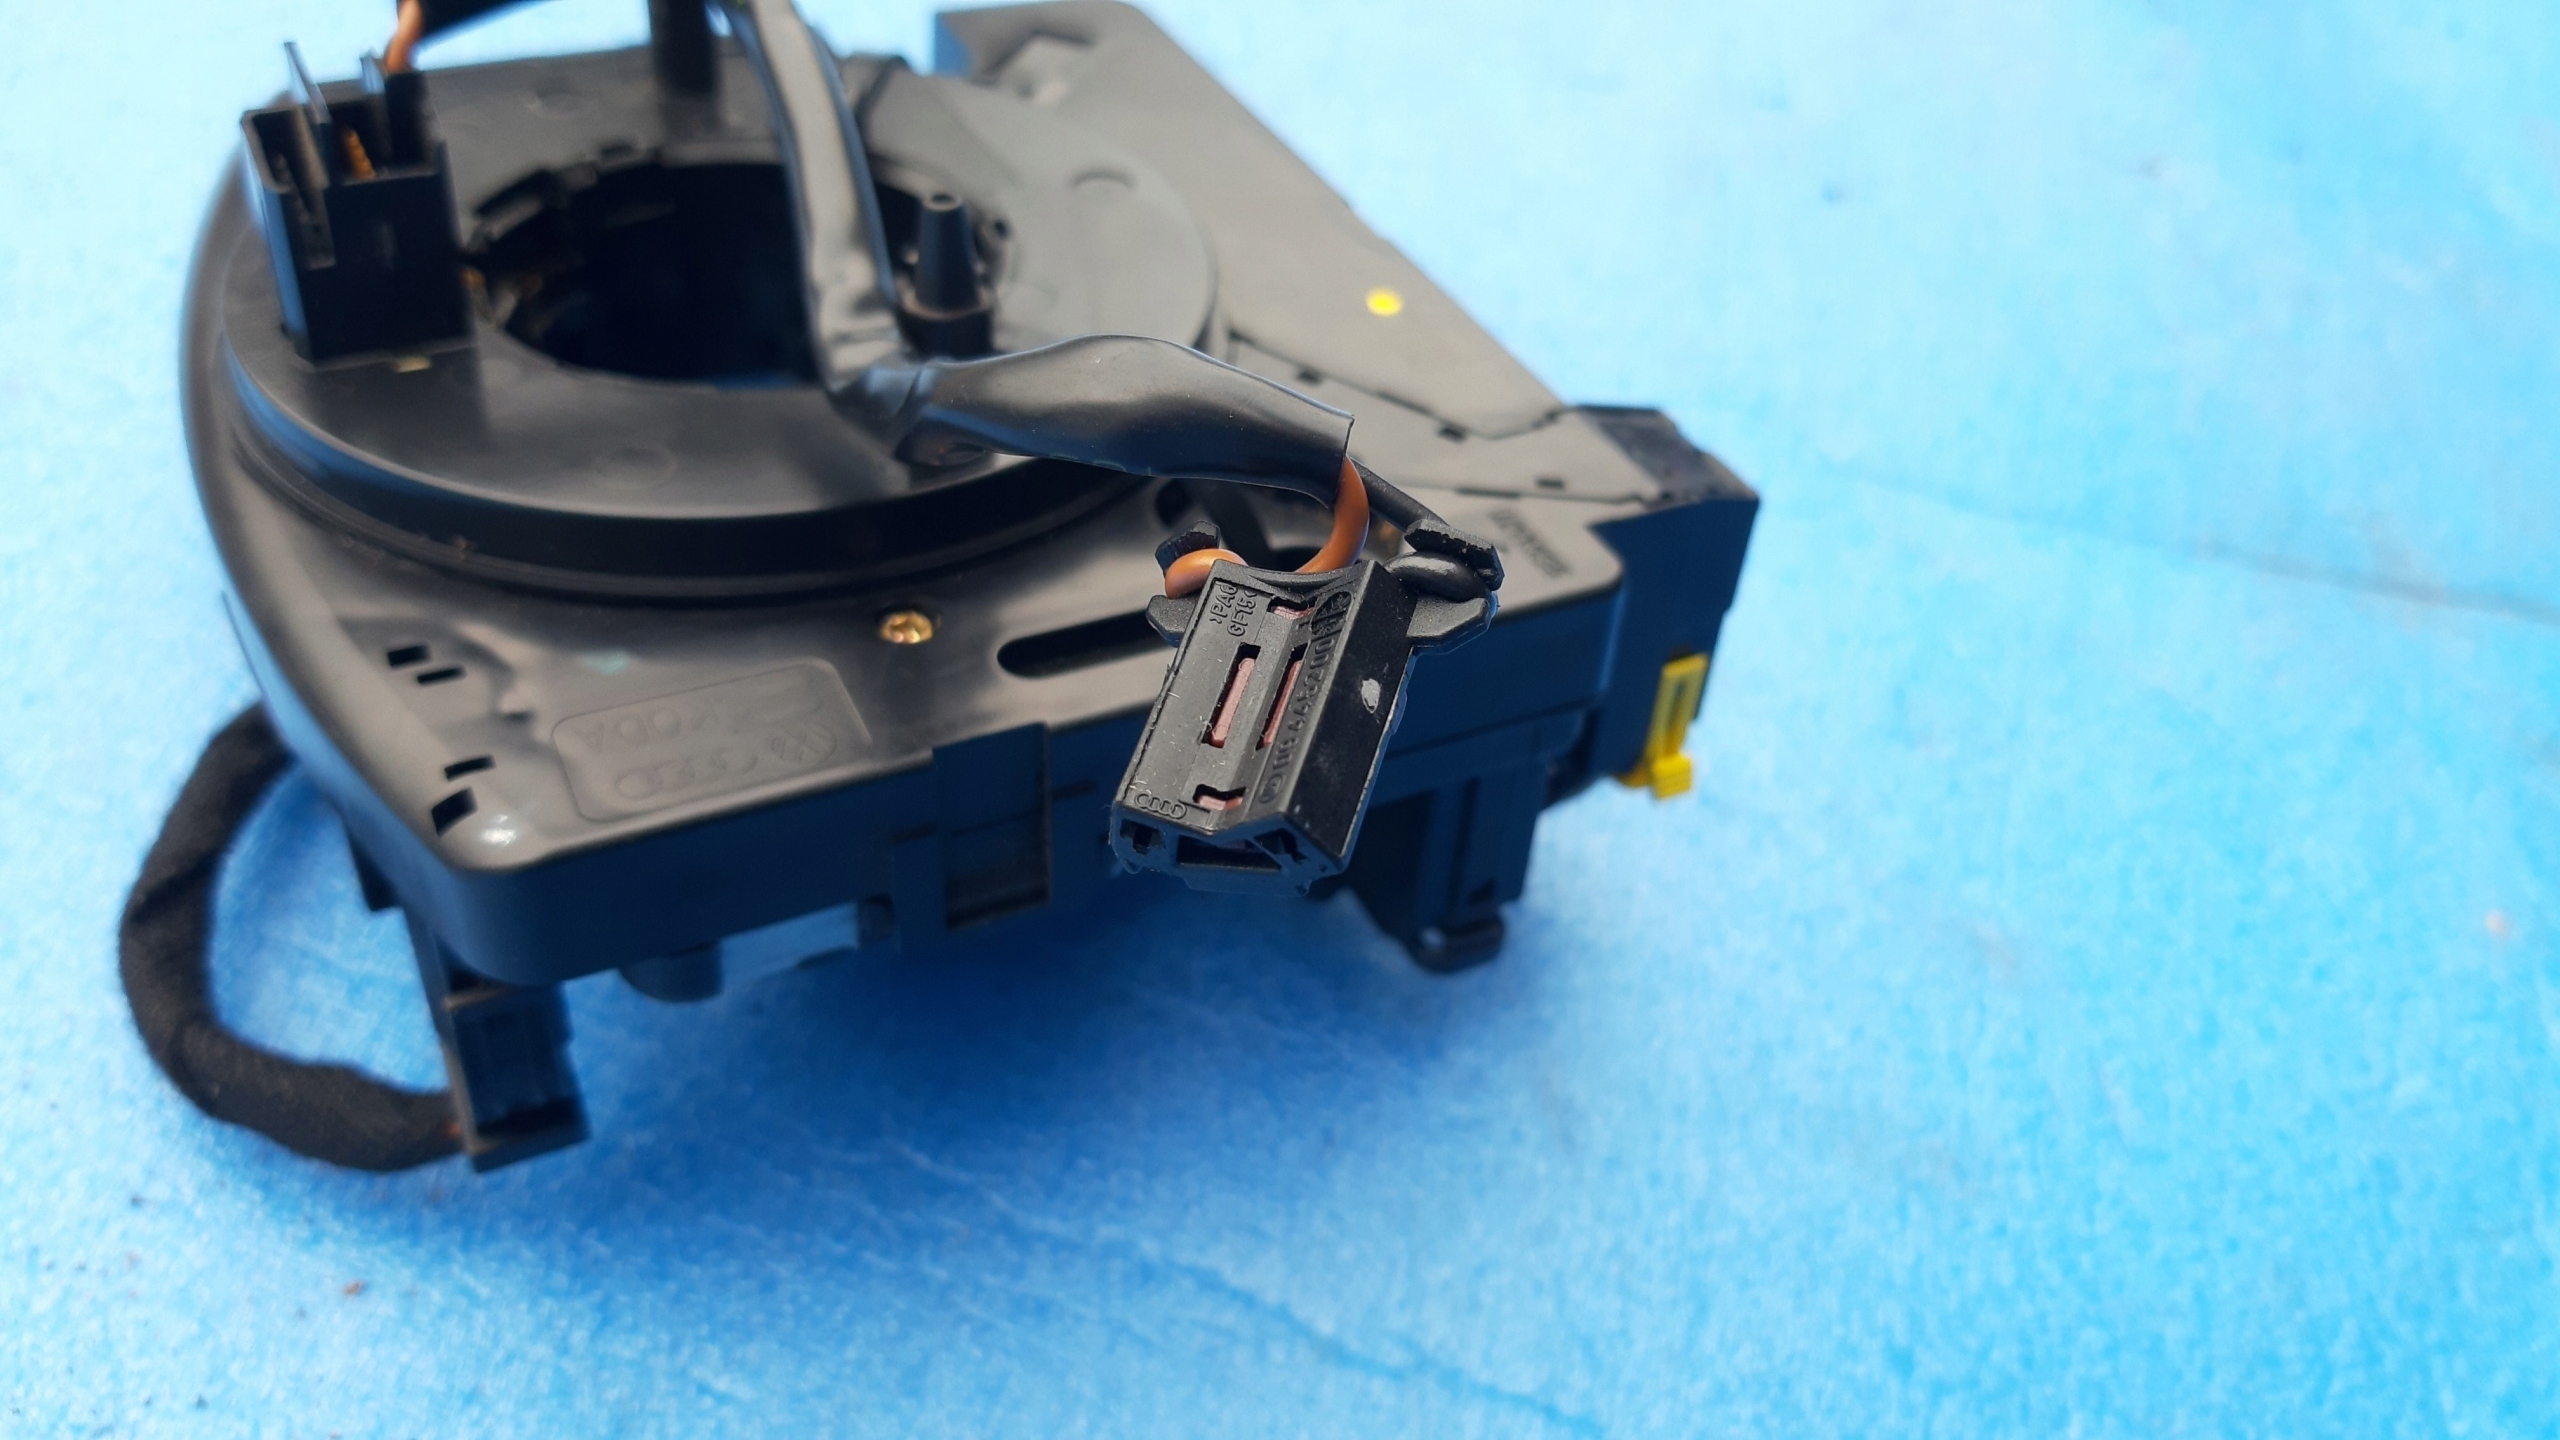
It is quite difficult to find such a thruster. You can try to add
power spirals to the standard steering wheel stub, or replace the
heating element with a heating element designed for 48V instead of
12V and use a voltage booster unit. In this case the current will be
reduced by 4 times and you can use a standard steering wheel stub,
but whether it will be able to save the temperature sensor heated
steering wheel - is unknown.
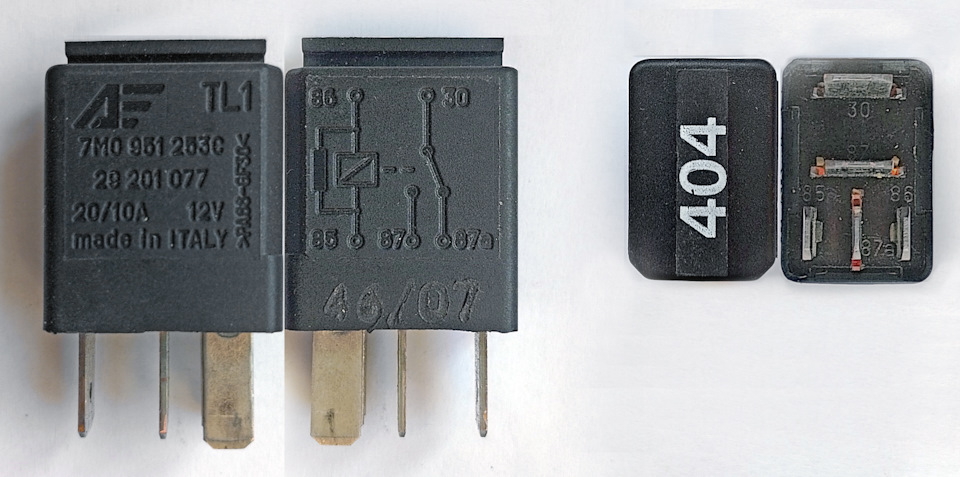
It is convenient to use "small" relays 404 (7M0 951 253) to turn on
the heating: |
|
| |
Найти такой подрулевой шлейф достаточно сложно. Можно попытаться
добавить в обычный подрулевой шлейф силовые спиральки либо заменить
нагревательный элемент на нагревательный элемент, рассчитанный не на
12В, а на 48В и использовать блок повышающий напряжение. При этом
ток сократится в 4 раза и можно будет использовать стандартный
подрулевой шлейф, но удастся ли сохранить при этом датчик
температуры подогреваемого рулевого колеса – неизвестно.
Для включения обогрева удобно использовать “маленькие” реле 404 (7M0
951 253): |
|
| |
|
|
| |
|
|
| |
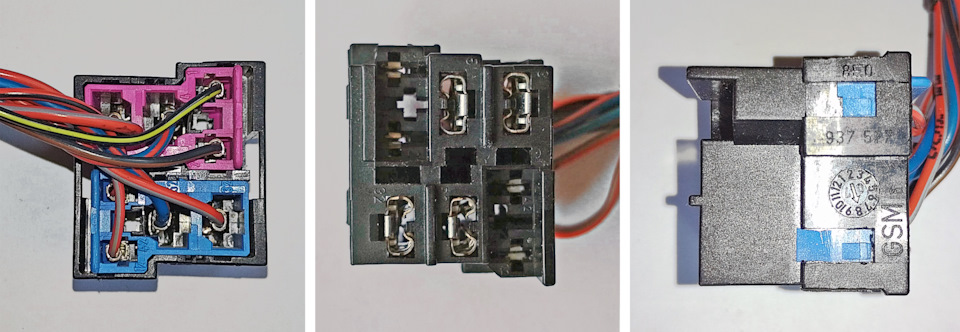
The 404 relay contacts are rated up to 20A make current or 10A
switch current. Winding current is 150 mA.
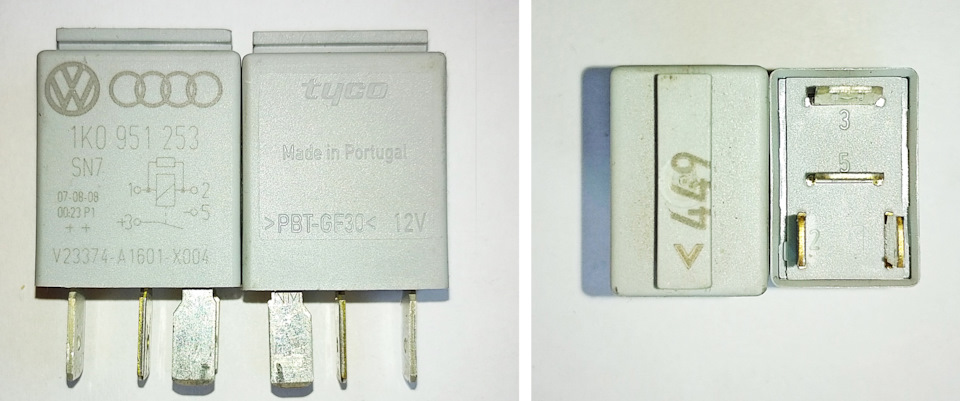
Relay 449 contacts are designed for current up to 30A (only
closing). Winding current - 125 mA
For these relays you have to use a double small relay block 8E0 937
527: |
|
| |
Контакты реле 404 рассчитаны на ток до 20А на замыкание или ток до
10А на переключение. Ток обмотки — 150 mA.
Контакты реле 449 рассчитаны на ток до 30А (только замыкание). Ток
обмотки — 125 mA
Для этих реле нужно использовать двойную маленькую колодку реле 8E0
937 527: |
|
| |
There are two places for it in the relay block bracket (8D0 937 503
E) of the MK4: |
|
| |
Для неё в кронштейне колодок реле (8D0 937 503 E) МК4 предусмотрено
два места: |
|
| |
Instead of relay you can use electronic key BTS443P, designed for
current up to 25A.
On the same bracket there are places to install fuse holders 4B0 937
530, 4A0 937 530, but they are, to put it mildly, not very
convenient access and there are usually installed fuses, associated
with the alarm. True, you can put a thermal fuse 443 937 105 C (12A)
with holder 4A0 937 530, but it is more convenient to place a fuse
in a fuse block, since there is always free space there, depending
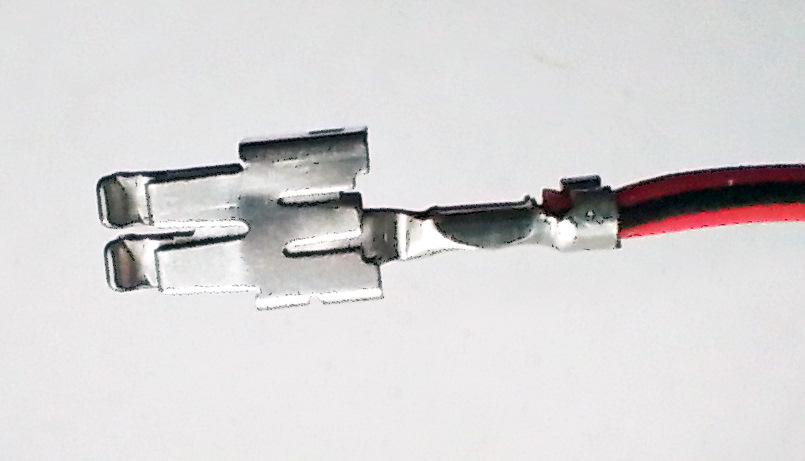
on a complete set. You only need to add the missing 4.8 mm contact: |
|
| |
Вместо реле
можно использовать электронный ключ BTS443P, рассчитанный на ток до
25А.
На этом же кронштейне имеются места для установки держателей
предохранителей 4B0 937 530, 4A0 937 530, но к ним, мягко говоря, не
очень удобный доступ и там обычно устанавливают предохранители,
связанные с сигнализацией. Правда можно поставить
термопредохранитель 443 937 105 C (12А) с держателем 4A0 937 530, но
удобней всего расположить предохранитель в блоке предохранителей,
т.к. там всегда, как правило, в зависимости от комплектации, есть
свободные места. Нужно только добавить недостающий контакт 4,8 мм: |
|
| |
- N 907 326 03 repair wire 000 979 135 E (1.0 mm²) or
- N 907 326 03 repair wire 000 979 135 E (2.5 mm²)
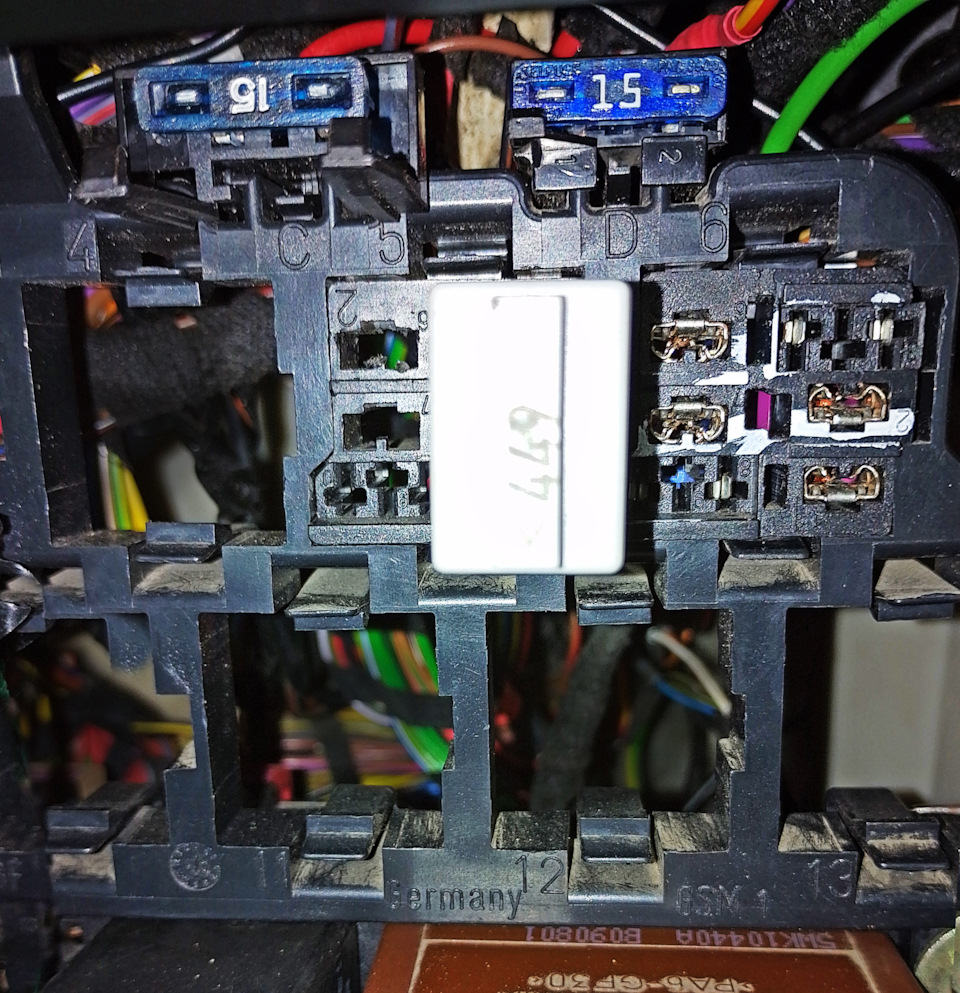
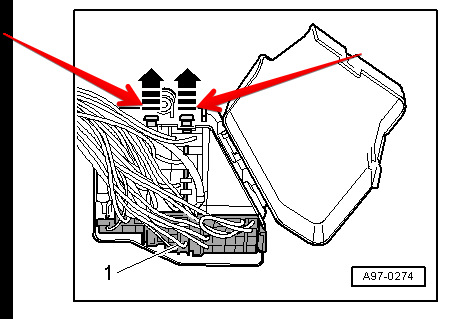
In order to insert the contacts in the fuse box, the corresponding
purple locking inserts must be moved: |
|
| |
• N 907 326 03
ремонтный провод 000 979 135 E (1,0 мм²) или
• N 907 326 03 ремонтный провод 000 979 135 E (2,5 мм²)
Для для того, чтобы вставить контакты в блок предохранителей
необходимо сдвинуть соответствующие фиолетовые фиксирующие вставки: |
|
| |
|
|
| |
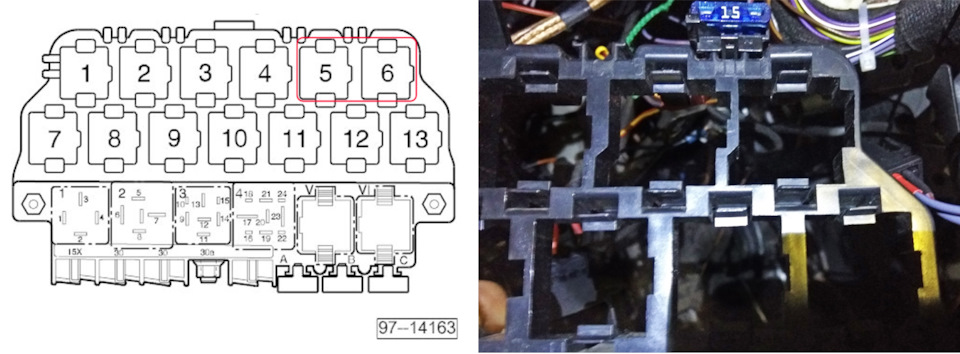
For example, the following fuses may be loose:
S227 - 15A Rear window wiper. Terminal 75x (Bora only)
S230 - 20A Sunroof. Terminal 30
S231 - 20A Automatic transmission. Terminal15
For the steering wheel heater, you must install a 10A fuse and
connect it to terminal 75x. On this bus +12V is present only in the
ignition position, but disappears at startup, i.e. +12V is present
only when the ignition is on and the engine is running. But you can
also use terminal 30 or 15, but in this case one of the contacts of
relay winding must be connected to any fuse (because relay winding
current is only 120-150 mA), connected to terminal 75x (not to plant
the battery), but not parallel with the power steering wheel heater,
as in the diagram. The second contact of the relay coil in all cases
is connected to one of the seven control outputs (OUT) of the
adapter. |
|
| |
Например могут быть свободными следующие предохранители:
S227 – 15A Очиститель заднего стекла. Клемма 75x (только Bora)
S230 – 20A Верхний люк. Клемма 30
S231 – 20A Автоматическая коробка передач. Клемма15
Для подогрева руля нужно установить предохранитель 10А и подключить
его к клемме 75х. На этой шине +12 В присутствует только в положении
«Зажигание», но пропадает при старте, т.е. +12В присутствует только
когда зажигание включено и работает двигатель. Но можно использовать
и клемму 30 или 15, но в этом случае один из контактов обмотки реле
необходимо подключить к любому предохранителю (т.к. ток обмотки реле
всего 120-150 мА), соединенному с клеммой 75х (чтобы не посадить
аккумулятор), а не запараллеливать с питанием подогрева руля, как на
схеме. Второй контакт обмотки реле во всех случаях подключается к
одному из семи управляющих выходов (OUT) адаптера. |
|
| |
 |
|
| |
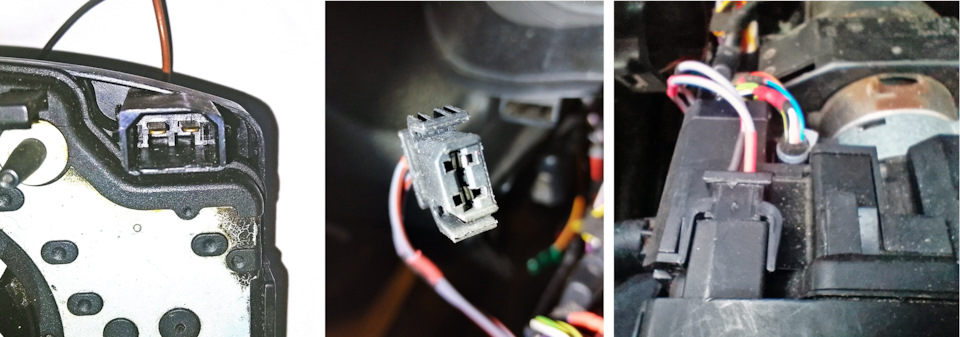
Parts pictured: 1J0973605F
The steering wheel heater connector on the inside of the steering
wheel control stub does not match the steering wheel heater
connector in the steering wheel, so we cut it off and install the
pins: |
|
| |
Запчасти на
фото: 1J0973605F
Разъём подогрева руля с внутренней стороны подрулевого шлейфа ни по
половому признаку, ни по конструкции не подходит к разъёму подогрева
руля в рулевом колесе, поэтому его отрезаем и устанавливаем штыревые
контакты: |
|
| |
The connector on the outside of the control strap is 893 971 632: |
|
| |
С внешней
стороны подрулевого шлейфа используем разъём 893 971 632: |
|
| |
Before installing the steering wheel, do not forget to check the
presence of the yellow indicator in the upper right corner of the
steering wheel stub. |
|
| |
Перед
установкой руля не забываем проверить наличие жёлтого индикатора в
правом верхнем углу подрулевого шлейфа. |
|
| |
Next:
- Connect the laptop to the multilink adapter and run the Adapter
Configurator program.
- Press the Read Config from device button to read the original
configuration of the adapter.
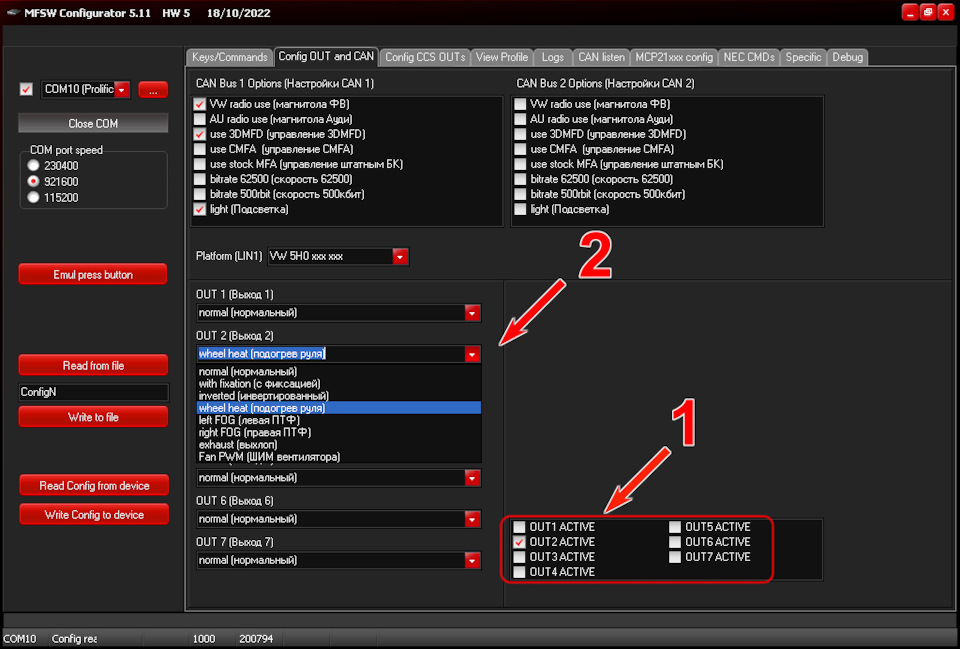
- Go to the second tab (Config Out&Can), to configure the power
output that turns on the steering wheel heater: |
|
| |
Затем:
• Подключаем ноутбук к адаптеру мультируля и запускаем программу
Конфигуратор адаптера.
• Нажимаем кнопку Read Config from device, чтобы прочитать исходную
конфигурацию адаптера.
• Переходим во вторую вкладку (Config Out&Can), для настройки
силового выхода, включающего подогрев руля: |
|
| |
Next:
- Connect the laptop to the multilink adapter and run the Adapter
Configurator program.
- Press the Read Config from device button to read the original
configuration of the adapter.
- Go to the second tab (Config Out&Can), to configure the power
output that turns on the steering wheel heater: |
|
| |
1. Выбираем (ставим
галочку) силовой выход, включающий подогрев руля — OUT2 (1)
2. Из выпадающего списка выбираем режим этого выхода — wheel heat (подогрев
руля) (2).
• Переходим в предпоследнюю вкладку (Specific), для настройки
силового выхода, включающего подогрев руля: |
|
| |
|
|
| |
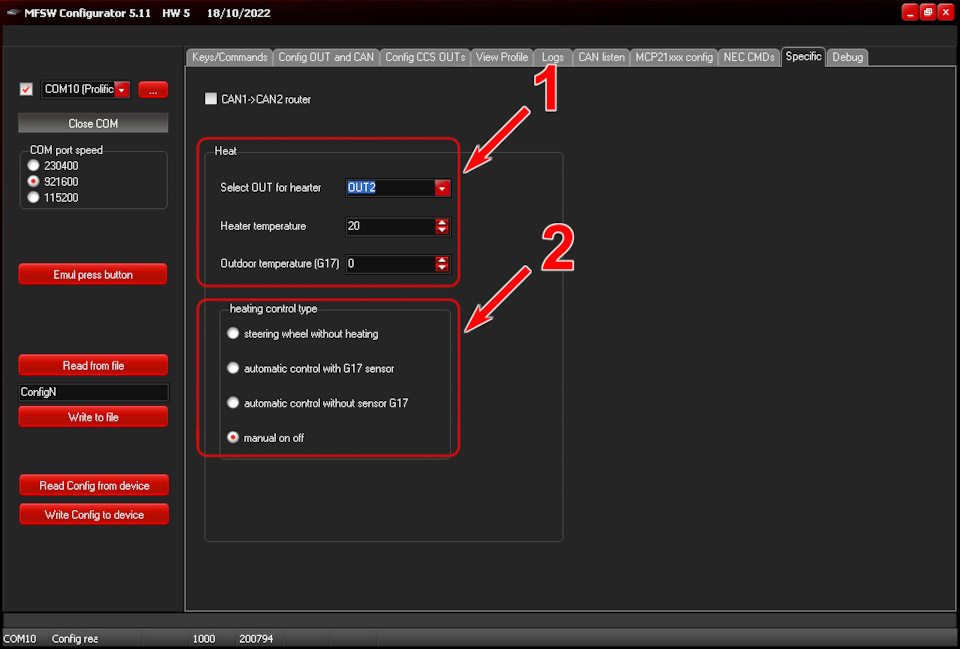
1. In the Heat group (1) you must:
Select output (Select OUT for Heater) that controls the relay
through which the steering wheel heater element is powered.
Set Heater temperature from 20 to 50°C.
Set the outdoor temperature determined by the sensor G17 (Outdoor
temperature (G17) from 0 to 15°С.
2. In the group heating control type select one of the items (2):
steering wheel without heating.
automatic control with G17 sensor. The heating is automatically
switched on when the outside temperature drops below the value set
under Outdoor temperature (G17) and the steering wheel temperature
is automatically maintained. There is no need for an on/off button.
automatic control without sensor G17. The steering wheel heater is
turned on when the engine starts and then automatically maintains
the set steering wheel temperature, regardless of the outside
temperature. There is no need for a button to switch the heating
on/off.
manual on off. The steering wheel heater is switched on with a
button, and then it automatically maintains the set temperature of
the steering wheel, without paying attention to the temperature set
on the G17 sensor.
- Go to the first tab (Keys/Commands) to assign the button that
turns on the steering wheel heating, if we have set the manual
on/off steering wheel heating: |
|
| |
1. В группе Heat (подогрев)
(1) необходимо:
Выбрать выход (Select
OUT for Heater), который управляет реле, через которое запитан
элемент подогрева руля.
Задать температуру подогрева (Heater
temperature) от 20 до 50°С.
Задать температуру наружного воздуха, определяемую датчиком G17 (Outdoor
temperature (G17)) от 0 до 15°С.
2. В группе heating
control type (тип управления подогревом) выбираем один из
пунктов (2):
руль без подогрева (steering
wheel without heating).
автоматическое управление с датчиком G17 (automatic
control with G17 sensor). Подогрев автоматически включается при
опускании наружной температуры воздуха ниже значения, выставленного
в пункте Outdoor
temperature (G17) и далее автоматически поддерживается заданная
температура руля. Кнопка включения/выключения подогрева не нужна.
автоматическое управление без датчика G17 (automatic
control without sensor G17). Подогрев руля включается при
запуске двигателя и далее автоматически поддерживается заданная
температура руля, вне зависимости от температуры за бортом. Кнопка
включения/выключения подогрева не нужна.
ручной вкл. выкл. (manual
on off). Подогрев руля включается по кнопке и далее
автоматически поддерживается заданная температура руля, не обращая
внимание на выставленную температуру на датчике G17.
• Переходим к первой вкладке (Keys/Commands)
для назначения кнопки, включающей подогрев руля, если у нас
установлено ручное вкл./выкл. подогрева руля: |
|
| |
 |
|
| |
1. in the left column select the button or petal (AKKP -) to turn on
the heating (1),
2. assign it a value when pressup (2),
3. Press Set new state for current key (3),
4. then in the right column select command 122;OUT2 Toggle (4),
5. Click Set new command for current key (5)
6. Send (write) this configuration to the adapter by pressing Write
Config to device (6).
That's all.
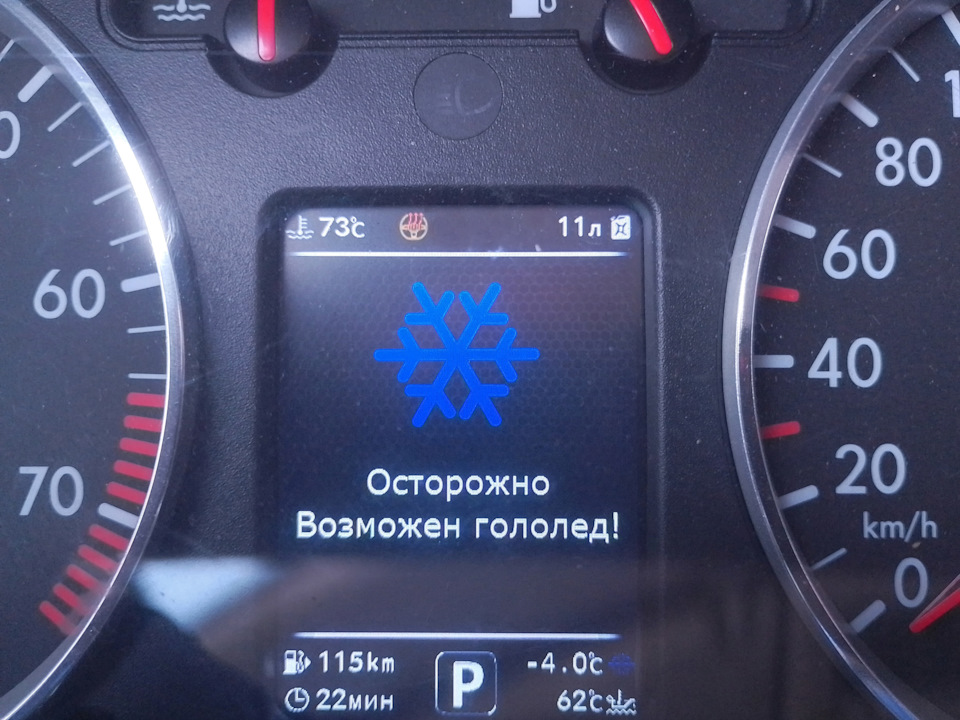
Start the engines and turn on the steering wheel heating, if the
manual mode was set. In a couple of seconds, in the upper line of
the display 3D Color MFD the icon of the steering wheel heating will
appear: |
|
| |
1. в левом столбце выбираем кнопку или лепесток (AKKP -) для
включения подогрева (1),
2. присваиваем ей значение when
pressup (2),
3. нажимаем Set
new state for current key (3),
4. далее в правом столбце выбираем команду 122;OUT2
Toggle (Переключение) (4),
5. нажимаем Set
new command for current key (5)
6. отправляем (записываем) эту конфигурацию в адаптер нажав клавишу Write
Config to device (записывает
полную конфигурацию в адаптер) (6).
И всё.
Заводим двигатели и включаем подогрев руля, если был задан ручной
режим включения. Через пару секунд в верхней строке дисплея 3D Color
MFD появится значок подогрева руля: |
|
| |
The steering wheel heating icon is present only while the steering
wheel heating is active.
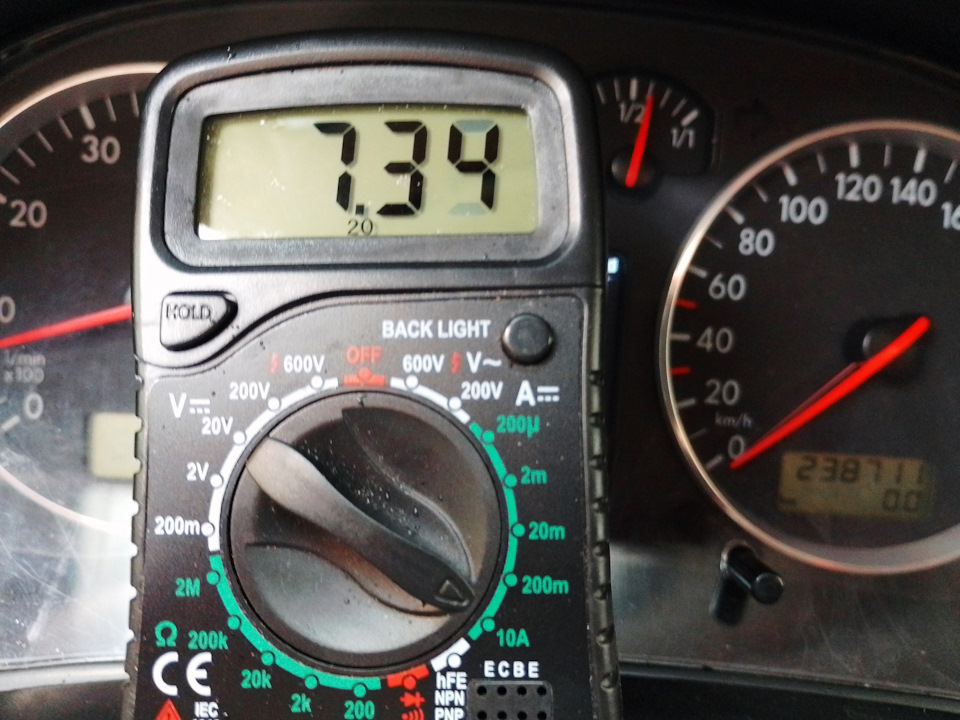
In reality, the heating current was 7.4A at 13.7V on-board voltage. |
|
| |
Значок подогрева руля присутствует только, пока подогрев руля
активен.
В реальности ток подогрева оказался 7,4А при напряжении бортовой
сети 13,7В. |
|
| |
Author / Автор статьи
Dimirty https://www.drive2.ru/l/640563930543972127/ |
|
|